It’s basic, right? New spark plugs, new points (unless you have electronic ignition), adjust the valves and set the timing. And change the oil in the air filter or replace the paper element later model vehicles.
Over Servicing
Take a look at the following text in quotes. It’s from a Department of Energy test on air filters and how they effect fuel economy. Very interesting.
“All of these functions are to be met for the service life of the filter without allowing engine performance to be affected.5 In light- and medium-duty applications, the service life is normally defined by accumulated mileage. However, it is very common for over-servicing to occur in these applications due to a lack of understanding of how optimum air filter efficiency is achieved.5,6 The standard recommended service life for an air filter in light- and medium-duty applications, during normal driving conditions, is about 30,000 miles.5–7 It is common, however, for servicing to occur when the filter appears dirty. Engine air filters are designed to actually increase their efficiency by using this initial layer of dust as an added filter layer. Initial filter efficiency is usually approximately 98% but increases to more than 99% by the end of the service life of the filter. Therefore, changing an air filter before the useful service life is achieved can result in premature engine wear.6,9”
Over servicing can also result in stripped spark plug threads in the cylinder heads, stripped point screw threads in the distributor, stripped sump plate studs on an type 1 based engines, stripped oil drain plug threads in the aluminum oil pans in New Beetles, unnecessary load on the environment, and a car with a bunch of new parts installed that will result in virtually no change in performance or reliability, wasted money, and wasted time.
Air Filter
As far as the early oil bath oil filters, just because the oil is dirty doesn’t mean it needs replacing. Stick a finger in the oil. If it’s still kinda clear or honey colored, it’s fine. The book says not to turn the element upside down to clean it. Ignore. If the element is real dirty, clean with solvent, rinse with water in any position, let drain right side up. A few water drops dripping in the oil won’t hurt anything. If you clean the element with solvent today, unless you live in a real, real dusty area (dirt roads everyday), you shouldn’t bother doing this again for a long time. Even if the oil goes away from use, the element still retains some oil and so it’s still effective.
Spark Plugs
Spark plugs last about 10,000 miles. You look at an old one then look at a new one. The electrodes on the spark plug slowly erode away with time. The top of the electrode that protrudes out of the center of the plug is flat when new. If it still looks pretty flat with sharp corners, the plug is fine. No reason to replace it. Just slather the threads with some watered down (with WD-40) anti-seize compound. It’ll be easier to put in and easier to take out next time. 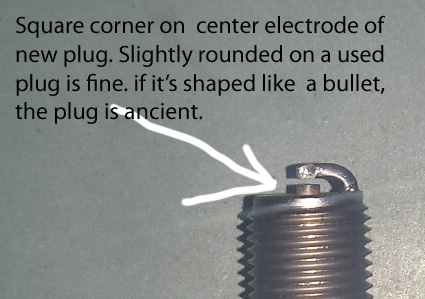 Also, never use platinum plugs in any air cooled VW. The center electrode on the non-platinum, old school plug above is (I’m guessing), is about 3 or 4 millimeters across. It also sticks up well past the porcelain below. A platinum plug’s center electrode is probably less than a millimeter in diameter and it doesn’t protrude past the porcelain at all – the tip of the electrode is actually flush with the surface of the porcelain so there’s only a small fraction of exposed electrode surface area compared to the plug above. The less exposed surface area you have, the easier it is to foul. And a platinum plug is real, real easy to foul in an air cooled VW. Especially carbureted models. Just don’t use them. And use Bosch plugs. The diameter of the threaded part of a Bosch plug is a teensy bit bigger than any other brand. This makes it less lightly for you to end up with stripped thread hole threads in the head. There’s 2 basic types of plugs – long reach and short reach. Short reach is for type 1 engines and long reach is for type 4 engines but you may encounter some type 1 heads that use long reach plugs. To be sure, poke a small screwdriver into the plug hole and slide it along the threads. You’ll be able to tell if you have long or short reach plugs this way. Type 1 heads that use long reach plugs are becoming more common lately.
 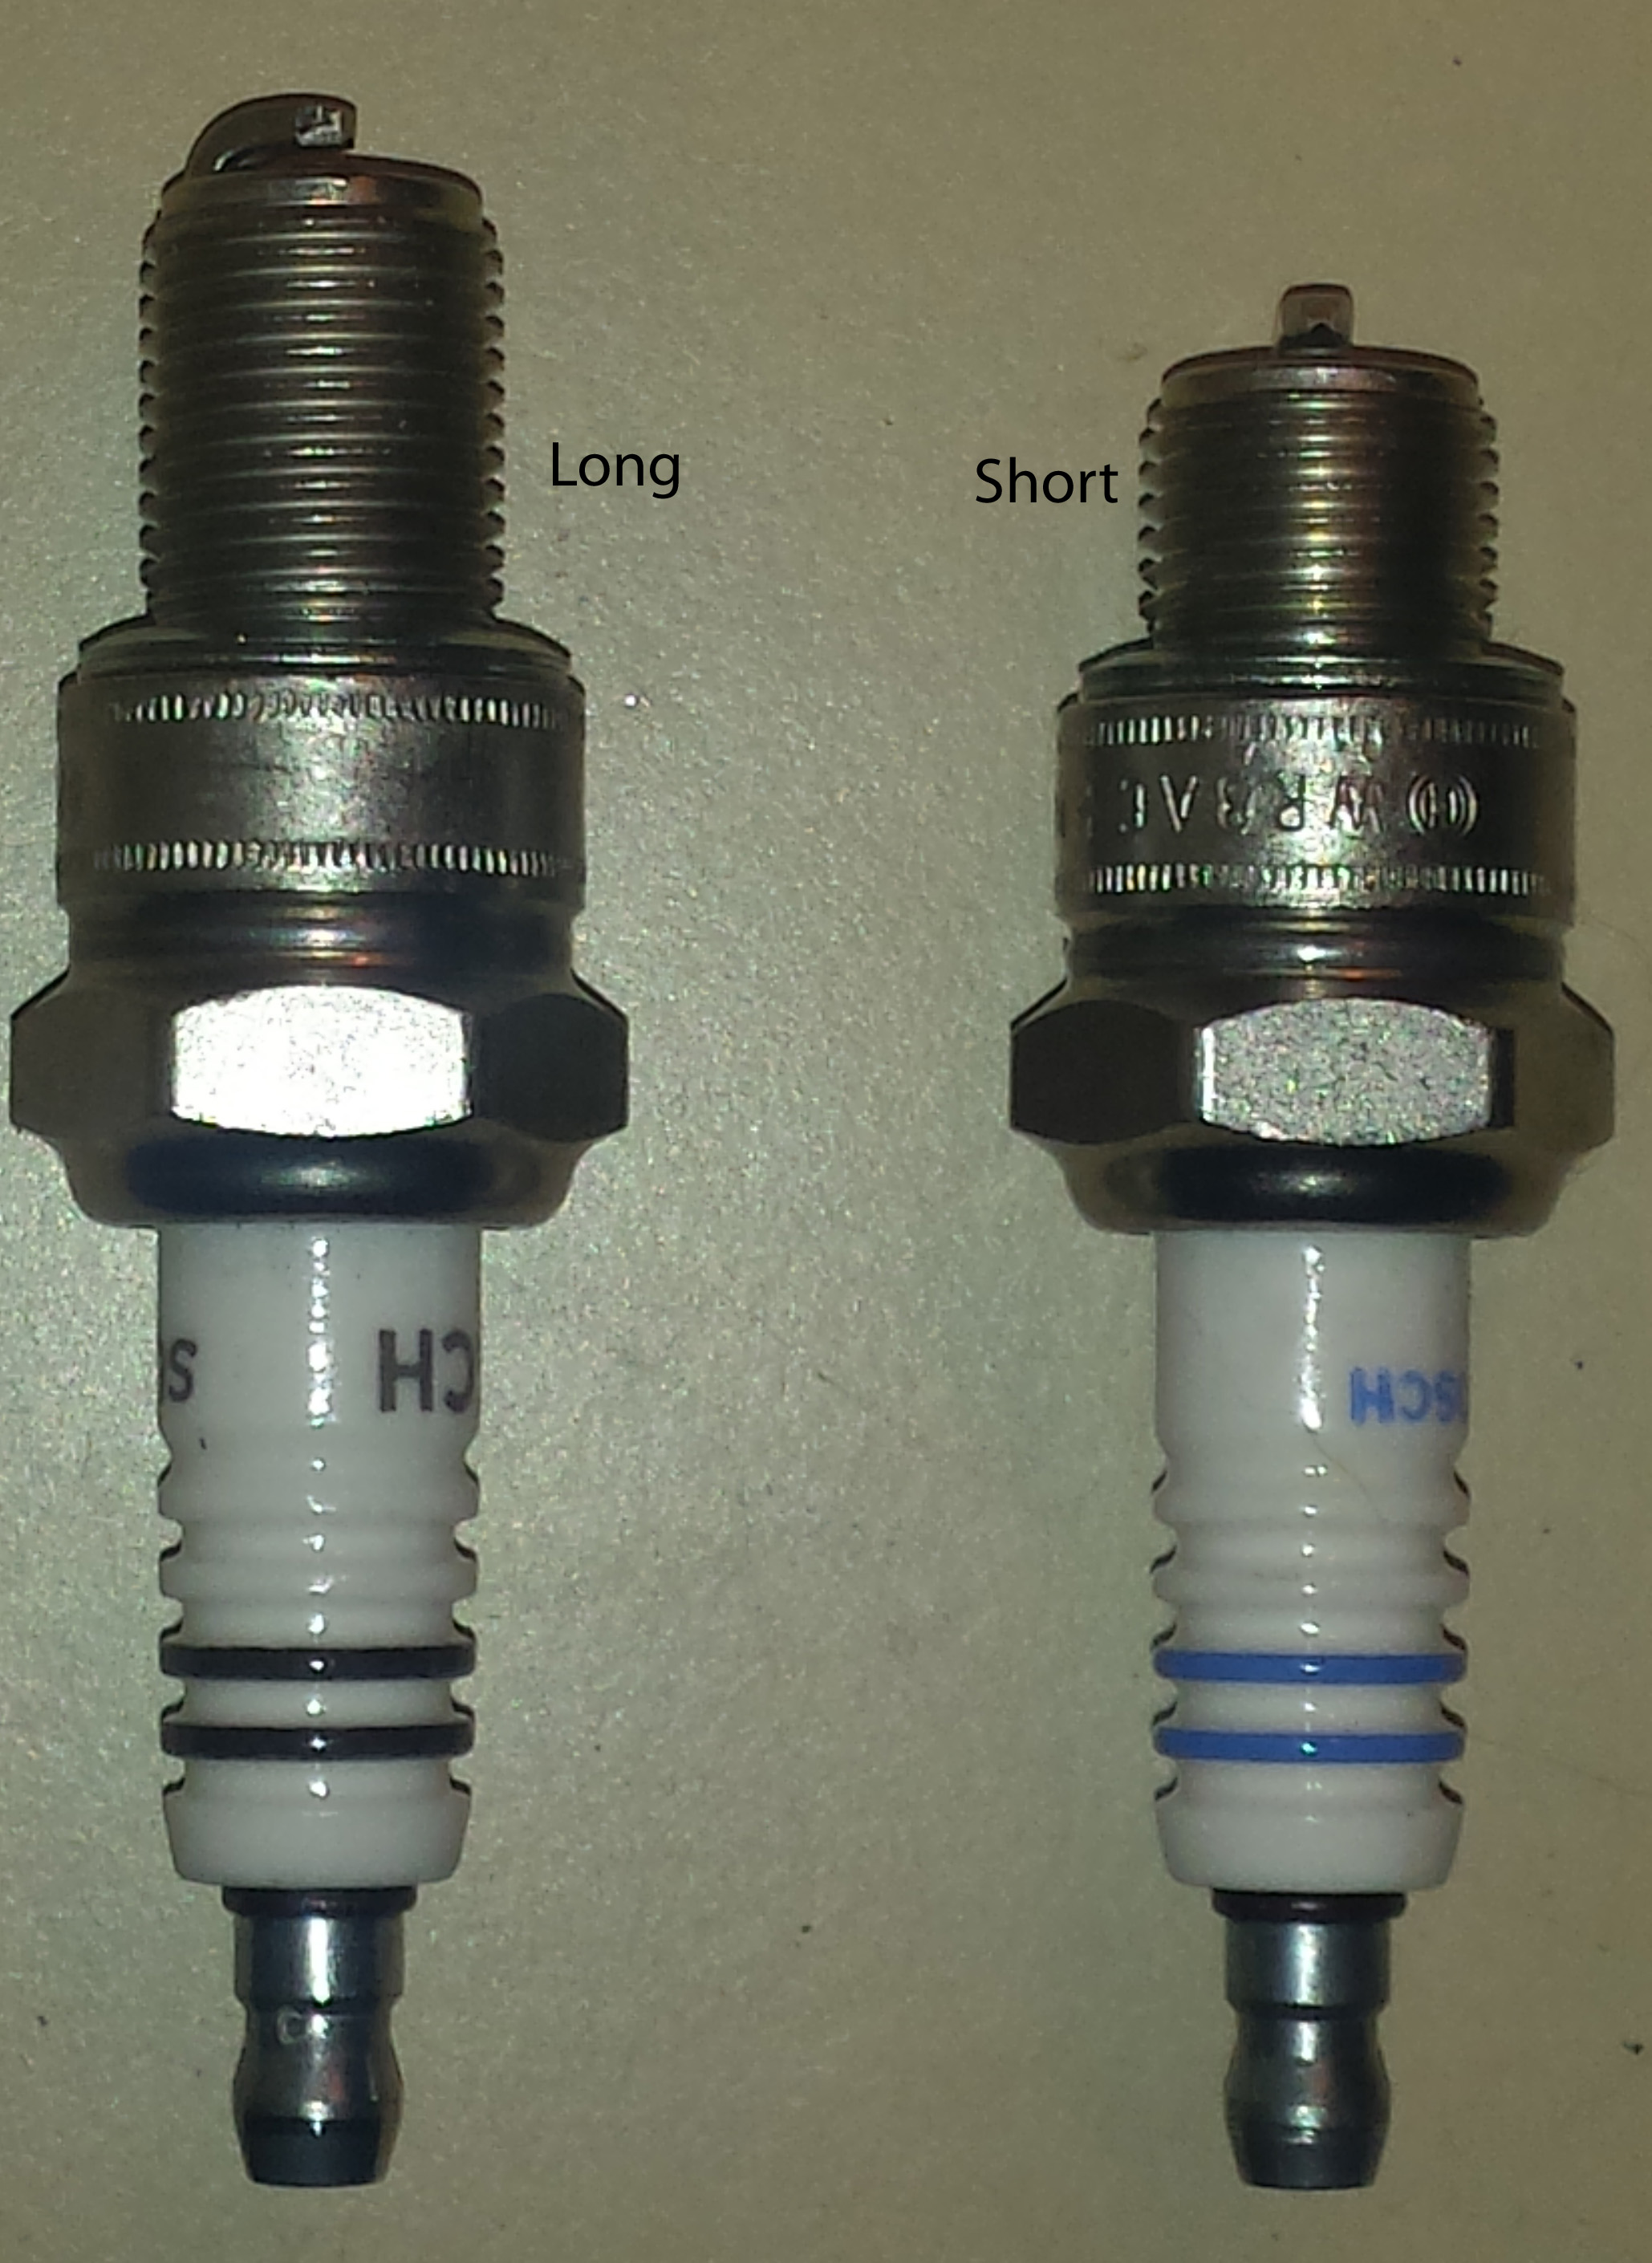 Spark plug replacement is scary in the VW. Sometimes they try to seize when taking them out. Sometimes the threads in the head strip when you put them in. It’s just one of those things but regardless, it doesn’t happen very often but when it does … Plugs threads strip for several reasons (over servicing is one). The most common reason is caused by loose spark plugs. A loose plug wiggles. When it’s wiggling, the steel plug threads erode away at the aluminum threads in the head. This creates tiny particles of aluminum dust between the plug and the head. When you remove the plug, the dust particles roll together into bigger particles and make the plug jam and hard to turn. It’s like the opposite of lubrication. The aluminum galls onto the steel and the plug gets harder and harder to turn as you remove it. So you end up damaging the threads necessarily because you have to take the spark plugs out once in a while. Another reason for plug thread stripping is over servicing. The threads in the head don’t last forever. But it’s a good idea to take the plugs out once in a while if you hardly drive the car because they can get stuck over time even if your car spends a long time parked and is seldom driven over a span few years. So periodic removal and re-installation is a good idea if your vehicle spends a lot of time sleeping. Type 4 engines or type 1 engines with long reach plugs are pretty forgiving regarding plug stripping since there are so many threads to accommodate the longer spark plug. Damage to the threads is usually not enough to result in an untightenable plug but sometimes long reach plugs get stuck and break off during removal leaving just the threaded part of the plug left. Usually an E-Z out will remove the offender. You may need to grind some of the taper off the E-Z out to make it bigger across for a better bite. Pound it in real good an try to unscrew it. The plug will probably come out. Always use the biggest E-Z out as possible for the given headache. The way to put a plug in right is to make sure that when it’s in, the gasket is compressed. You can tell if a plug was loose just by looking at it – the gasket will not be flattened. Here’s what the gasket looks like new and and on a used, properly installed plug …
 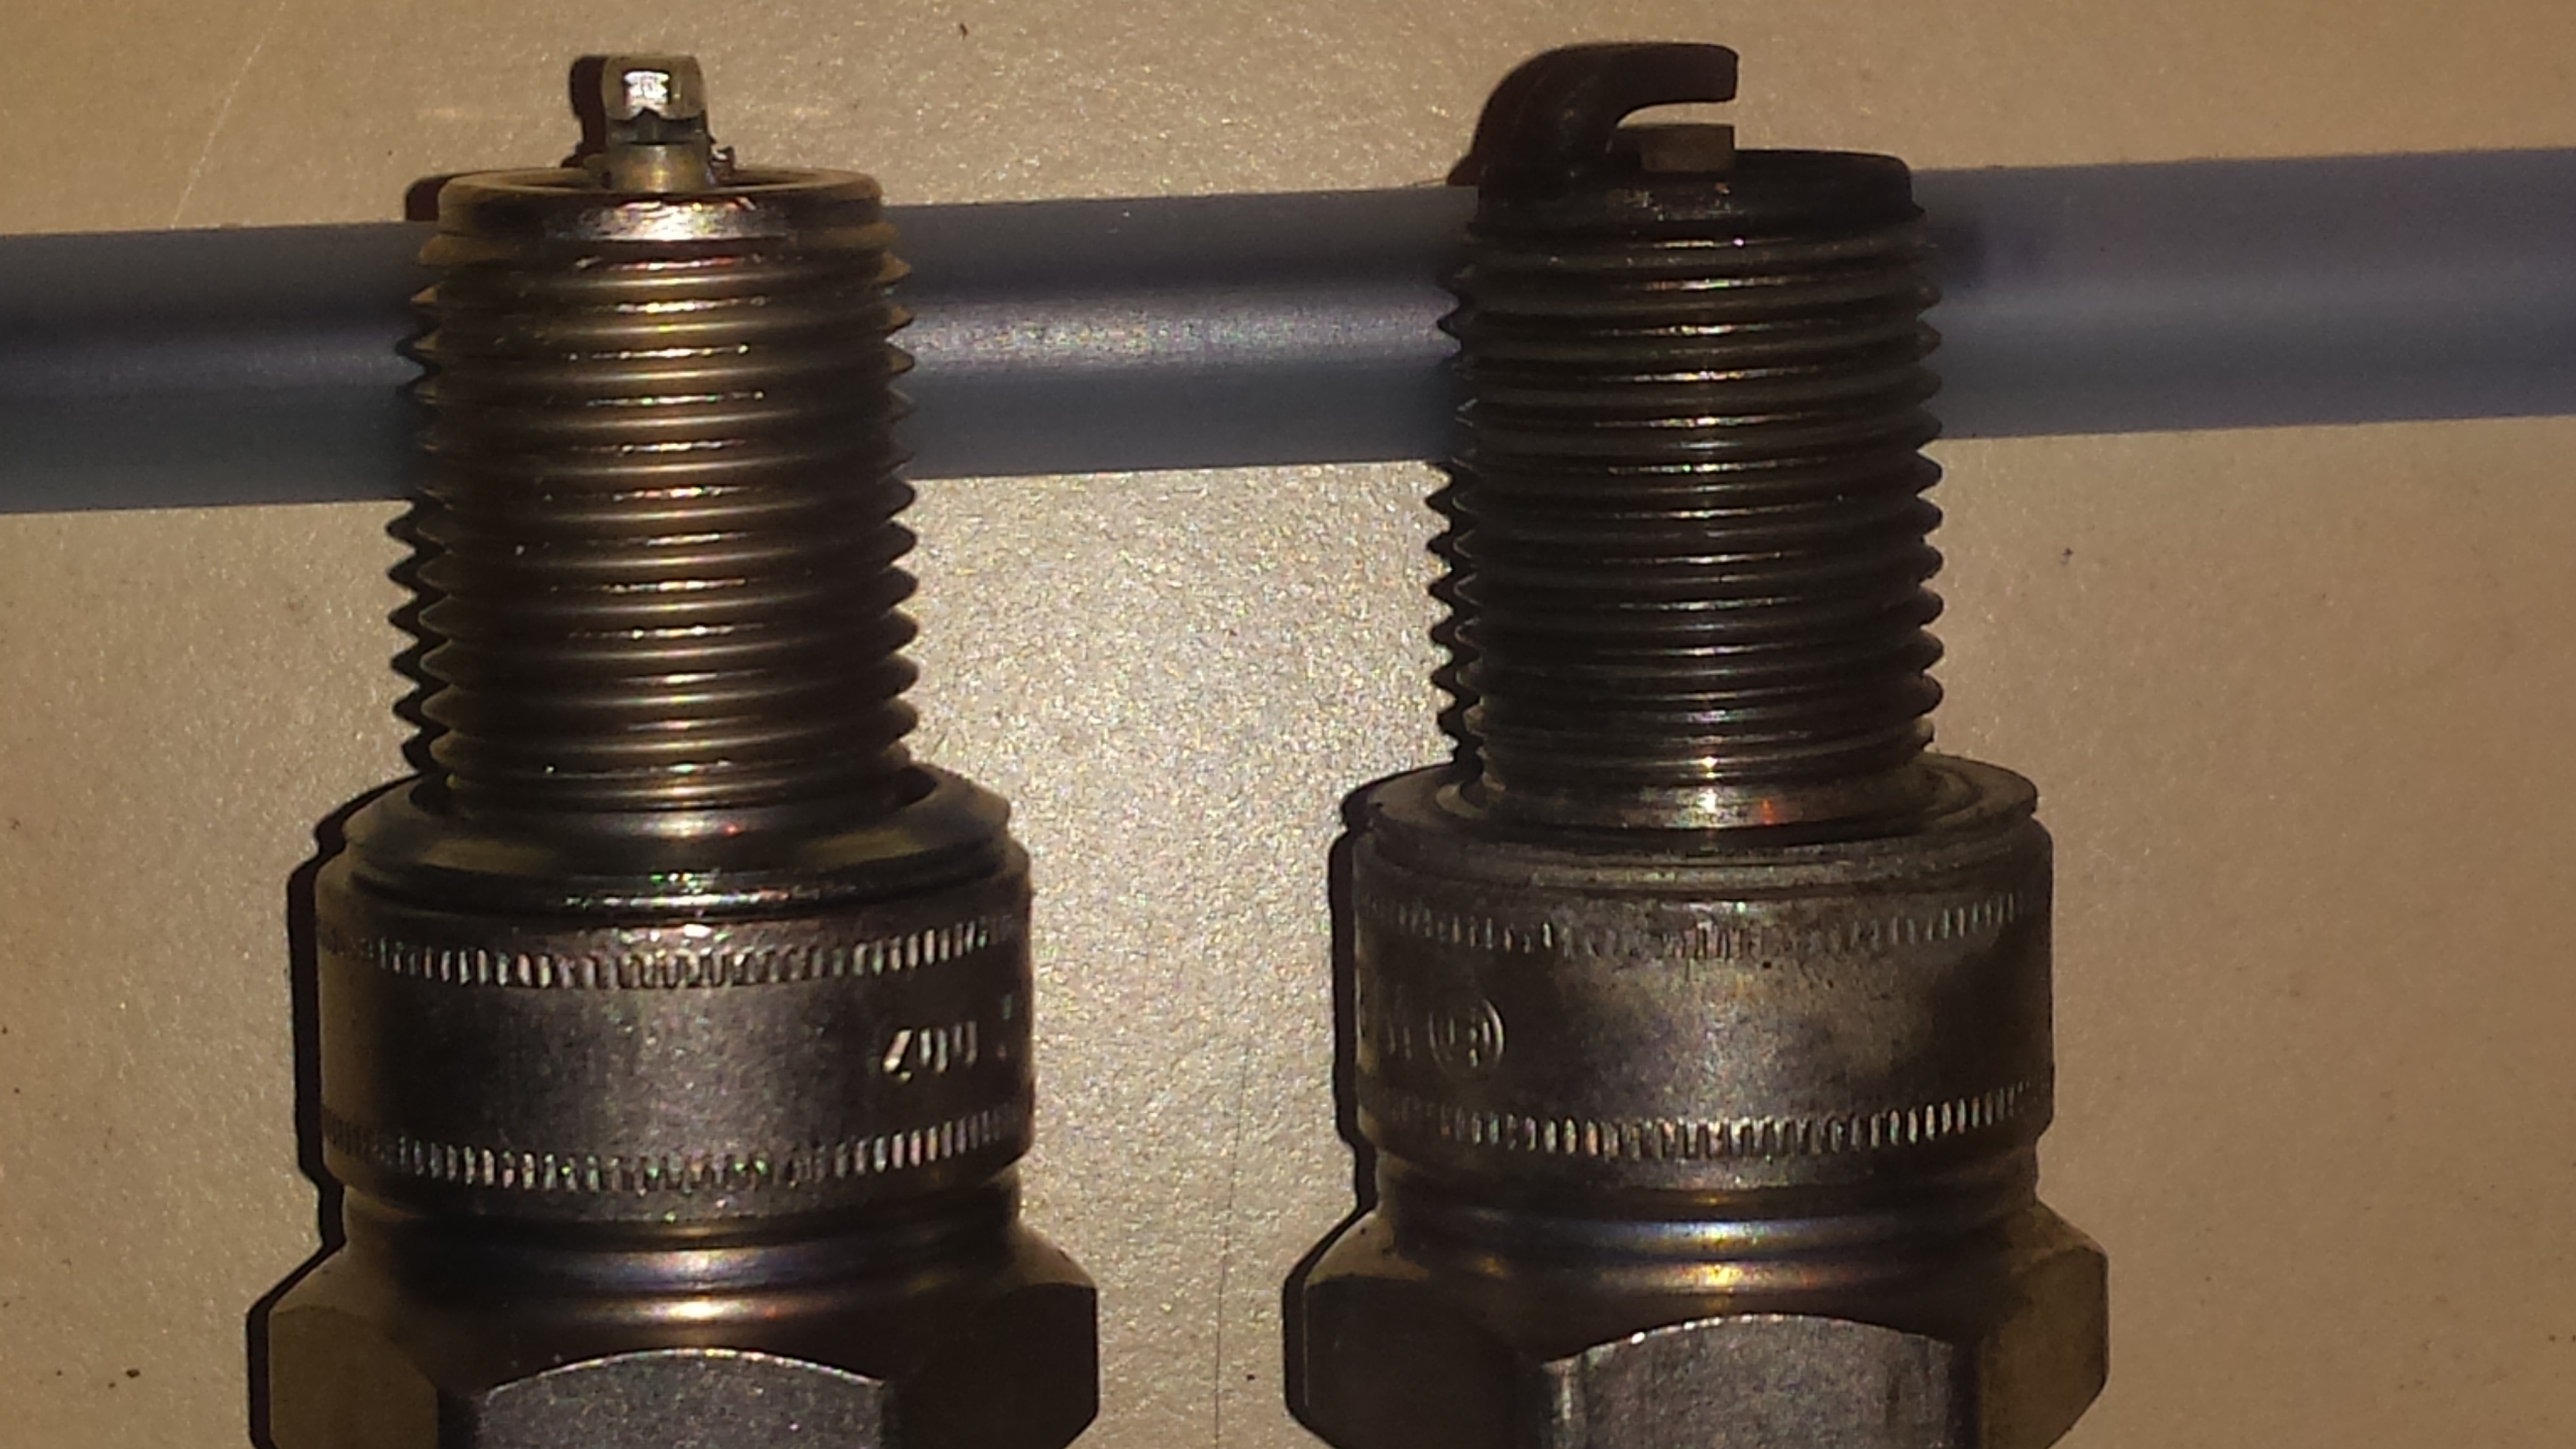 If you pull plugs on a vehicle and the gaskets don’t look like the one on the right, the plug was loose. You can actually feel the gasket compressing when you put the plug in. You’ll meet with resistance as the plug begins to snug up, then for about another turn or so, you’ll feel the gasket compress. Then just a little tighter. Don’t forget to take the thingie off the end of the plug so you can put the spark plug connector on.
The best – easiest to use and fastest to install – spark plug insert tool is made by a company called Time-Sert. A truly amazing tool and very efficient – fast tapping in particular. Other options are frustratingly slow and awkward but very inexpensive. With the latter, make absolutely sure you’ve tapped all the way through. If you don’t and there’s not enough threads for the insert go in all the way and it jams up, you may have to pull the engine and some sheet metal just to remove it and finish it off properly.
Installing a Time-Sert in a type 4 engine can be difficult. For me, on number 3 cylinder, the tap hit the edge of the closed intake valve. I had to grind the tap shorter to finish tapping the hole. I had to buy another tap because the taper and been ground off the other one. Now I have both though. So can start the tapping with the unmolested tap and and finish it off with the shortened one. This was on a fairly new AMC head. You may not encounter this on an original head. Valve position varies. Seats have been often been changed. Valves get ground. Every head is different. You may have no issue like I had.
And realize, if a standard (first time fixed) insert strips, there’s a solution. A bigger insert and thus a bigger hole. This is seldom a viable solution. Might not even last or a week. Best fix – another head. With no inserts – yet. Because it doesn’t need any. That way, once the engines got a few tens of thousands of miles on it and a plug strips, it’s fixable. Good rule of thumb – never put a head with an insert already in it on an engine you’re rebuilding unless there’s no other solution.
Spark Plug Wires
You really should check the spark plug wires and connectors too. You’ll need an ohm meter. You can get one real cheap in an electronics store. You don’t need anything fancy. The spark plug wire itself should have zero resistance. Because of the internal design of most ohm meters, you may see a reading of .1 ohms or less. This is not the wire, it’s the meter. Ignore it. The short connectors should be pretty close to 1000 ohms. Long connectors on buses have 1500 ohms. The value is actually molded right into the end of the connector. Non- Bosch connectors (even those made in Germany) are capable of making your car miss even if they measure OK with the ohm meter. Always use Bosch connectors and wire that has actual wire inside. Some connectors have zero ohms resistance. No problem with that, except if they’re not Bosch. Bosch parts are quality products. Their products are used on brand new cars. Although the Bosch products made today may look different than what came on your 55 bug, they’re one of the few products you can buy easily today that are actually the same quality that came with your car when it was new. Sort of like NOS. And we all know NOS or genuine VW is always – always – the best kind of part you can use on your car. So why skimp when you can get the real thing? 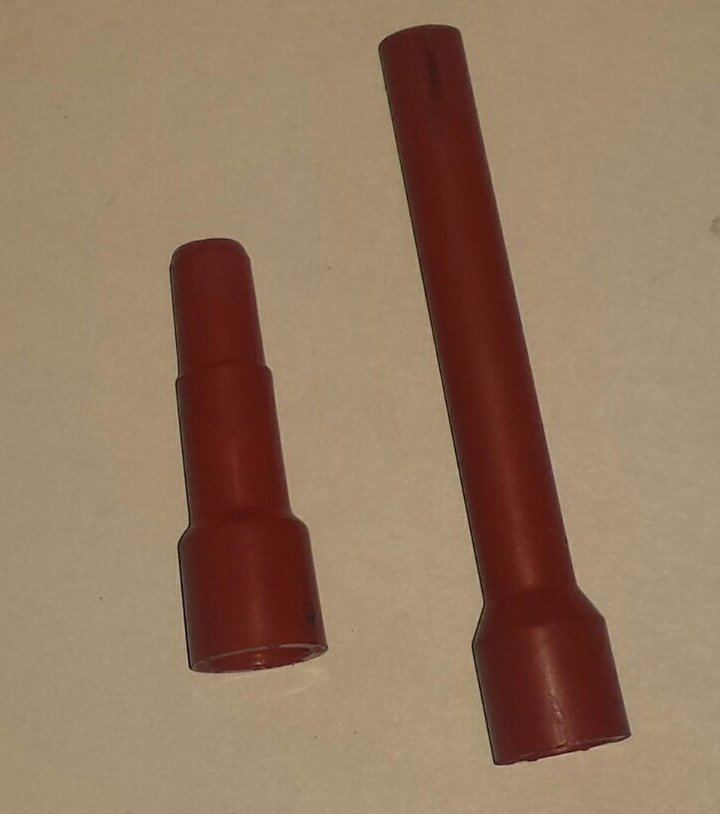 Bosch connector on left has should have approximately 1000 ohms resistance. The one on the right should have about 1500 ohms.
 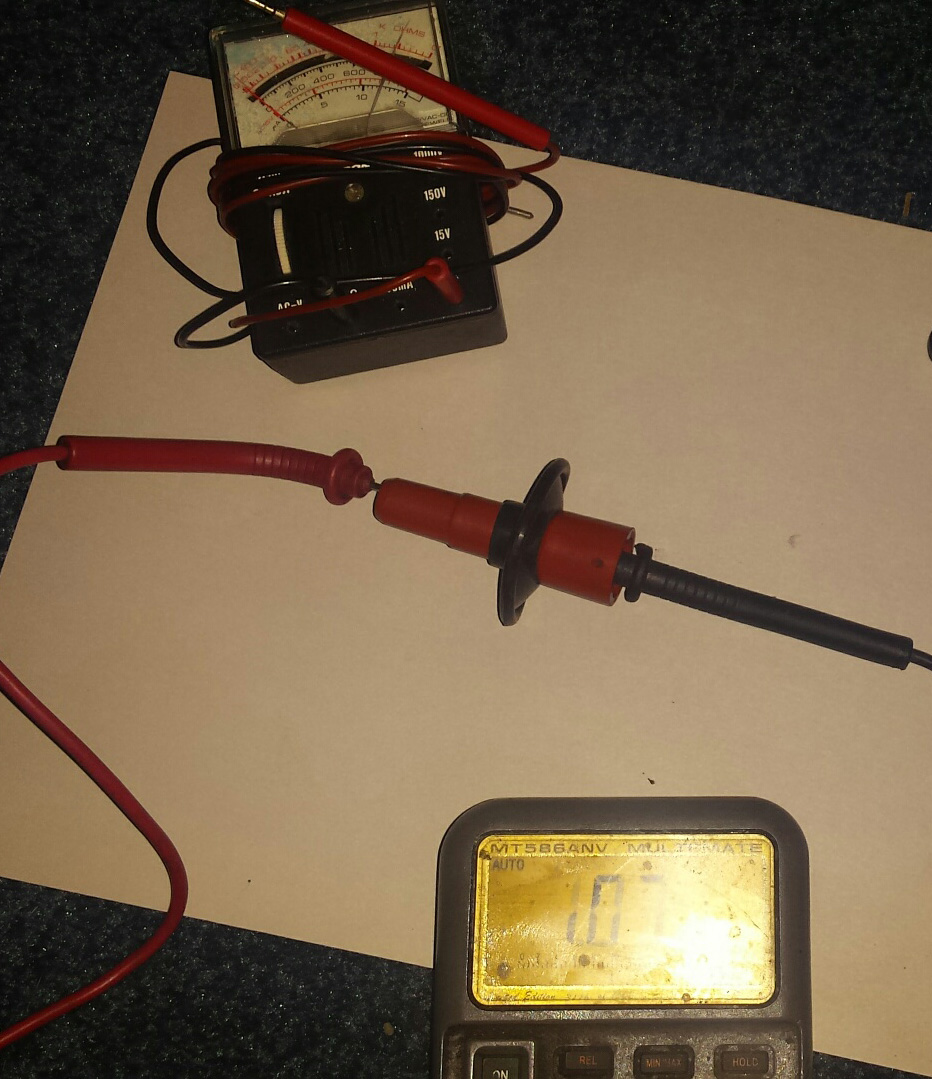 This connector reads 1070 ohms. Its a new Bosch one. It’s labeled as 1000 ohms. 1070 is fine. The analog meter in the photo is real inexpensive. I don’t know if they actually make this kind anymore. Shop for an ohm meter at Radio Shack. Doesn’t have to be fancy. Realize the conductor in the plug wires as original is copper. Some aftermarket wires don’t have a metallic conductor but rather a carbon impregnated string of some sort. Do not use these wires. They have tons of resistance and can easily cause a miss. New Bosch plug wires come with this type of wire for the coil only. Don’t use this wire. It has about 5000 ohms per foot. Since electricity takes the easiest path to ground, with this much resistance in the coil wire (the ignition system was designed to only have resistance at the plug connector – no more than the 1500 ohms found in the long connectors), the spark may never make it to one or more plugs intermittently and cause a miss. To prevent this possibility, make a coil wire with a used plug wire that actually has wire inside. Just put one end from your Bosch coil wire on an old plug wire. It’s real good insurance. Also, take a look at your plug wires with the engine running in the dark. If you see a spark where it shouldn’t be, you’ve got a bad plug wire. Rare, but possible. Actually, if you can see any spark, you’ve got a problem with a plug wire. Except for this … If you have a leaky muffler for instance, over time, carbon leaking from the muffler will deposit itself all over the engine. Including the part of the coil where the coil wire connects. On a wet or foggy night, water can deposit on the carbon dust on the coil. Now it’s real easy for the spark from the coil to jump to the wet surface of the coil and thus create a no-start condition. The same can be said for the distributor cap and spark plug connectors. So wipe off a dusty coil surface or distributor cap and plug connectors when doing a tune-up.
The Distributor
The distributor distributes the spark. The condenser, along with the coil, creates the spark. Sometimes a condenser makes the car run real funny. I think what happens is the spark doesn’t spark instantaneously with a bad condenser and thus the spark doesn’t spark when is should, but condensers hardly ever go bad. Just put a new one in once in a while, especially if the wire is real old. Sometimes they break off right at the condenser. This will leave you walking.
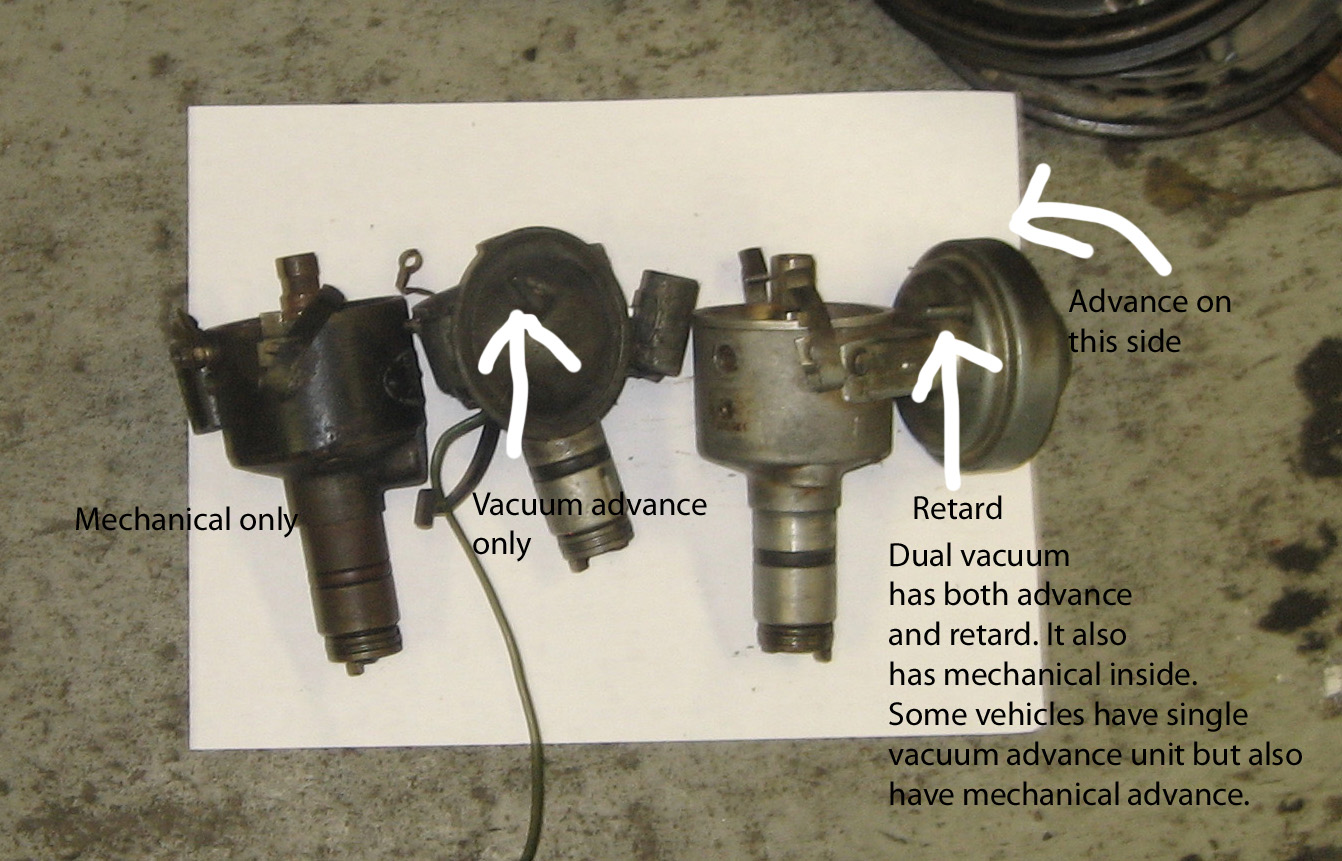
Here’s the three basic kinds of distributors …
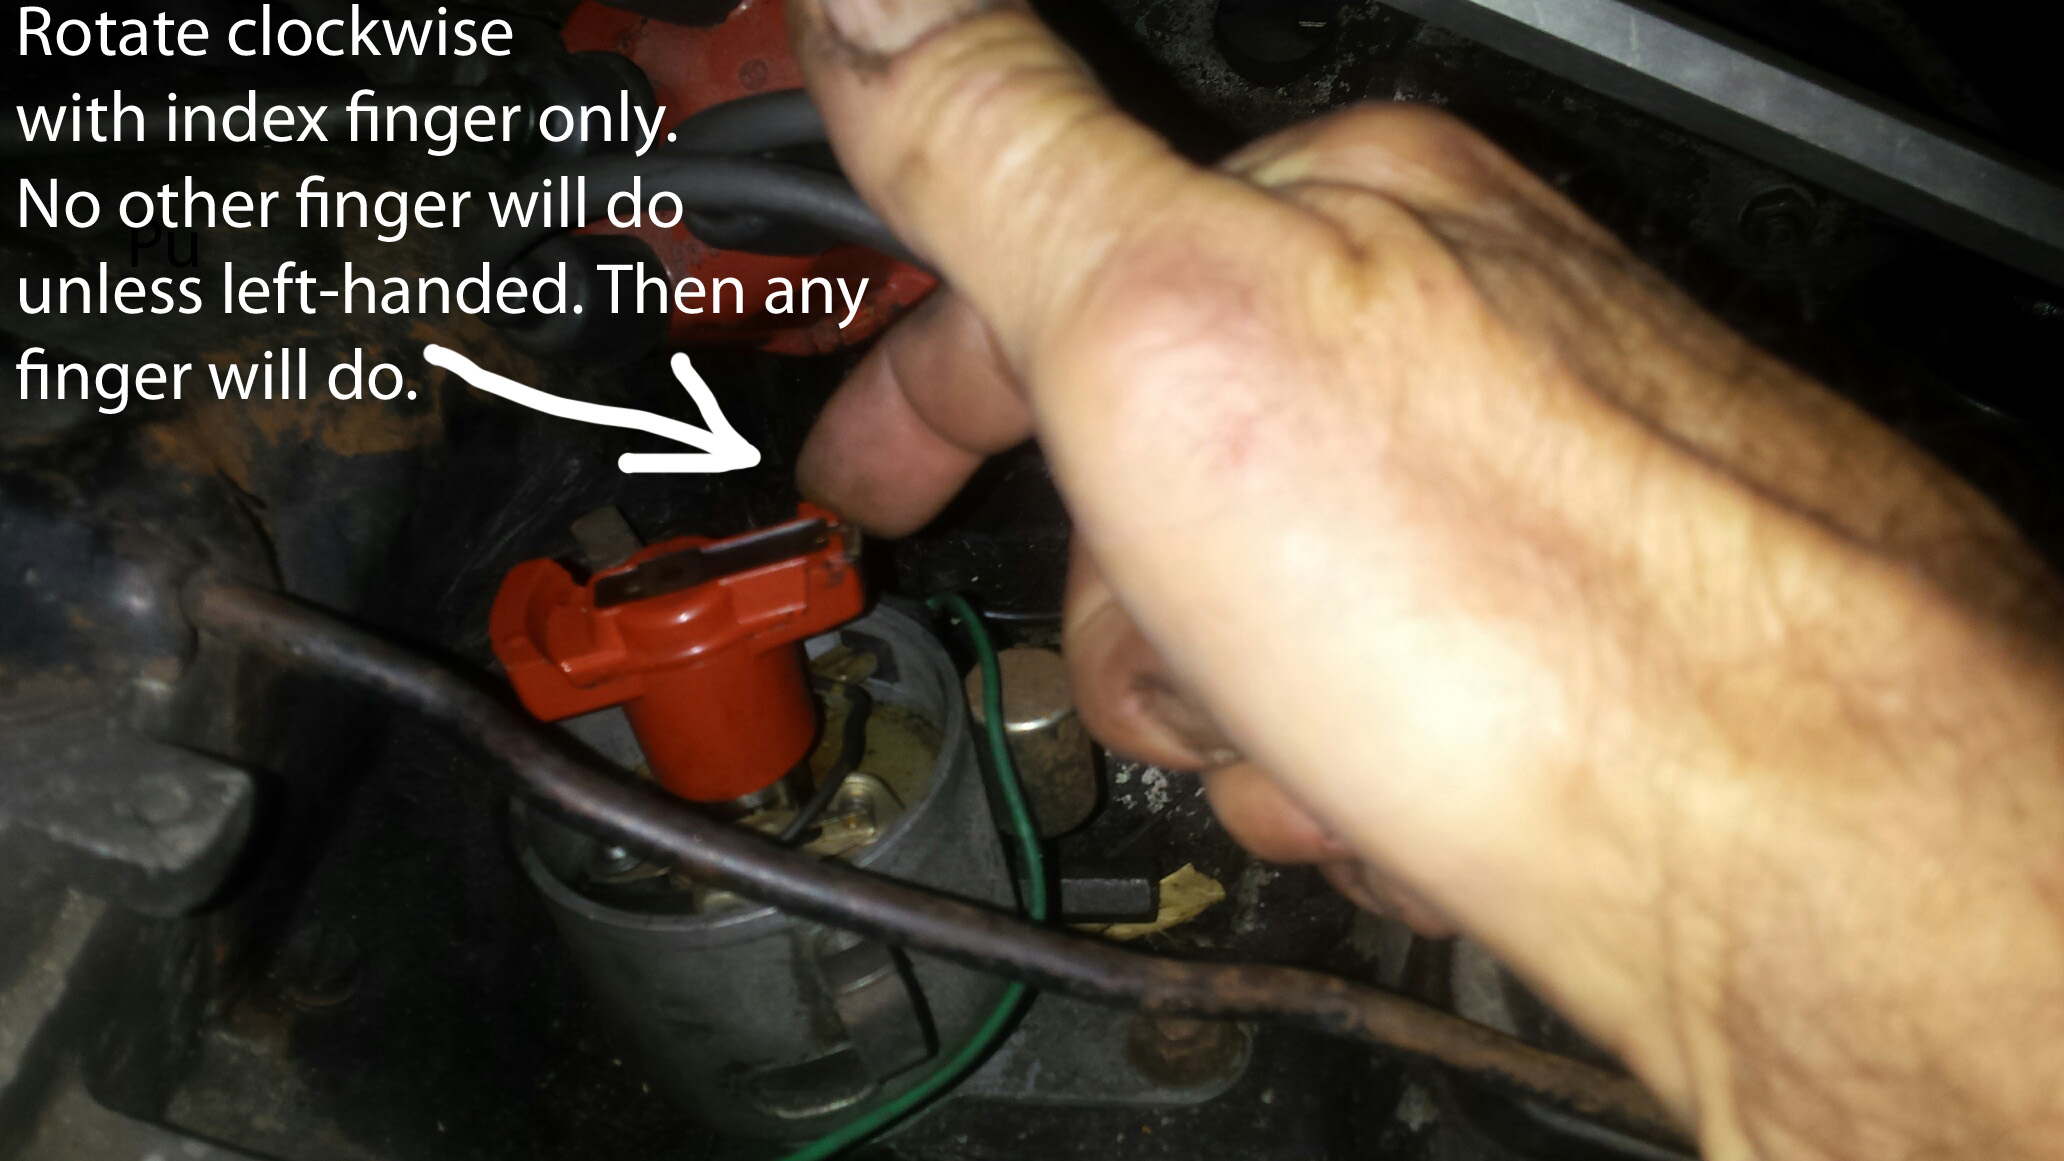
If you have a mechanical only or vacuum/mechanical distributor, rotate the rotor in the clockwise direction. The shaft it engages with is spring loaded. It should move a bit and should move back when you release it. This is more clear with the points removed because the points exert a little drag on the shaft. If it’s sticky, you’ll need to remove the distributor and lubricate it. The mechanism below the breaker plate (that’s what the points attach to) it easy to lube. Use oil liberally then let it drain of excess oil to keep it off the points when it’s running.
If the above doesn’t fix it …
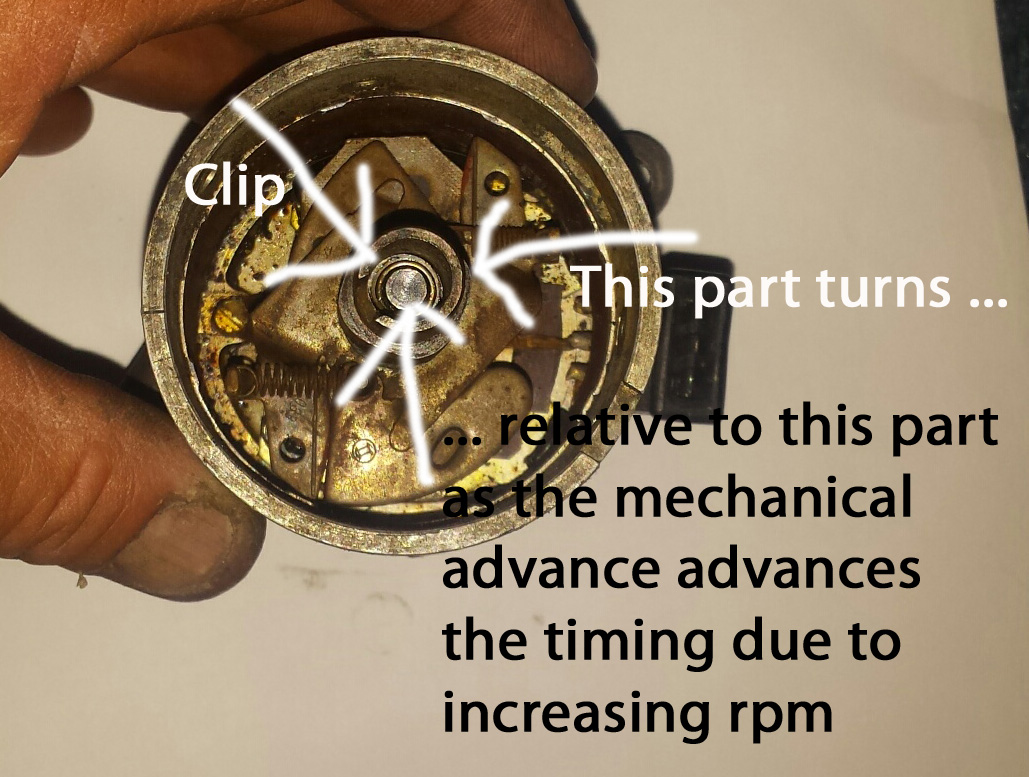
The part the rotor engages with rotates relative to the the part of the distributor that engages with the engine. This is the part the actually moves when you rotate the rotor. This part gets stuck at the interface. The only solution it to take out the clip that resides under the felt wick directly under the rotor (unless it’s missing) and disassemble. But don’t ever do this unless you must. The clip is hard to remove and easily distorted.
The best way is lots of WD-40 and force by applying vise grips (or just the rotor if it’s not real frozen) to the part the rotor engages with while holding the driven dog at the bottom of the distributor stationary. Rotate and pull up. It should also move up and down a bit when begins to free up. It may disengage with the mechanism below when you do this. Easy to deal with. If it’s real sticky, a few passes with a torch will help too. Keep messing with it until it moves real easy. Then drench the whole distributor with oil and turn it upside down. The easiest route for the oil to get to the interface is from below.
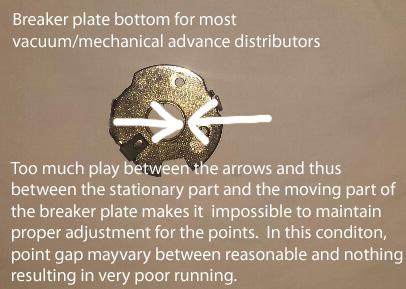
The part the points attach to. It’s called the breaker plate …
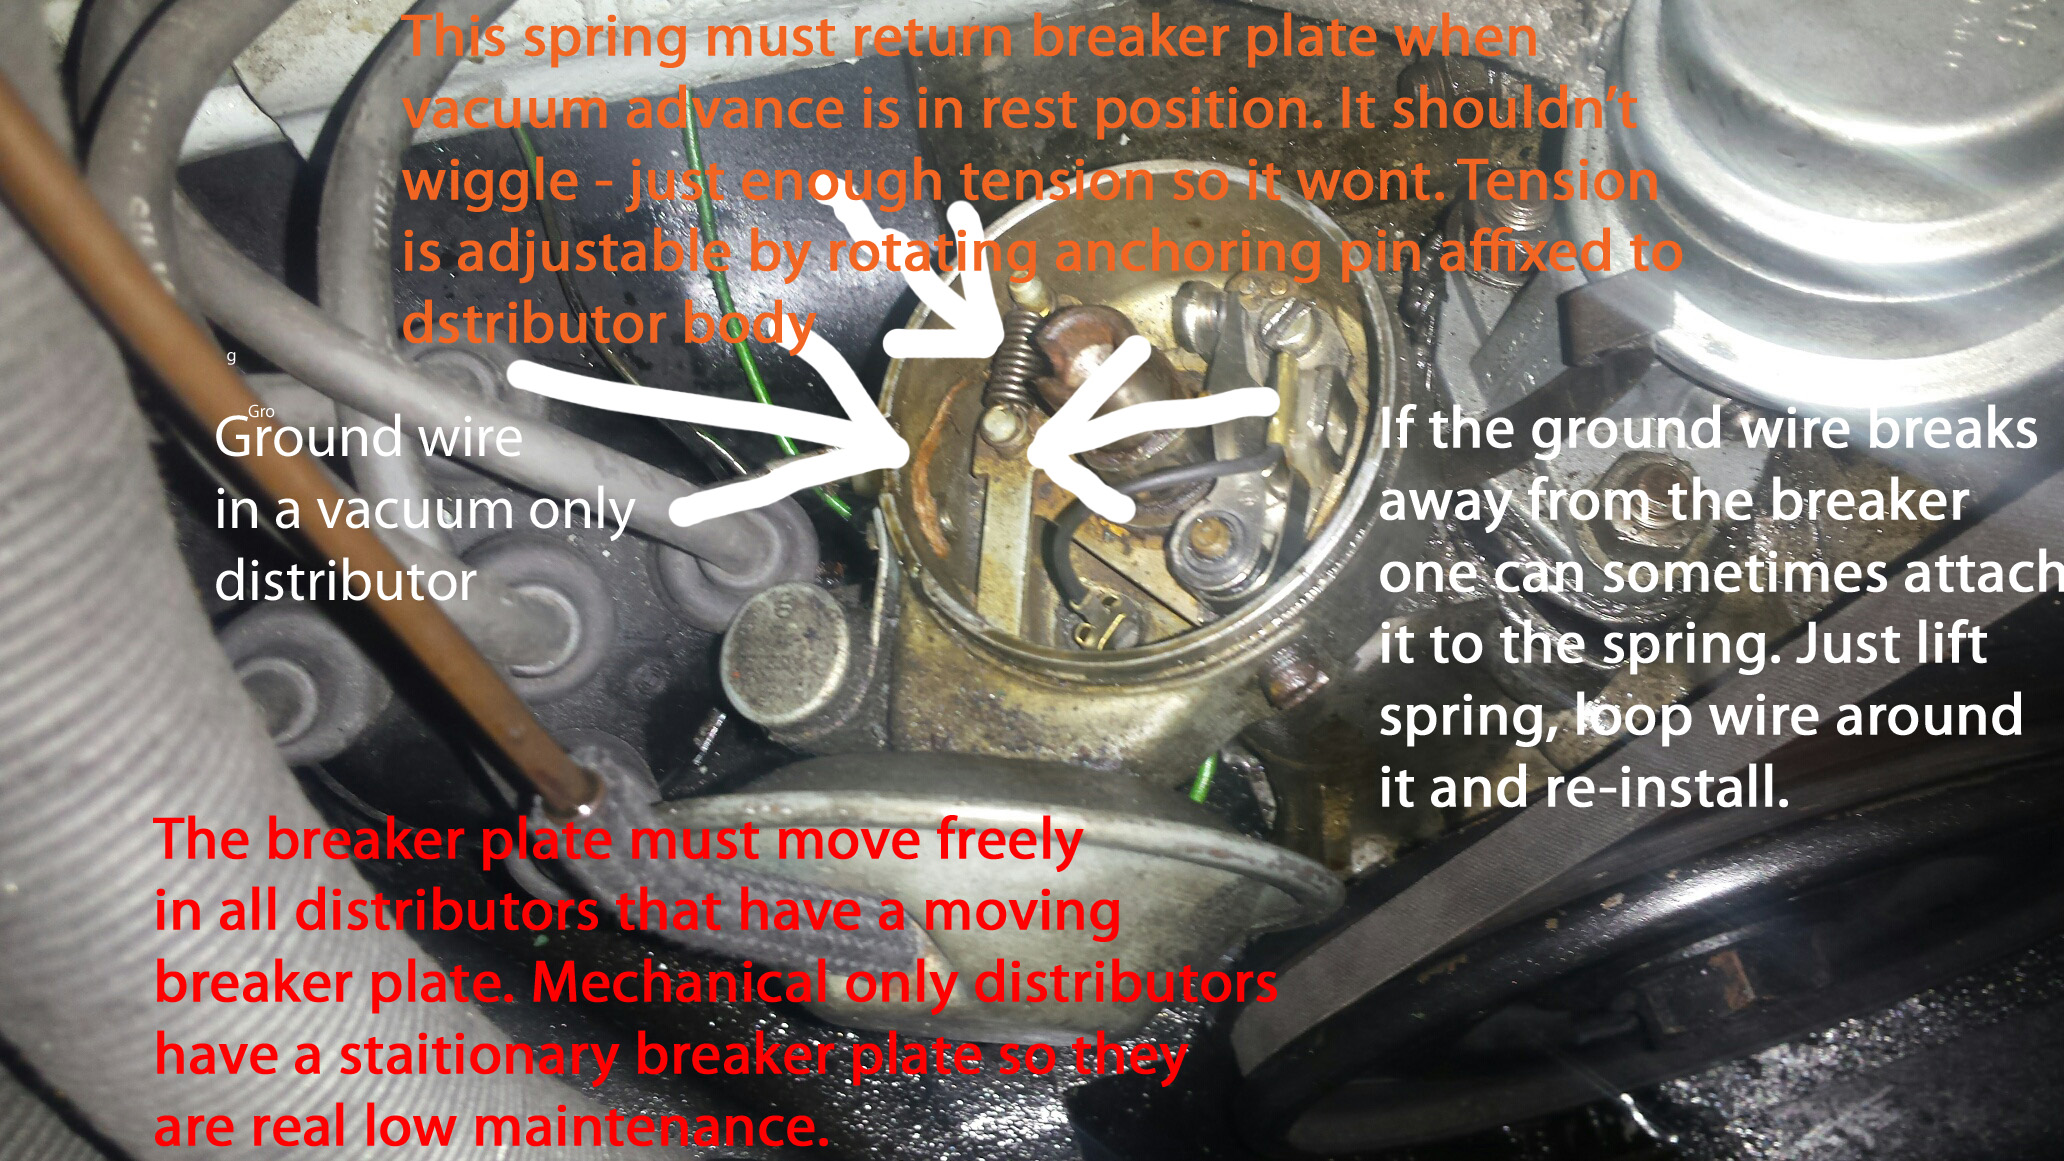
Here’s the breaker plate from a vacuum/mechanical advance distributor …
Points
There are three things responsible for the massive uptick “electronic ignition” sales.
1. Little understanding of how to adjust the point gap.
2. No lubrication of the distributor cam and thus the rubbing block on the points. Every time the distributor turns around once, the rubbing block probably touches (slides along the highs on the distributor cam) it for about an inch. I’ve never measured it, so that’s plus or minus. So that’s about 1/2 and inch per revolution. So at 3000 RPM, that’s 1500 inches per minute. Therefore, the points slide about one mile every 42 minutes at 3000 RPM. And they’ll slide for many, many miles with just a tiny bit of lube. Only use Bosch points and set them carefully. It’s easy.
3. Grease or oil on the contacts. The spark from the points is arcing electricity. It’s real hot. Grease or anything on the contacts burns. When something burns, it leaves carbon. Carbon is like insulation for the surface of the contacts. It makes the points stop working when it’s allowed to pollute them. THE POINT CONTACTS ARE LITERALLY THE CLEANEST PART ON YOUR CAR, OR AT LEAST THEY SHOULD BE. THEY MUST BE STERILE FOR LONG LIFE. NO TRACES OF ANYTHING ALLOWED.
The points – they’re basically just a switch. Like the light switch in your bathroom . As the distributor turns, the points open and close. The moment they open, you get a spark. When you install points, rotate the distributor and watch them open and close. If the rubbing block is touching the flat part of the distributor cam they may not really be closing. This condition can happen if the gap is too big. That’s what the gap is all about. Not too big, not too small and no touching when flat surface of cam faces the rubbing block. The bigger the gap the better (more miles traveled before there’s no gap) but no touching at flat surfaces of lobes. No touching insures that the points really open and really close. About .020 inches is about right for the gap but always check as shown in the pic below …
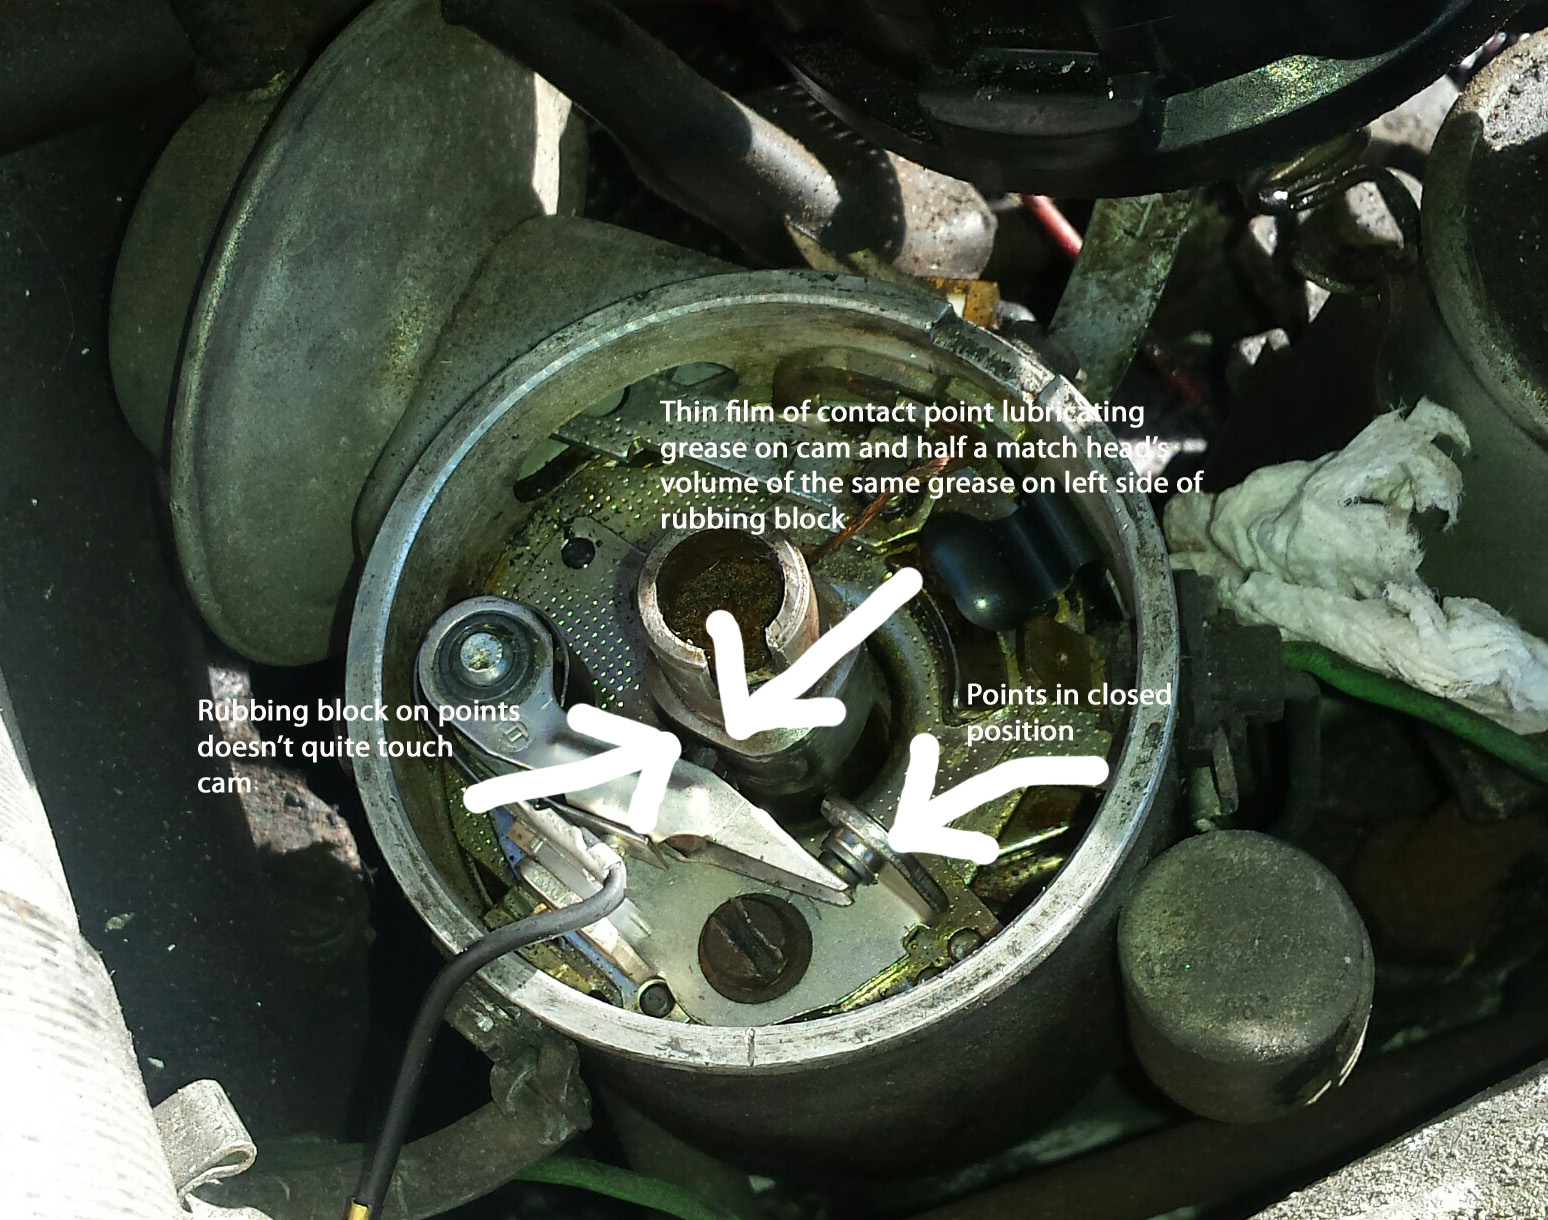
If you set your points exactly with a feeler gauge, then tighten the screw when done and check them again, the gap will be different. You’ll have to do them again to get them perfect. Even if it takes you a million tries. Not really, just try to keep the gap within reason and make sure they really open and really close. That’s perfect. Like everything else on the car, points need lubrication. The rubbing block on the points rubs on the distributor constantly while the car is running. The distributor turns around millions of times during the life of the points. With just smear of grease on the cam and about half as much as the volume of a paper match head on the pivot side of the rubbing block, not the contact side, the points will last many thousands of miles. Maybe ten thousand miles. But the key to long point life is – Bosch points only – and zero contamination of any kind on the contact surfaces. The best thing to do after you install and gap your points is to clean the contact surfaces with a squirt of brake cleaner. Then, with the points in open position, place a piece of clean paper between the contacts with the points open, then rotate distributor till the points close, and carefully pull paper out. If paper tears, do it again and make sure there are no particles of paper between the contacts. Your points will now last “forever”. Remember, Bosch points only. You can buy a tiny container of grease meant specifically for greasing distributor cams and point rubbing blocks at any auto parts store. Many vehicles have aftermarket electronic ignition. It needs no maintenance. Some types enable you to set the gap. I find a gap of .033 is best although they recommend .030 in the instructions. Car may start with less cranking. The red wire goes to coil positive – terminal 15 – and the black wire goes to coil negative – terminal 1. Never connect these wires backwards. This will instantly cook the module the moment you turn on the key. Which is why I don’t like this kind of ignition. It’s too easy destroy by accident. Also, if it just fails in the middle of nowhere, you’re walking. Points usually cause problems because they have no gap. You can usually get a car to run with closed points by bending them open even if you have no screwdriver to adjust them. Use a key or anything you have available to bend them so they actually open but not too much or they won’t close completely. Just a tiny gap is enough. No measuring required in an emergency. Realize this will change the timing but it will make a car run well enough to get you out of the middle of nowhere. An increase in point gap advances the timing. A decrease in gap will retard the timing. That’s why you set the timing whenever you change the points. If you set the points narrow in an emergency, the timing will likely be more retarded than when it was set when the points were originally installed. This is a good thing because if you open the gap too much, you may advance the timing too much and the vehicle may run hot. But set the timing correctly as soon as you’re able. If you’re going on a long trip, bring a set of points and a condenser and a screw for the points just in case your electronic ignition fails. And if you have no point grease, just smear a little oil wiped off the dipstick on the distributor cam.
Setting the Timing
If your distributor is working properly – nice breaker plate, all mechanical parts moving freely, then you can set the timing. The timing must be right in a Volkswagen if you want the engine to last. The correct basic timing set at idle speed is defined by the factory specs for a stock distributor or the proper specs regarding the distributor that’s in your car if it’s not stock. When the speed of the engine increases past idle, the timing changes with it. The rate of advance is determined by the vacuum advance (metal “can” on the side of the distributor) or the mechanical advance within the distributor or both. Real old models – from the fifties – have only mechanical advance. Later fifties (36 horsepower engines) had both. In the sixties it was the vacuum advance only except on some type 3 models like the 1500 S which had both. Fuel injected type 3’s from 1968 had both. In 1971 it was vacuum and mechanical for all models (except some years of type 4 buses which no retard feature) except the vacuum advance on most models had something additional – two hoses to the advance mechanism. One was for vacuum retard and the other was the typical vacuum advance. These vehicles idle with the timing at 5 degrees after top dead center. All others are timed at either top dead center (zero degrees from top dead center), 7.5 degrees before top dead center, or for a few models, 10 degrees before top dead center.
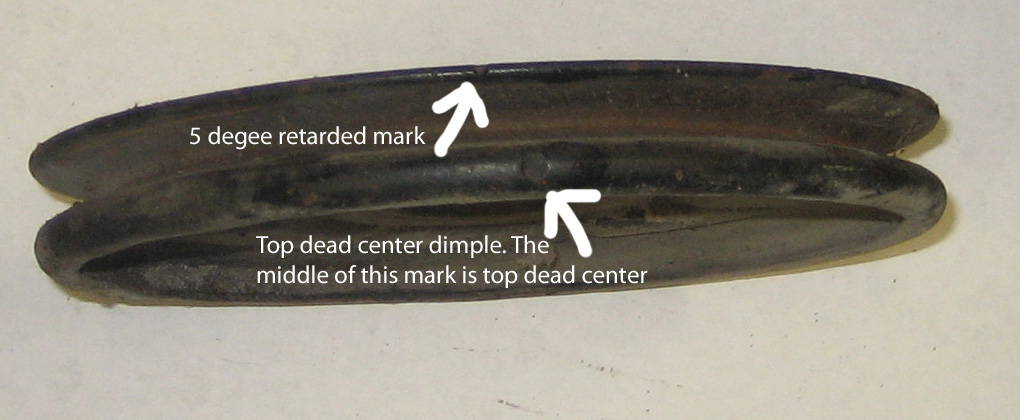


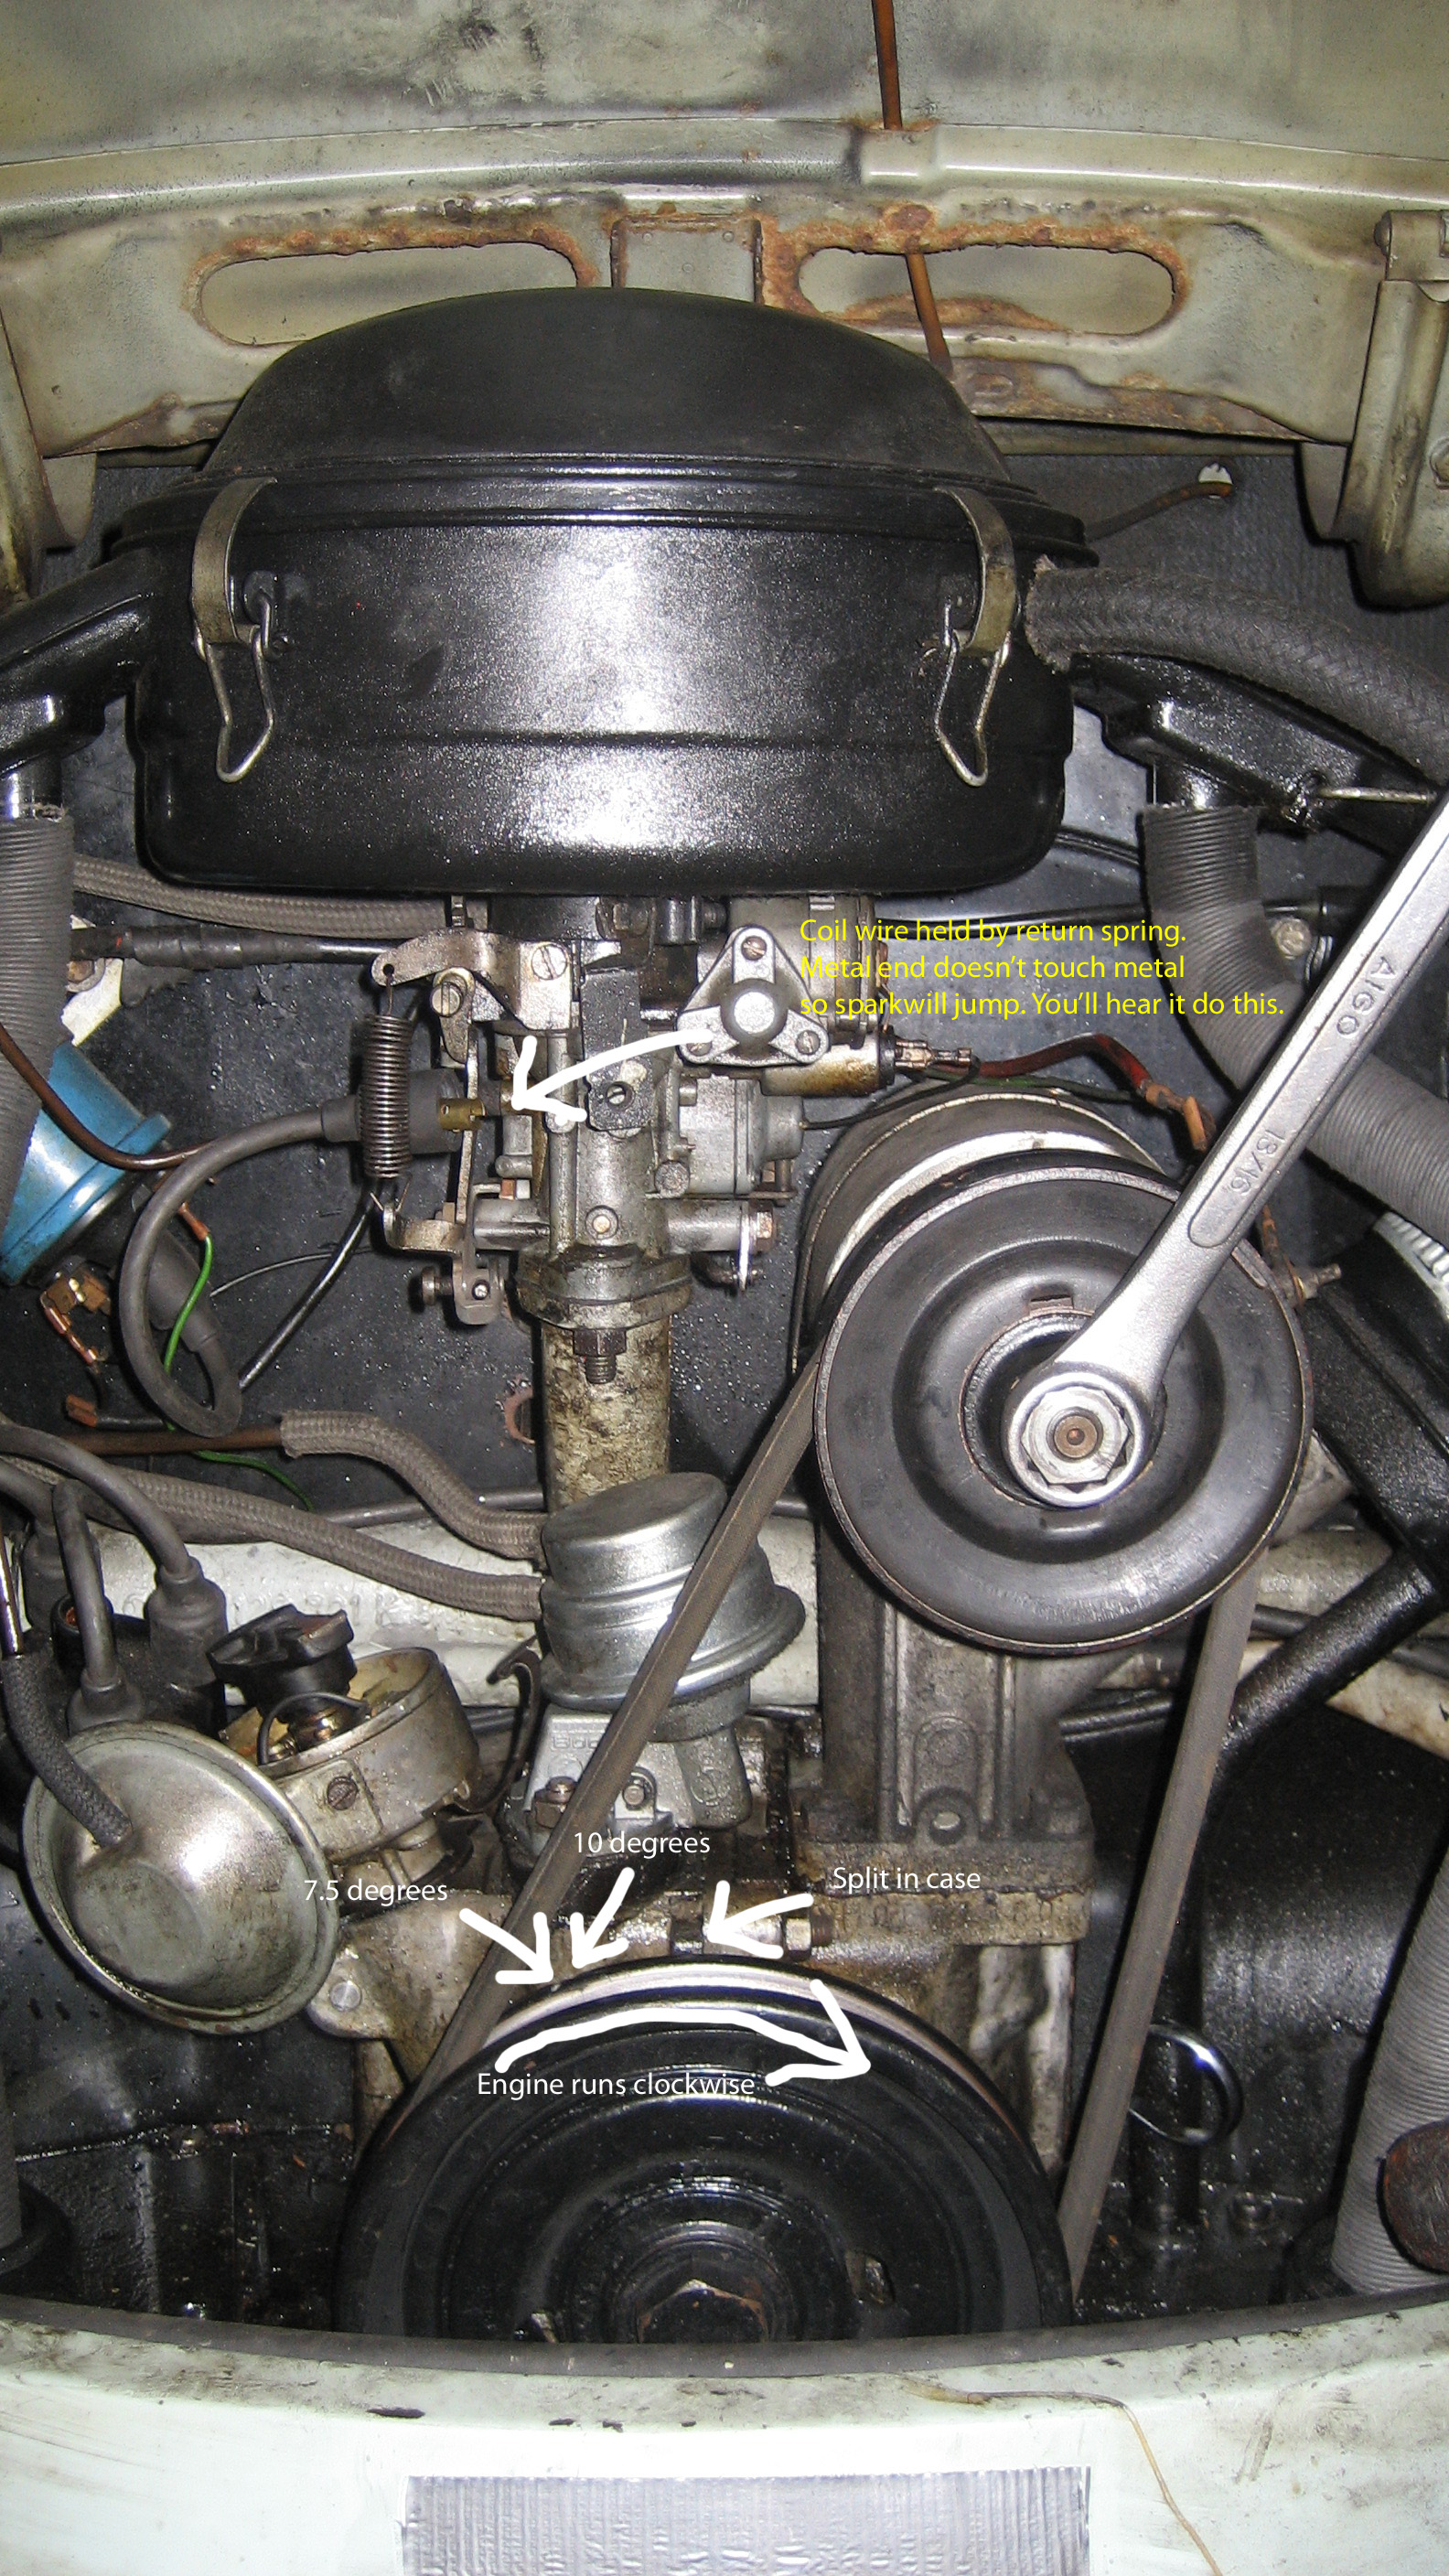
The above photo shows the timing ready to be checked on a 1967 bug. The key is on. The the timing marks are little to the left of the split in the case. When the engine is rotated clockwise by the wrench on the generator, the spark should happen just as the 7.5 degree mark passed by the split in the case. It’ll jump of the end of the coil wire held in position by the carb return spring. It’ll make a quite audible snap as this happens. The reason you begin turning the engine with the marks to the left of the split in the case is to mimic the engine running. Any play in the gears gets taken up as you turn the engine. This may be more accurate than using a timing light because with the engine running, the gears may bounce around a little. Doing this this eliminates the possibility of bouncing. If, when setting the timing as above, and, for instance, you’ve installed new points and nothing else is connected wrong and you find you have no spark, rotate the engine so the points are closed. Now bridge a screwdriver between the moving part of the points and the rotating part of the distributor. You’ll likely see and hear a spark. If this is the case, try pushing the points open with a screwdriver. If there’s no spark, use the screwdriver to push the points and the contact up and down a bit. Just to wipe them a bit. Likely you’ll have a spark and you can carry on.
If the spark doesn’t happen at the split, you’ll need to move the distributor a little until it does. You may accidentally move the distributor too far but realize that when the timing is right or at least in the vicinity of right, the rotor will point pretty close to the number one mark on the distributor. Read below for more about this. Or if for some reason you can’t figure out where number one cylinder is or if someone stole your spark plug wires last night.
Adjusting the Valves
Valve adjustment is the most important part of a tune up. In fact, if you’re not over servicing your vehicle, you’ll be a adjusting the valves more than you’ll be changing the plugs or points. Valve adjustment changes quicker than either especially if you drive at freeway speeds often. Driving around in town, not so much. Think of a spring loaded door in a house. You push the door open with your finger. You close the door by releasing the door with our finger. It’s really shut when you actually remove your finger. Your finger is the pusher and the door is the pushee. For the valve adjusting screw is the pusher and the valve is the pushee. Valve adjustment is simply adjusting a specific clearance between valve adjusting screw and the valve to be certain the valve, like the door with no finger touching when closed, is really closed. Here’s a pic of the engine positioned to adjust the valves on number one cylinder …
 If your spark plug wires get mixed up and you can’t figure out where they go, realize the rotor will always point at the place on the distributor where the wire belongs for the representative cylinder that’s in valve adjustment position. Start with what you think is number one and see if the valves have clearance and remember, the marks on the pulley will always line up with the split in the case. For a VW, this will be in either number one or number 3 position. If you think you’re on number one, rotate the engine back and forth a little. You should see no rocker arm movement on number one and you should see rocker arm movement on number 3. But the main thing is, if the vehicle was actually running, the rotor will always point to the plug wire leading to the cylinder that’s in adjustment position.
Fuel Injection
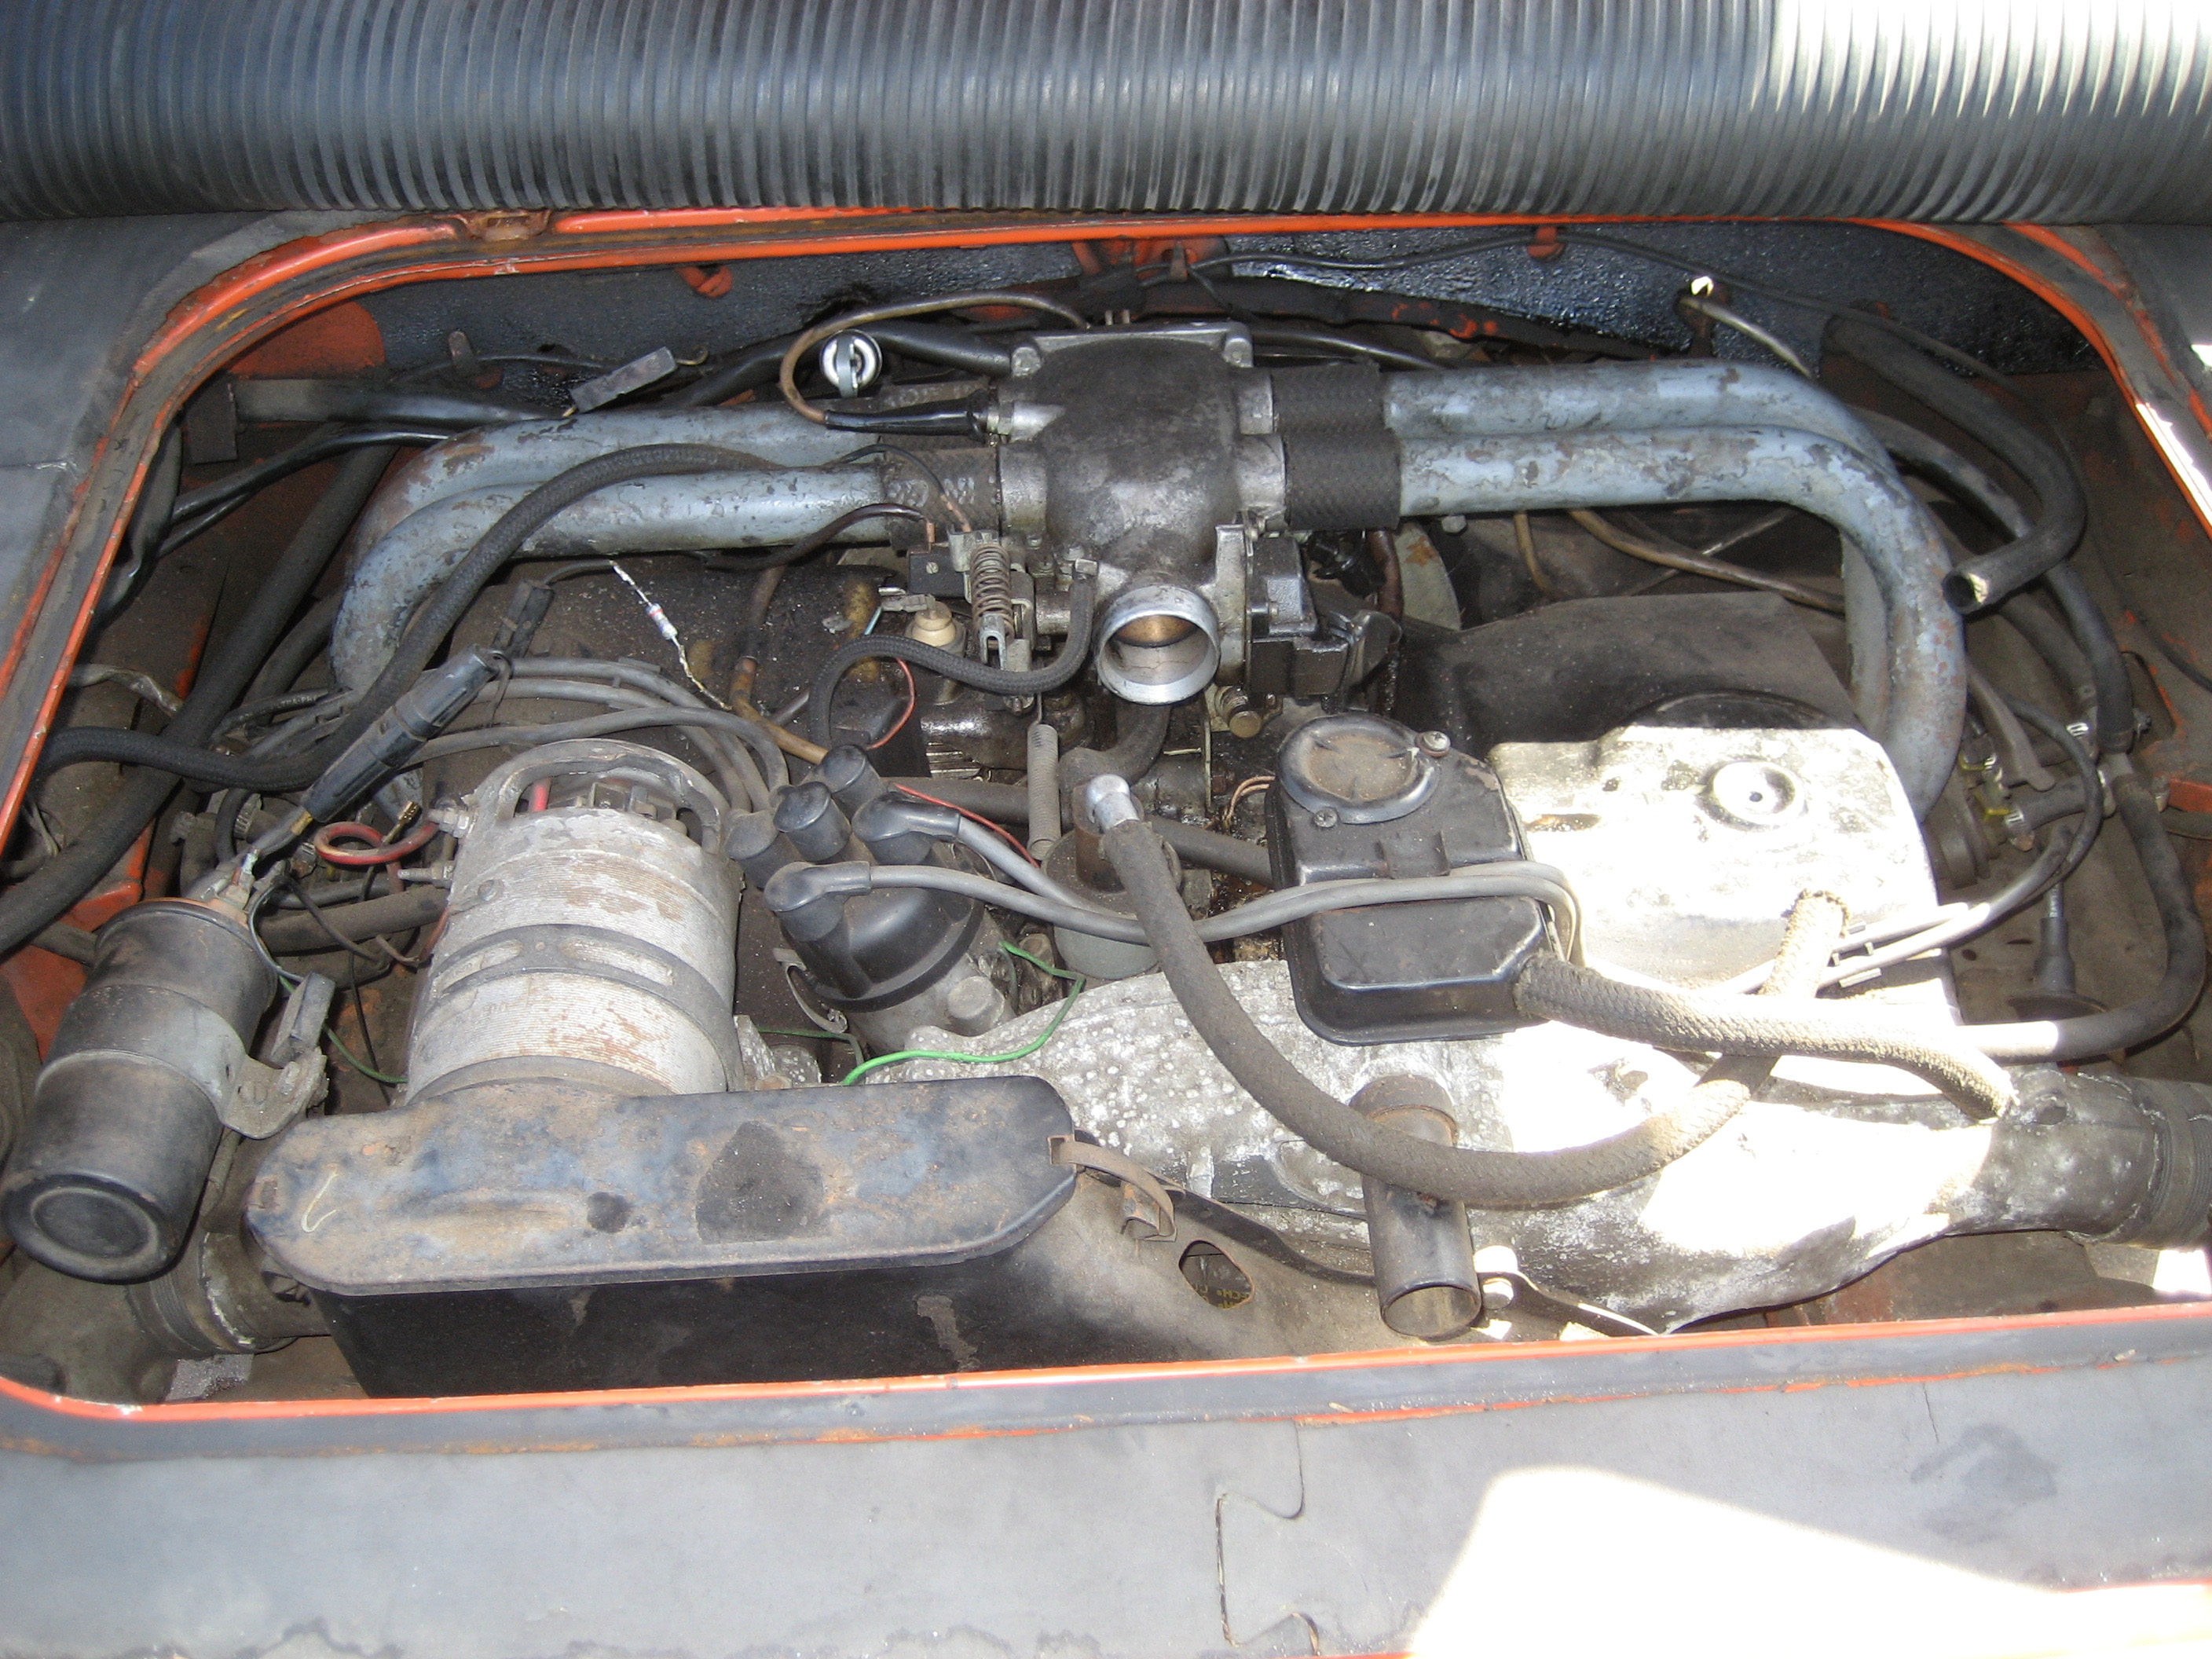
Remember not to over service. Think fuel filter and air filter. You don’t need to replace these every 3000 miles. Here’s a picture of a 1971 type 3 automatic. The only thing that’s ever been changed on it is the pressure sensor and the head sensor. Injectors, computer and all other parts are original. Bosch products last a real long time.
Since fuel injection engines have lot’s of fuel hoses subject to a constant 30 pounds of fuel pressure, tighten all the fuel line clamps on a tune up. Since fuel injection engines, particularly type 4 engines, have lot’s of vacuum hoses – both big and small – tighten any related clamps and replace any questionable hoses. Air leaks at vacuum hoses cut down on the life of the valves on a type 4 engine significantly. Also tighten the intake manifold nuts on type 4 engines during a tune up.
When you rotate at fuel injected engine with the key on, you’ll hear the injectors actuate. It’s an audible click. Don’t confuse it with the sound of the spark from the coil. Type 4 engines use the signal from the spark from the coil sent to the computer to let the computer know it’s time to open a pair of injectors. For type 4 and type 3, the injectors always fire in pairs. I think it’s one on each side, maybe one side at a time. Realize the fuel goes into the manifold and waits for it’s given cylinder to suck it in. Injectors don’t need to fire in any particular order.
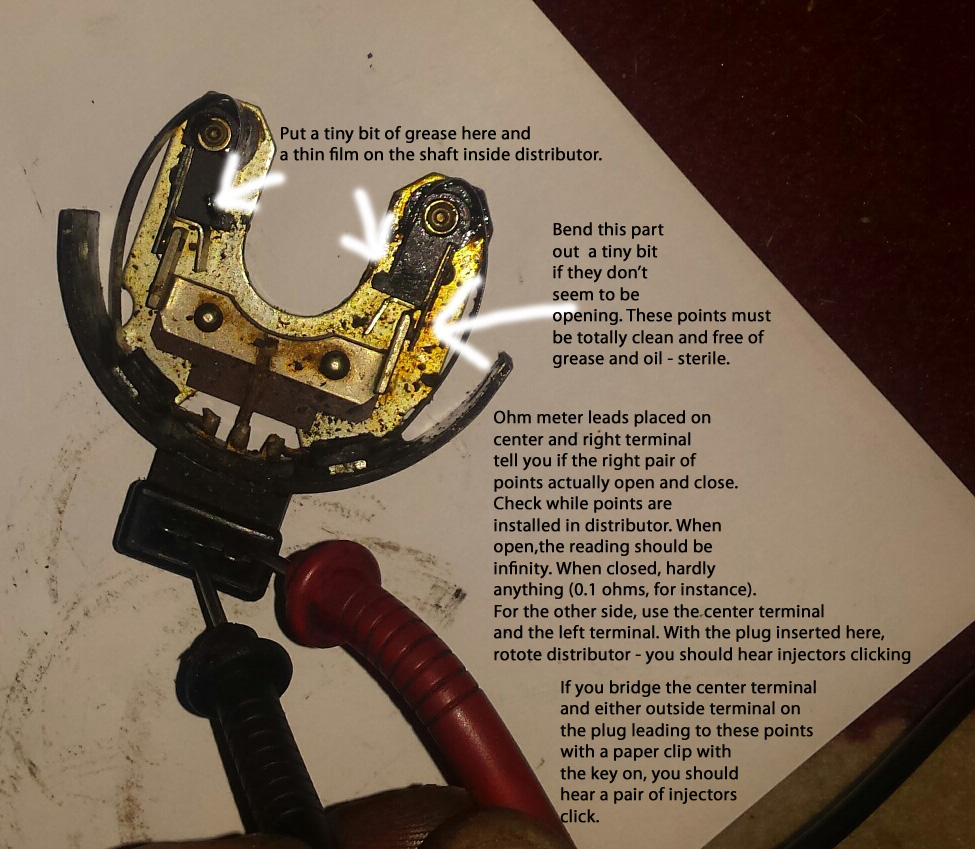
For type 3, the signal sent to the computer is sent by the trigger points. This is just pair of points that reside under the breaker plate. They don’t need adjusting but do need occasional lubrication just like the ignition points.
If you have a problem with you type 3, one thing to check is the trigger points. You’ll need an ohm meter. There’s nothing mysterious about trigger points. Just like the ignition points, they’re just a simple switch. Only instead of one, it’s a pair.
The pressure sensor – type 3 fuel injection only …
Long ago, this 1972 type 3 needed to pass a 2 gas – CO (carbon monoxide) and HC (hydrocarbons) – emissions test to be legal to drive in California. CO is measured in percent and HC is measured in ppm – parts per million. CO is typically around 4% and HC from around 400 to 600. These values would enable passing. Catalytic converters drop these values significantly and they’re always low on a new engine with perfectly sealing valves. For simplicity, CO is a measurement of how much fuel is going into the engine and HC is measurement of how much fuel is coming out which theoretically should be zero since we really want to burn all the gas that goes into the engine. But engines aren’t perfect so they can’t burn everything. For instance, the fuel mixture between the piston and cylinder above the top piston ring. For they type 3, the CO was real low and the HC was real high at idle. So the CO values were low enough pass but the HC values were not.
It did idle, can’t remember if it was rough. But no way it would pass the emissions check with the HC so high. The reason was because that mixture was so lean, there was a large volume of fuel that was not being ignited so it came out the tailpipe as gasoline steam – or high hydrocarbons. At least 1000 ppm. The CO was probably around 2 or 3 percent. I think the limit was around 6%. I tried several different pressure sensors and spent some real time adjusting each one to no avail. Since the head sensor leans the fuel mixture as the engine warms up, I thought – maybe …
I spliced a 450 ohm resistor into the wire leading to the head sensor. It worked. Now it idles so smooth is sounds like an electric motor is turning it around. It also passed smog with flying colors.
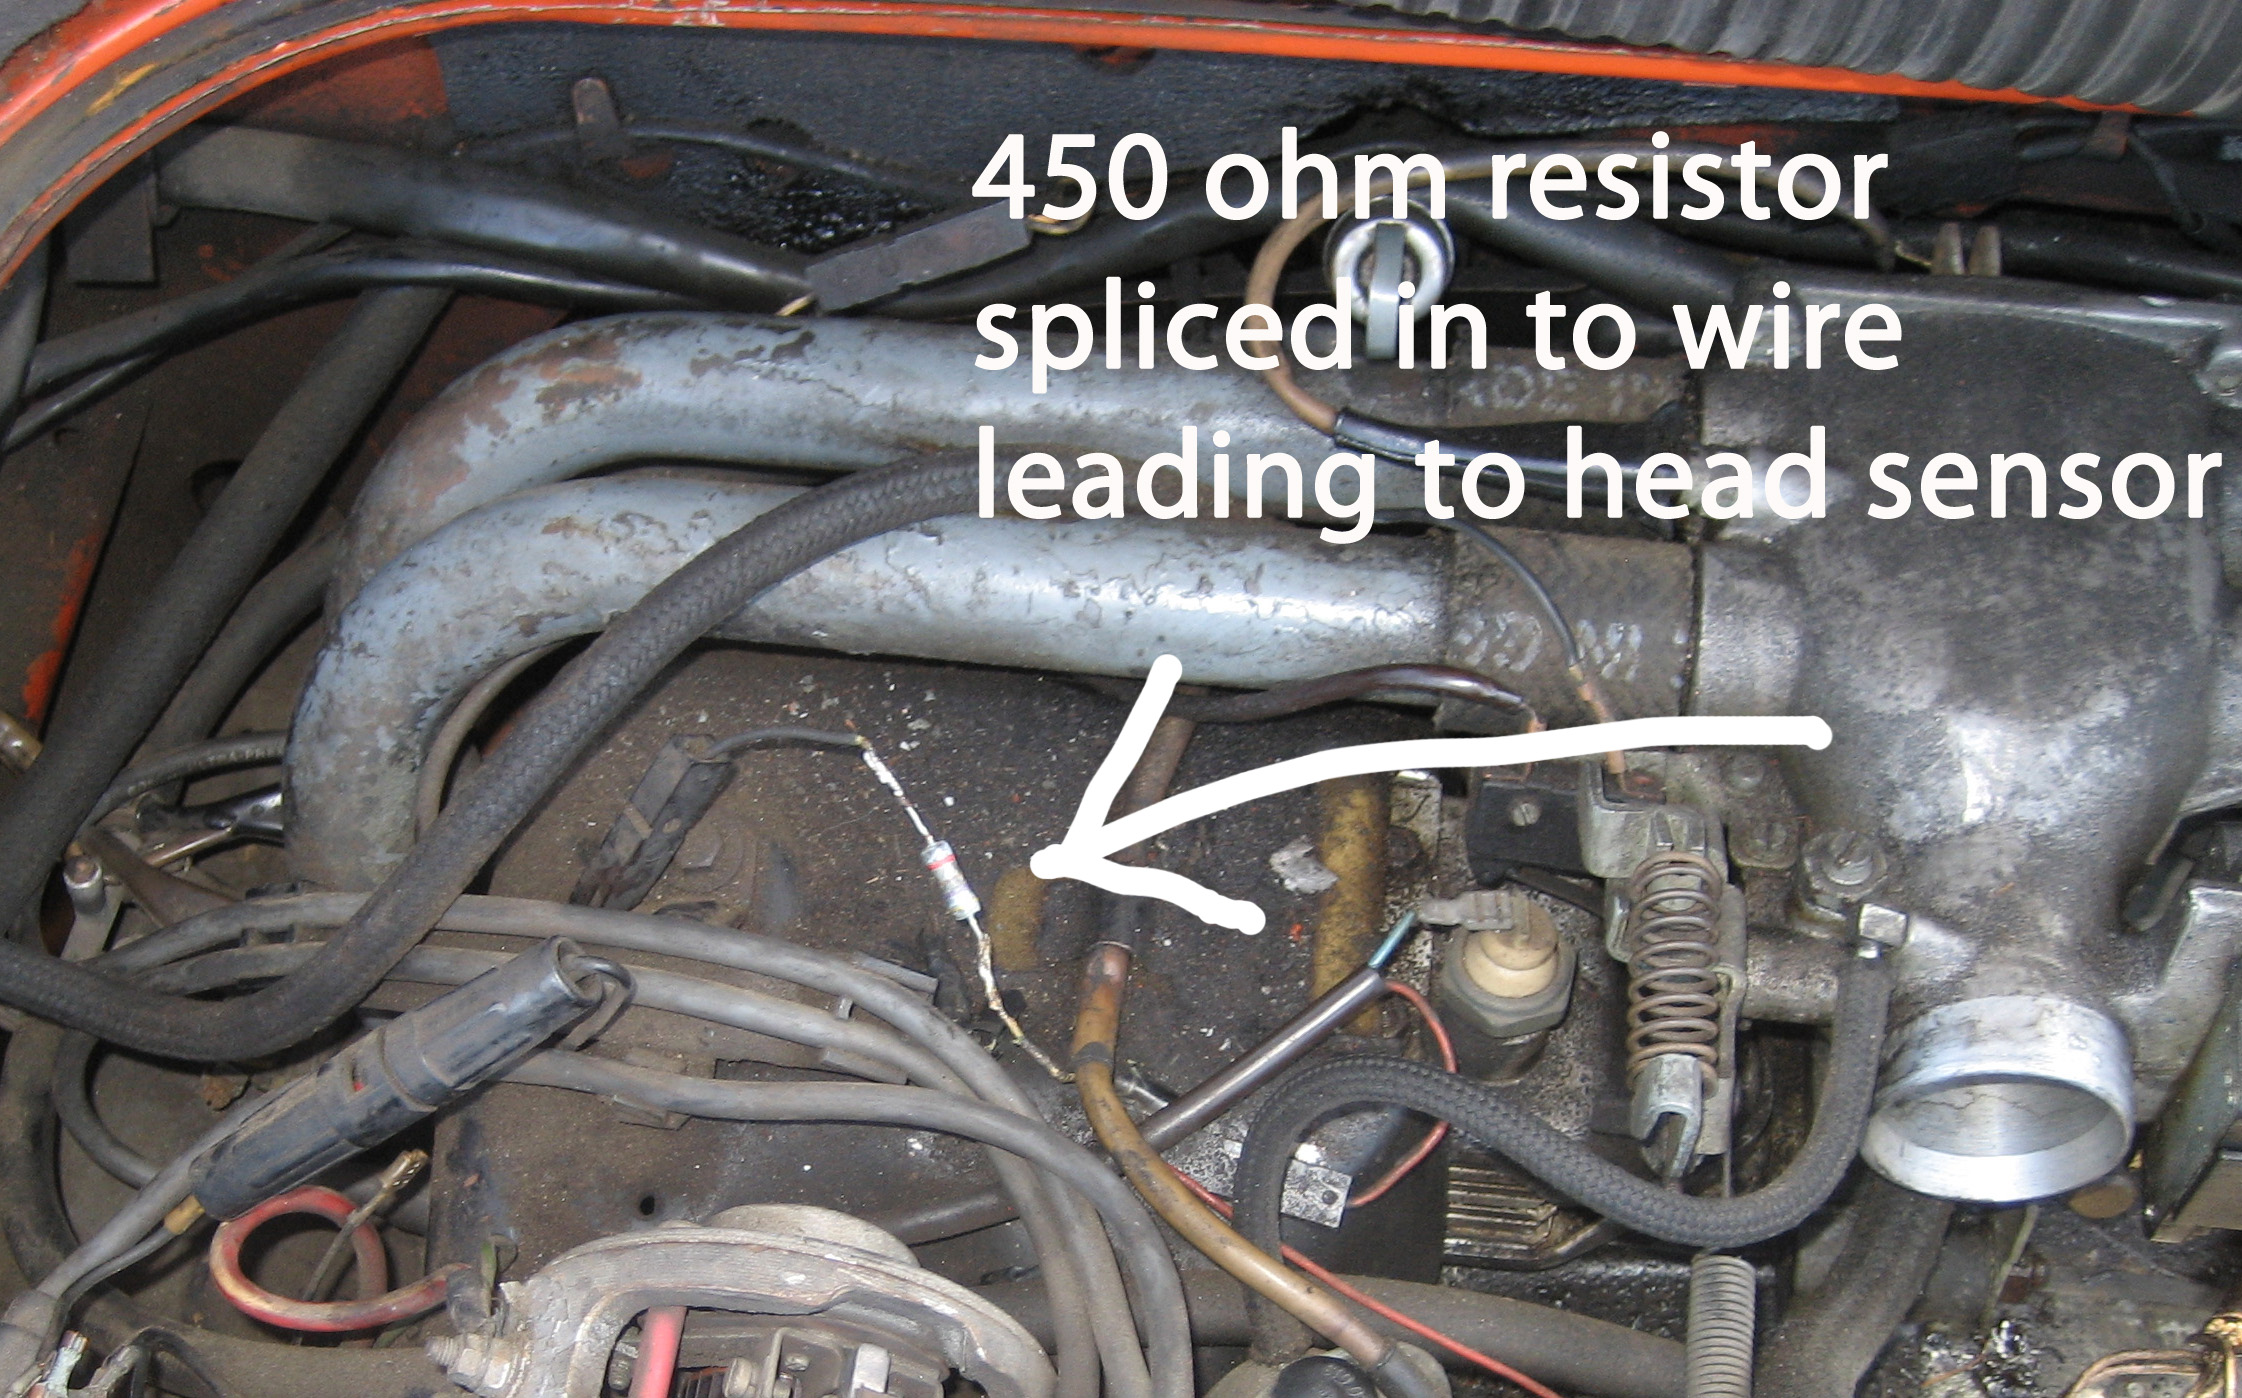
So it you think it’s the pressure sensor because it’s doesn’t seem to idle so nice, try putting a resistor in. VW tackled this problem in other ways. One was a bolt for the head sensor to screw into. The bolt then screwed into the head. By bringing the sensor away from the head itself, it ran cooler so it richened the mixture. Another version was a bracket that held the sensor in space a couple inches away from the head. The sensor didn’t even touch the head. So experiment with resistors. Use 450 as a baseline. It really works.
Emissions aren’t just something you need to have correct for smog. They tell you how the engine is working. A real nice engine in type 4 bus with perfectly sealing valves should have about 2% Co and 150 ppm HC at idle – upstream of the catalytic converter. After the converter, the exhaust should be so clean you can breathe it – figuratively, of course.
You can also add a resistor to a type 4 engine but you can’t really compensate for wacky emissions on a type 4 by doing this. It’s really only viable the type 3 system with the pressure sensor. However, you may be able to add a bit more pep by richening up the fuel mixture by adding a resistor.
If you have a real high CO reading – like 6 % and you can’t seem to get it any lower by adjusting the air flow sensor – on a type 4 injection system, you’re probably going to need to replace the air flow sensor. Tell the rebuilder the symptom. The rebuilder will probably need to use another core. You can’t fix everything.
Click THIS, then type the word “rigged” into the “find” function on your browser to find the section on that page that tells how you can adjust the air flow sensor on a bus. And some spark plug wire and EGR valve commentary and some other crap that just fell outta my head that night.
Epilogue
I realize that’s a lot of stuff. Thing is, if you get it all straightened out, all you’ll really need to do is adjust the valves once in awhile. Check the timing. If it’s where you set it the last time you tuned it up, the point gap should still be the same. But always take a look at the points just to make sure. Always take a good look at the belt, especially on a type 1 powered vehicle. A broken belt will leave you walking with no alternatives. You can’t fix a belt with a key like you can gap a set of closed points. Don’t forget the obligatory fuel line clamp tightening – fuel injection only. I never use clamps on stock carbureted vehicles and I always use braided German fuel hose. If you’re gonna over service anything, start with the fuel lines. Excellent fuel lines are the best fire insurance you can buy and real bargain. And always make sure there a no air leaks at any vacuum hoses on fuel injected vehicles. Air leaks are the number one killer of type 4 engines. Always maintenance tighten the intake manifolds at the head on type 4 engines, particularly those with fuel injection that use the bakelite intake gaskets/blocks. Also for type 4, always maintenance tighten the exhaust manifold nuts at the cylinder heads.
This entry was posted on Friday, July 10th, 2015 at 6:52 am
You can follow any responses to this entry through the RSS 2.0 feed.
