This post has nothing to do with battery or starter related problems. It’s only pertinent to fuel injected buses (mainly, but it in general, is applicable to virtually every single internal combustion reciprocating engine, including all VW’s) with intermittent starting problems where the car starts fine, runs fine, then you turn it off, run into a store or buy gas, come out and it won’t start, but it cranks and cranks and cranks – just won’t start. Then after 30 seconds or a minute or two of cranking or even standing around for 1/2 hour, it starts right up and runs fine. Or maybe it dies while you’re waiting at a stop sign or light and the engine dies and it’s you crank for a minute or so and then it starts and idles ok and runs ok again. Those are the problems I’m talking about.
This post is really all about air leaks. Since a leaking intake valve is an air leak, it starts there.
Fuel injected buses, especially with rebuilt engines or engines having any repairs done where the cylinder heads were removed often suffer with intermittent starting problems, poor idle, problems passing smog or all of the former. Heating problems are common too. All of these problems can often be traced to the “Lego Toy Method of Engine Assembly”. The following assumes that the spark plugs, plug wires, distributor, points, condenser (or electronic ignition), distributor cap, rotor, and all the other stuff is actually working and connected as it should be.
The Lego Toy Method of Engine Assembly requires a trip to the garden furniture department of Home Depot or Orchard Supply to pick up a cheap, but comfortable plastic garden chair suitable for 2 or 3 forays into Lego Toy assembly. Finally, the heads are on, the flywheel seal is installed and the fun begins. The remaining parts that aren’t really part of the engine (after all, the oil pump doesn’t pump oil to the heater boxes or the intake manifolds). And the metal heater pipe leading from the driver’s side heater box up to the heater hose has virtually no effect on compression. It’ll run fine just barely connected and hanging in space, rubbing on the axle (it can on a Vanagon). So it’s time to relax. It’s time to pile all those rusty pipes n’ parts next to the right side of the chair (lefties use the left side) and start throwing them at the engine. And have a few beers. Or something else. This last decision is time dependent.
Yes, that’s why your car won’t start sometimes and sometimes it does – leaky gaskets, leaky hoses, ill fitted fittings – stuff like that. But it could be leaky valves. Especially the intakes. Only detectable with a leak down test. You can have 120 pounds compression and but still have a massive leak at the intake valve. No one bothered to check the heads with fluid to see if the valves really seal. And for the one in ten who do, when they did find a leak, they told the machinist. The machinist replied with the standard script “It’ll wear in, I’ve never had a problem”. But you do. Maybe.
Here’s an example: An 80 air-cooled Vanagon quit on the freeway and was towed to my shop. It would not start. Compression was 60 pounds in number 4 cylinder. Compression in all others was 120 pounds. During cranking, I could hear air coming from the engine into the intake manifold (moving backwards) on left side of the engine. This is obviously an intake valve leaking where the piston is pushing the air out of the cylinder past a leaky intake valve. Since the compression was only 60 in number 4 cylinder, I assumed the leaky valve was on number 4 cylinder.
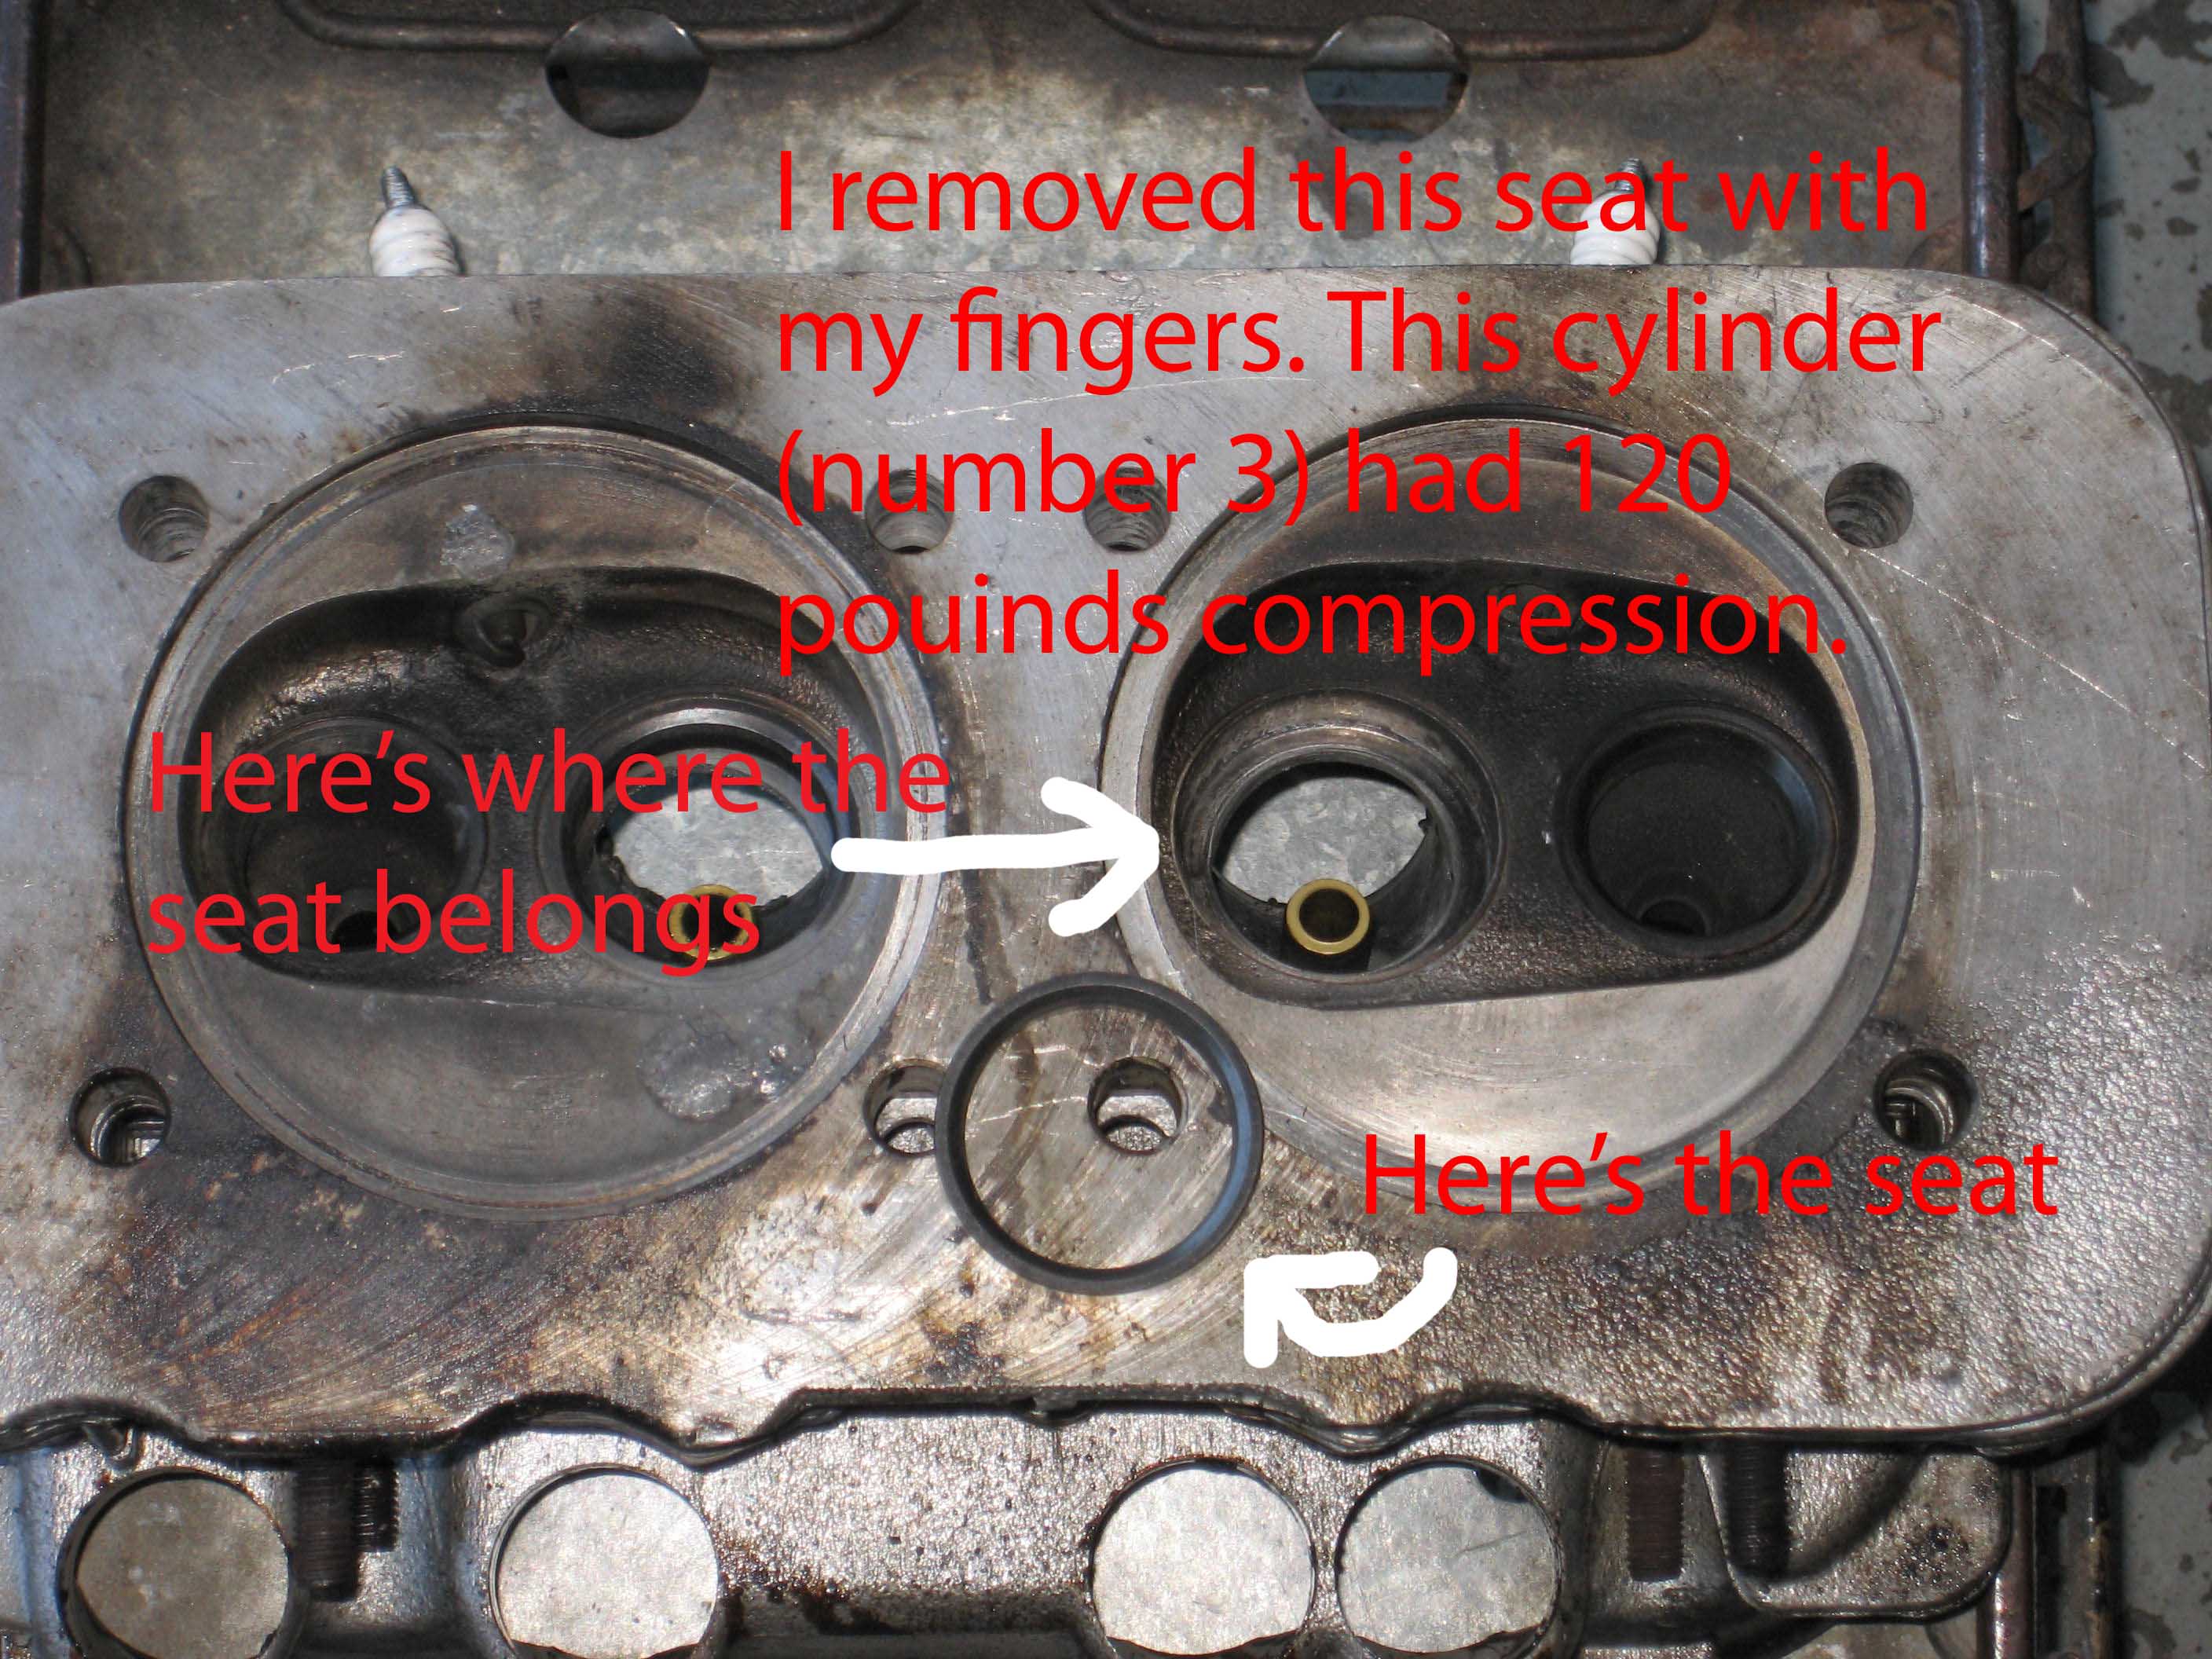
Wrong!! The cylinder with 60 pounds had a broken piston and both the intake and exhaust valves and their respective seats were in too good of a visual condition for either to be leaking so significantly. The source of the sound – poor sealing at number 3 intake valve due a completely loose seat – a removable seat. Realize, it didn’t fall out – it was held it place (and wiggling around) by the valve. They’re supposed to be tight in the head. A seat is really a metal washer for the metal valve. It does virtually the same thing as a rubber washer in a kitchen faucet. But perfect steel to steel sealing is dependent on perfect concentricity and that’s impossible with a wiggling valve seat. Considering the conditions a valve and seat work under and the millions of times it they must perform perfectly, it’s a wonder they actually work at all. But they do, for a real long time, if one starts out with perfect sealing and the only way to check for that is to place fluid – solvent or gasoline – into the combustion chamber after a valve job to actually check viability before you put the engine together!!
Realize, cylinder A’s piston moves upward to compress (cylinder A’s intake and exhaust valves are both supposed to be closed now), but with a leaky cylinder A intake valve , some of the “atmosphere” in cylinder A is pushed out through it’s intake valve and moves cylinder B (the sucker) that has it’s intake valve open because it’s supposed to be. The sucker will suck up anything that comes it’s way – atmosphere from the cylinder with the leaky valve, atmosphere that’s come through the air cleaner (and hence, the air flow sensor) and though any leaky hose, gasket, or fitting. So now, cylinder B has the wrong fuel mixture and maybe no combustion and thus not start.
So realize you can have a massive intake leak with perfect compression and a massive intake leak with perfect compression can make a fuel injected bus run ok but be hard to start or randomly die when idling. Or just not even start at all. And probably not a lotta power. Impossible not to have an effect on power, no? This condition can also make it impossible to set the timing properly because the vacuum of the engine is affected and thus vacuum pull on the vacuum advance unit will be wrong and you may never be able to set the timing where it really belongs particularly on vehicles with a dual vacuum advance distributor. Any attempt to correct timing may send the idle speed near or above 2000 rpm and it will be impossible to compensate with the idle speed adjustment screw. And on top of all that, since wiggling valve seats tend to rotate, sometimes they can seal good enough for setting the timing and idle correctly and then the seat can move and throw everything off again. In other words, “good enough” valve seat sealing can be intermittent!
However, whenever you have a problem with any vehicle, always check the basics – distributor, plugs, valve adjustment. Also check for air leaks at all gaskets. The plastic gasket block between the intake manifold and the cylinder head are very susceptible to poor sealing if care is not taken during installation. Just installing the manifold with a new gasket block and then taking the manifold off again for whatever reason and reinstalling without a ton of sealant will usually result in an air leak. They’re very sensitive blokes.
One could tear out their hair until they were bald and still wonder why the vehicle wouldn’t function right and had nothing wrong either electrically or with the fuel system and perfect compression. Only a leak down test would’ve revealed the problem with the seat.
A leak down test on any VW can eliminate the engine as a cause to poor running and poor idling on any model. And if you do find leak during leakdown, check valve adjustment. If you have hydraulic lifters, if you really want to diagnose it right and you have an intake or exhaust valve leaking shown by a leakdown test, you will have to de-adjust the respective valve meaning backing off the valve adjustment screw so you have clearance between the screw and the valve to make absolutely certain the valve is not being held open.
After all your testing and checking, you will have to remove the respective lifters and empty them of oil, to readjust. Any attempt to readjust (rotate screw 2 turns after contact with the screw) will open the valve, not compress the lifter. In this condition, you will have zero compression on that cylinder thus you cannot adjust hydraulic lifters with oil in them meaning an engine that’s been in service for any amount of time. Do the lifters one at a time and don’t mix them up. You will probably need to use a hydraulic press to compress the lifter to evacuate the oil. Yes, you can remove the clip then the piston and then the oil but you can damage the clip trying to remove it from a fully pumped up lifter because the clip will be under so much pressure from the piston in the lifter, you can easily damage it trying to remove it. The the tremendous force of the press will move the piston down and thus force the oil out making disassembly unnecessary. If you have no press, you’ll have to disassemble but don’t damage clip and keep an eye on it if it decides to fly of into space when you do manage to pop it out. The best way to prevent the clip from flying is to cover the lifter with a rag but with enough uncovered so you can see what you’re doing. The rag should catch a flying clip.
If your lifters have a plate like this, assemble as shown. If you happen to be assembling the engine for the first time, disassemble each lifter before installation and make sure the plate is installed as shown. They’re often UPSIDE DOWN as they come new in the box. Here’s a photo of the disc …
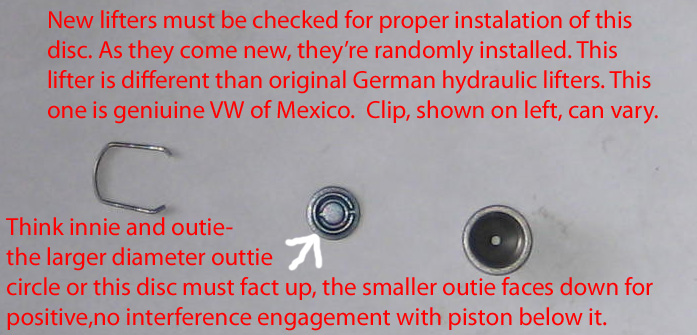
Lifter design varies – your’s may not have the disc. Shown above is a genuine VW of Mexico lifter. Diagram in Bentley manual is of original equipment from Germany.
Improper orientation of the disc results in a noisy, clicky lifter noise on startup often after less than and nour of sitting, allowing draining. If you have noisy lifters after they are fully bled and assembled properly (vehicle driven for awhile – 20/40d miles? ) and disc orientation has been corrected, place the engine on number 1 cylinder. Push the rocker towards the lifter. There should be no movement (from being able to compress spring in lifter). This should be impossible. If there is, turn the adjustment screw in a 1/2 turn. If there is no movement now, go on to next cylinder and check. This is mainly only pertinent to new lifters where you seem to have one that’s clicking when started after vehicle has sat for 18-24 hours or more. If this happens on a particular lifter a couple times after a couple increases in adjustment (more than the 2 turns as stated in the Bentley manual, up to 3 or 4?), replace the lifter. Realize, this is all under the assumption of you having new hydraulic lifters. They can get old and it’s impossible to get them to pump up sometimes.
After emptying lifters of oil or when starting a new engine with new hydraulic lifter, they’ll make noise. Forget putting oil in them before installation as it tells you in the Bentley Book (a couple drops from the oil can is ok, and a good idea). If you succeed in completely filling the lifer (good luck, I’ve tried), you’ll find that upon installation, when adjusting them – turning the adjusting screw in 2 turns after contact with valve stem – the valve will open rather than the piston in the lifter moving down the 2 millimeters that two turns of the adjustment screw will result in (.1 millimeter thread pitch means it moves one millimeter per 360 degrees of screw rotation). In this condition, the engine will not start because the valves will be open and thus no compression.
So, as previously stated, you’ve corrected the disc orientation and you’re ready to start you engine with empty lifters. It will make noise on start up. It will go away when there is no air and only oil in the lifters. Start it and let it idle for 10 minutes then turn it off and let it sit for a couple hours. It should be quieter when started again. You may have to do this several times. You can drive it rather than letting it idle but idling is better for a new motor. It’s hard on a lifter when it’s clicking and pounding away on the cam like a hammer with no oil and driving it in this condition may cause the lifter to begin life with a bad break in pattern causing it to not rotate when in operation so drive slow and keep the rpm’s low. Rotation is a must for the lifter to wear properly for long life. If a lifter does not rotate, it acts as a cutter on a lathe with the cam for a victim. For lifters that have been in service, drive it easy for ten minutes, the park and wait an hour or so, then drive. Noise will shortly go away although more than one drive it/park it sessions may be necessary. The point is, the slower the process you use, the greater the likelihood your new lifters will break in properly and the greater the likelihood that used ones will maintain proper movement (rotation). Finally, if you still have a bit of noise after the slow bleed method and there’s still a little noise, take it out on the freeway and drive it freeway speed for five or ten miles. You’ll probably have silent lifters.
The thing is this – if my memory serves me, and I think it does, original German lifters that came in a car brand new or were sold at the dealer as original did not respond as above. You could have a perfect engine, perfect lifters and all, no noise, then pull all the rockers and put them back on and the vehicle would start – lifter removal/oil removal necessary. After market lifters are different. Oh well.
Don’t assume that it’s ok to turn the adjustment screw in only one turn, or less than two. For every complete turn, you’ve moved the piston in the lifter 1 millimeter away from the piston retaining clip. The object of turning the screw in 2 turns is to get the piston away from the clip. The retention of the piston and inner parts a lifter in operation should not be dependent on the clip. 2 turns moves the piston 2 millimeters away from the clip. After, by way of turning the adjustment screw the 2 turn, retention of the piston is no longer dependent on the clip but is performed by the constant pressure of the comparably massive valve spring via the rocker arm and pushrod. Realize the clip is not made to retain the piston at high speeds for many tens of thousands of miles without the 2 millimeters of preload. It’s really there just to enable the lifter to remain assembled until it’s installed and finally bled. Once the lifter is properly adjusted and bled, one could theoretically remove the clip and throw it away and the vehicle would run fine with no ill effect.
Leakdown Testing
To perform a leakdown test, one removes the spark plug on number 1 cylinder, rotates the engine so it’s at top dead center for number 1 cylinder (valves are closed in this position so theoretically, there is no way for air to escape from the cylinder). The tool to use for a leakdown test is simply a hose that will screw by hand into the spark plug hole. There must be a rubber washer on it to seal well when tightened by hand. The other end is connected to air from a compressor. When the compressor is turned on, you should not hear the sound of air coming from the tailpipe (sound means leaky exhaust valve) or from the carburetor (sound means leaky intake valve). Taking off the oil cap and listening should result in a slight hiss – this is the sound of air leaking past the gaps in the rings. This is normal. If you you’re not sure if what you hear coming from the oil cap is too loud (broken ring, for instance), check other cylinders. If they all sound the same, it’s probably normal since it’s pretty unlikely that all four pistons conspired to fail at the same time, so if ones louder than the other, there’s something wrong with it.
Another, probably better way of learning what a normal ring gap leakage sounds like is take off the oil cap and rotate the engine slowly by hand with the plugs installed – no preparation of any kind other is needed. You’ll hear it. Rotate it around a few times to familiarize yourself with the sound. If you hear a cylinder that’s significantly different, you may have found the problem. Actually, the sound of a normal ring gap leak sound is pretty much the same on ever vehicle ever made.
If you’re having idling problems or starting problems and don’t hear anything coming from the intake with your leakdown test apparatus connected, find a port in the manifold that’s on the engine side of the throttle valve in closed position. The best ones are shown in the pics …
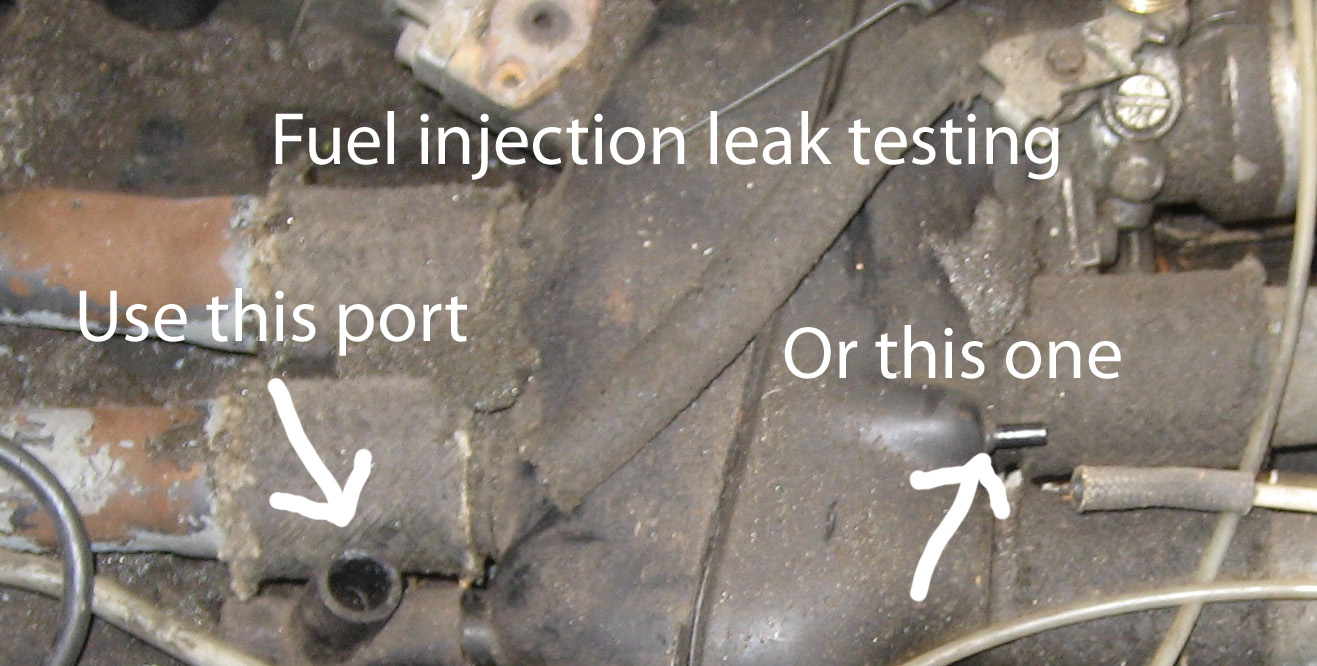
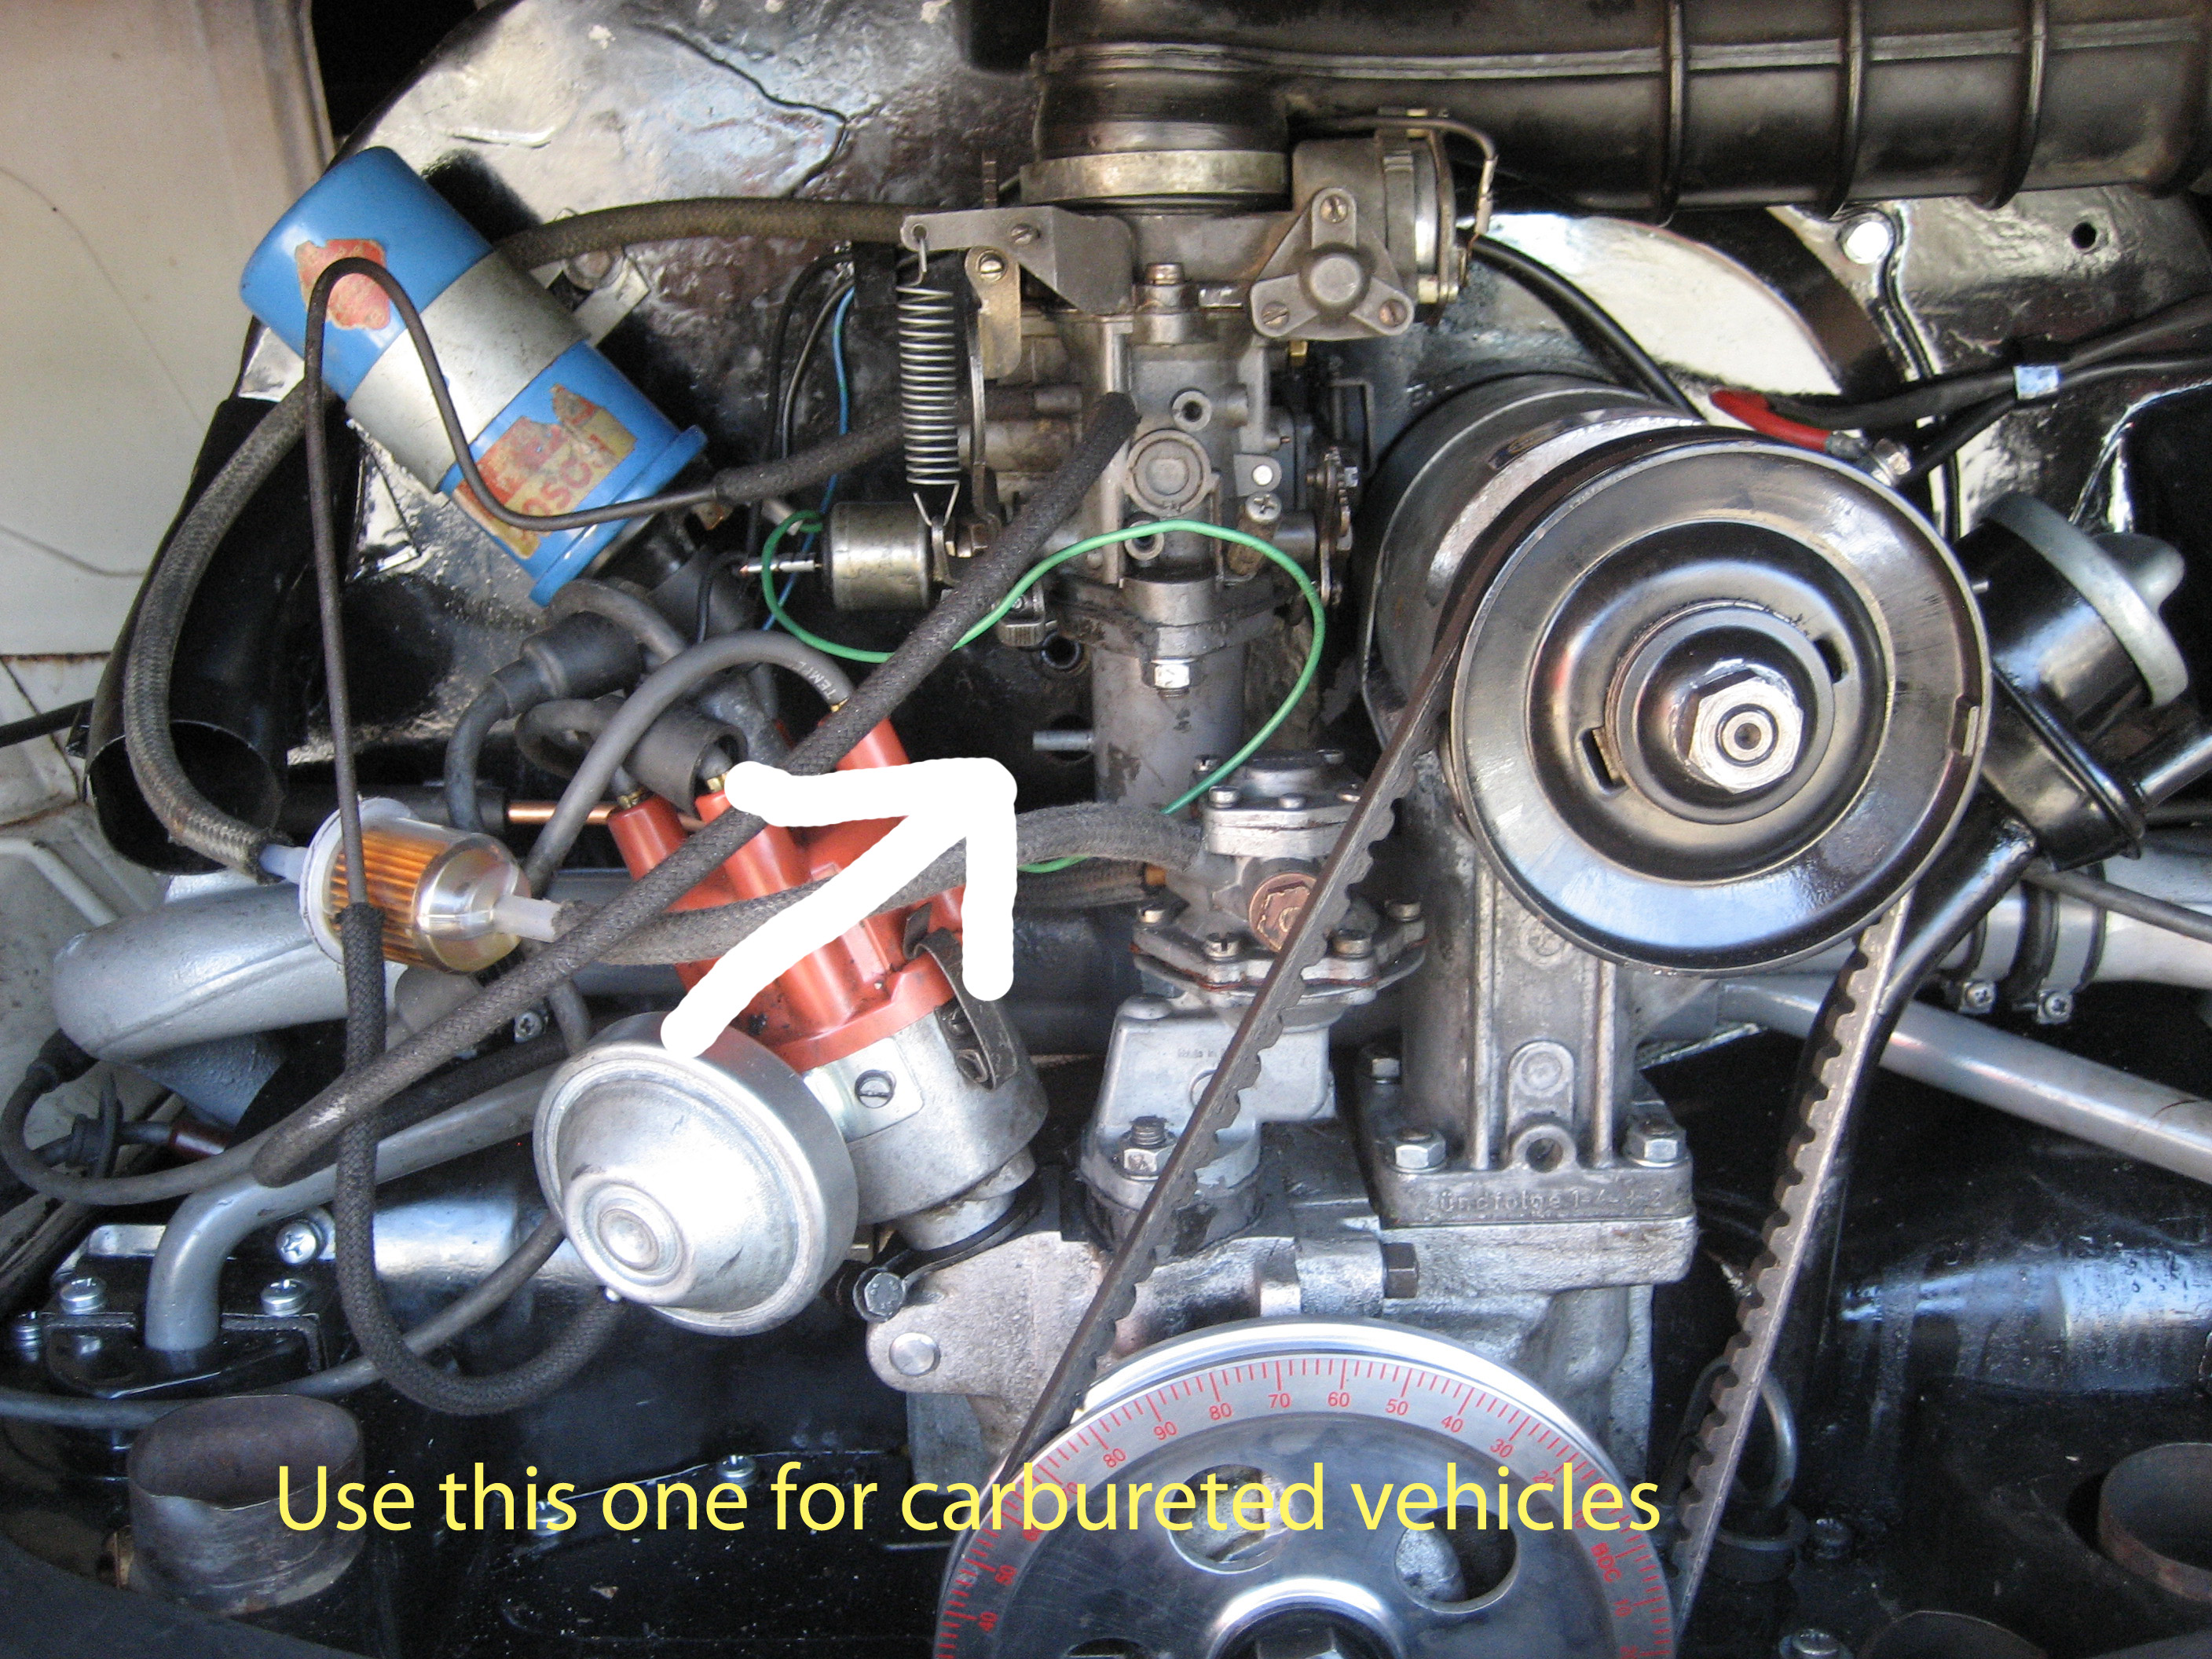
Any intake port will do. Some models have them on the left side of the intake manifold. Realize intake ports are below the throttle plate thus any port on the carb that pulls air from below the throttle plate will work. For instance, the vacuum advance port on the left side of the carb is not a viable place to check for intake valve leakage but the port that feeds the vacuum retard will work fine. If you can’t tell, look at the casting on the surface of the carb (looks like the top of a tunnel) that serves as the channel for the air to flow to the port. If it’s fed air from below the throttle plate, it’s viable for intake leakdown testing. So if you have no intake ports for checking, try to find one on the carb. But it must be fed air from below the throttle plate. Blow any beckoning port to make sure it’s actually drilled. It’s possible it might not be.
The best thing do do is place a smoking wooden match, cigarette, a flaming lighter or a punk (for lighting fireworks), or burning incense (maybe that’s the best thing!) next to the port and see if the smoke moves or the flame wavers. Watch out for gasoline. This is safe if there’s no liquid fuel in the area. Any movement of the smoke or wavering of the flame tells you there’s an intake leak. Properly sealing engines will show no leakage, no wavering, no flickering. It can be a judgement call, but you really should have zero leaks on a good engine.
Here’s a leakdown tester …

You’ll need to hold the engine with a wrench to maintain top dead center (meaning both valves closed) doing the test. With solid lifters, you can take off the rockers and all valves will be closed regardless of engine position but do your you best with the wrench method, holding the engine at TDC for the given cylinder if you have hydraulics or you’ll have to take every single lifter out to empty them of oil to enable adjusting.
You don’t really need the gauges, all you need are your ears. This one actually reads backwards – the scale on the gauge is wrong (bad is good and good is bad) or they’re installed wrong. I just use the hose and my ears. You don’t need a big air compressor for a source but you need enough air to for the test to be able to turn off the compressor so you can actually hear any leakage in the motor and still have the air last long enough feed the cylinder long enough to hear it. Realize, even a perfectly sealed cylinder will leak through the ring gaps so you may need to listen fast if your compressor has a very small tank.
Intake System Air Leaks
But first thing you need to check after you’re sure all tune up basics are right (and assuming the vehicle will idle) when you have intermittent starting problems on a fuel injected type 4 bus is for air leaks. There are several places on these engines that are prone to leakage that are often ignored or not assembled with the care it takes to make sure things really seal.
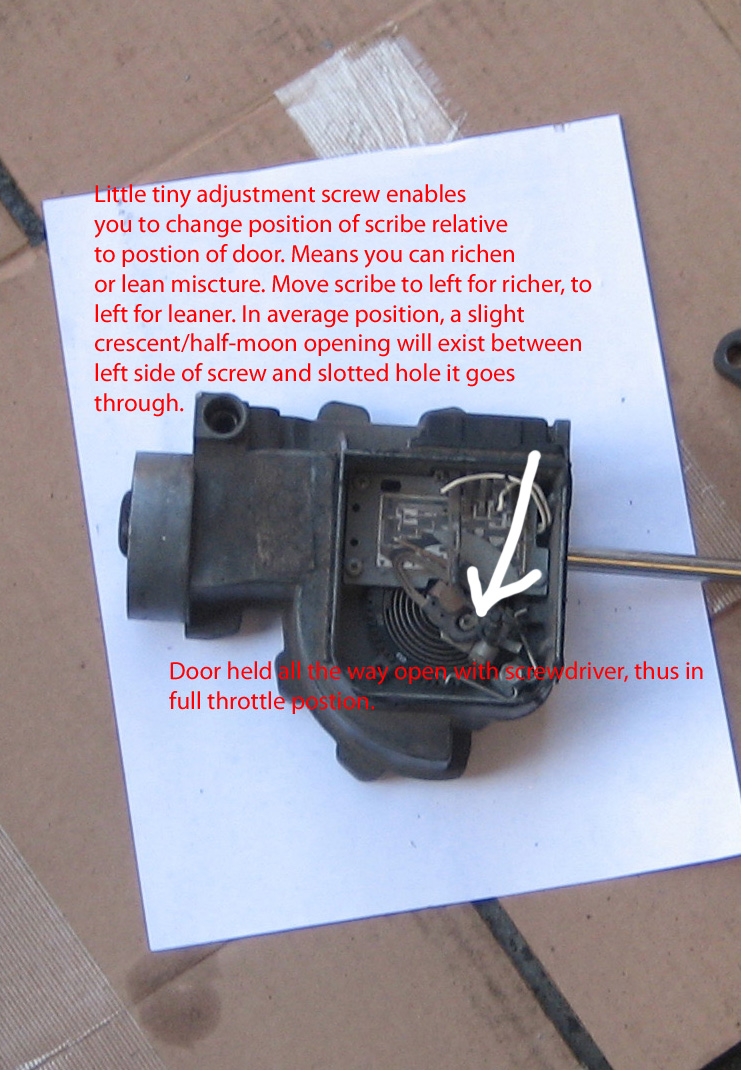
The thing is this … every engine is a pump. It’s the pumping action of the engine that draws the air into itself to mix with the fuel introduced from the injectors. The air begins it’s path by entering the air cleaner. After the air cleaner, it passes through the spring loaded door in the air flow sensor. The more air (higher RPM. ) passing through the door in the air flow sensor, the farther the door opens as the force from the air overcomes the force of the spring. Moving with the door is a scribe that slides across the surface a potentiometer. In real time, the computer is reading the electrical signal from the potentiometer. The higher the RPM, the farther the scribe moves (with the door – it’s attached to it).
With the key on, the two contacts, that should not be touching when the engine is not running, are the fuel pump contacts so the fuel pump will not be on. With the key on and the engine not running, rotating the scribe assembly counterclockwise by hand will allow the contacts to touch and you should hear the fuel pump go on. If it’s on as soon as you turn the key on (do you hear it?) with the engine not running, and the contacts are touching, bend then away from each other so there’s a tiny gap. The pump should go off. The exact amount is not critical – just a millimeter maximum. That’s how it’s supposed to be. The reason is to prevent the engine from filling up with gas when the key is left on. Injectors are not perfect. And if a single cylinder fills with gasoline, upon cranking, the engine my lock up when the valves close for the cylinder filled with gas because liquids, unlike air, are not compressible. Many batteries have been jumped to try to get a car to start in this condition. The worst thing that can happen in this condition is one can actually bend a connecting rod. If you think you have this condition, pull out the spark plugs and crank it. That’ll clean it out.
If the pump is on and the contacts aren’t touching, you probably have a wiring problem (really a rigged repair). This is something you can probably live with if you don’t feel like dealing with it, but just don’t leave the key on for even a few minutes as this may flood the engine and if left on for a real long time, you could actually fill the engine up with gasoline. Knowing about the above is helpful in diagnosing the fuel pump. If you suspect the pump is not working, turn on the key and move the scribe assembly counterclockwise. The pump should go on. If it doesn’t – relay, wire fell off, pump failure. This is assuming there’s no rigged wiring – meaning the switch in the photo worked normally before your concern about the pump.
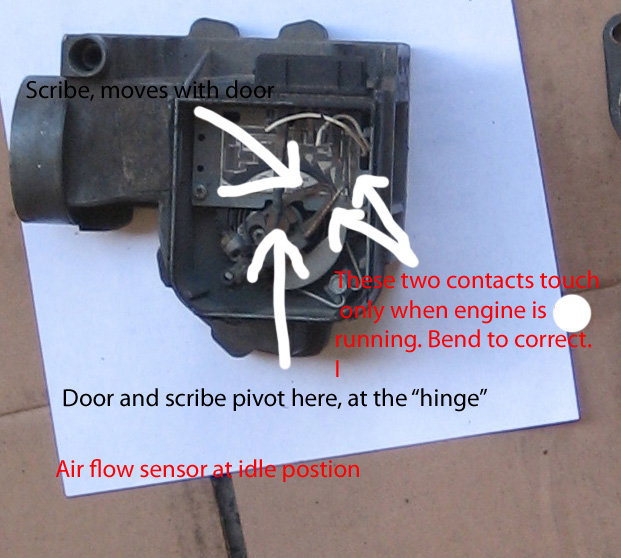
With the key on,engine off, the fuel pump should go on (you’ll hear it) if you move the mechanism to the left. If the mechanism is at rest and the key is on and you hear the fuel pump, bend the contacts just enough so it goes off. If the pump stays on even when the contacts are touching, the wiring is wrong somewhere or … something else. Regardless, if it runs, no biggie. Just don’t leave the key on for long or you can literally fill the engine with gasoline.
This translates to a changing injector pulsewidth (time open) and when the injectors open relative to TDC. The computer can only calculate proper fuel amount by the air actually “sees” and the only air it sees is the air moving the door (and thus moving the potentiometer scribe) in the air flow sensor, that’s it. That’s how fuel injection on your bus works. It’s really simple and when right, the vehicle will start right up every time and run great. This is because the engine is operating with the proper air/fuel ratio. If there are leaks in the intake system – in between the engine and the air flow sensor) or the valves (intakes) – the air/fuel ratio will not be right and the vehicle may run fine, but when starting, the ratio must be just right will very little margin for error in the air/fuel ratio or a no start condition will result. And realize, unlike a carbureted vehicle, pumping the gas pedal does NOT result in the introduction of fuel into the engine. It does absolutely NOTHING – starting is totally dependent on the air the computer is measuring and thus matching the proper quantity of fuel too. The only time fuel is introduced is when the engine is being turned by the starter or actually running. Since cranking speed is only about 600 RPM, just a bit of fuel is needed to start the engine. But with little fuel needed because of little air flowing since it’s such a low speed, any error in the air/fuel mixture has a huge effect. With air leaks, the air flow sensor feels less that the actual amount of air the engine is pulling in and matches the fuel to that lesser amount of air and thus too little fuel is being introduced at cranking speed and the vehicle won’t start. Continued cranking adds liquid fuel that does not burn (improper air/fuel ratio will not ignite) to the engine but also floods (wets the spark plugs) but can also help promote starting as it accumulates, or make you have to wait awhile (flooding). Every failure is different but nevertheless, all the same.
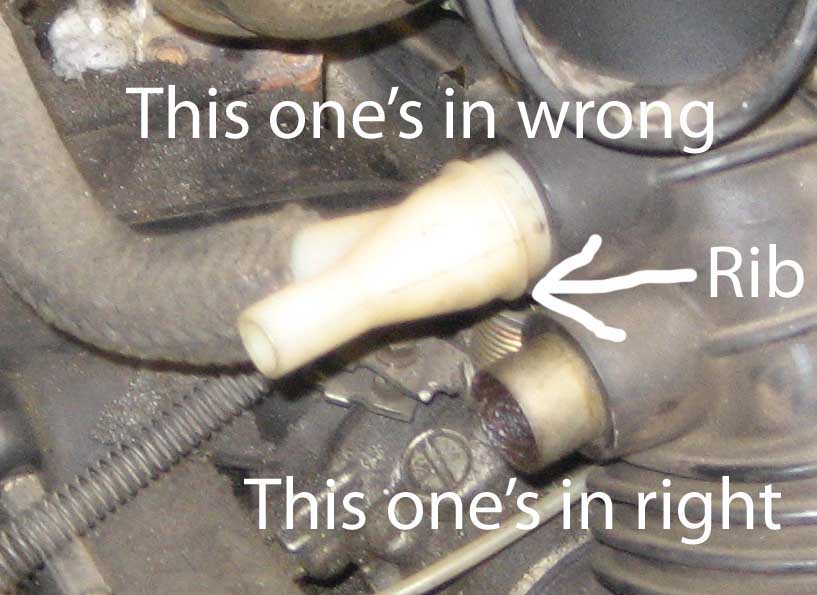
Between the center section of the intake manifold and the air flow sensor is a boot. It’s really just a hose to join the sensor to the center section. It has two pipes – one metal and plastic – that insert into it. Each pipe has a rib around it’s center. The ribs engage into a groove in each respective hole in the boot. They hardly ever are thus the pipe(s) are loose and thus, you have an inlet for air to be drawn into the engine (a pump) that does not go through the air flow sensor.
And thus, the air flow sensor does not “feel” it, it only feels what actually goes through it and thus the computer does not know about it so it doesn’t open the injectors properly for the conditions and thus the vehicle does not start. Until is just feels like it. Fuel piles up in the cylinders as one cranks a non-starting car and so it finally starts. Or floods. Every vehicle behaves differently.
The are other places on these engines that commonly leak and contribute to the starting problems. Another is the the hose from the auxiliary air regulator to it’s respective pipe at the boot. Also the hose for the brake booster and the anti-backfire valve coming from the small boot on the driver’s (left) side of the center section of the manifold. They have to be tight, even with a new boot (they’re either real old or reproduction meaning loose) so a big splash of Gasakcinch on the boot and each hose is a good idea – makes them tight after it dries. Hose clamps may be necessary. If the boot is falling apart, start with that though. The check vavle for the power brake servo must work properly and leakage in the servo diaphragm also translates into and air leak but this leak usually causes the vehicle to die only when you put the brakes on.
The other place for leaks are the intake manifold gaskets. They seal the end of the intake manifold directly to the head.
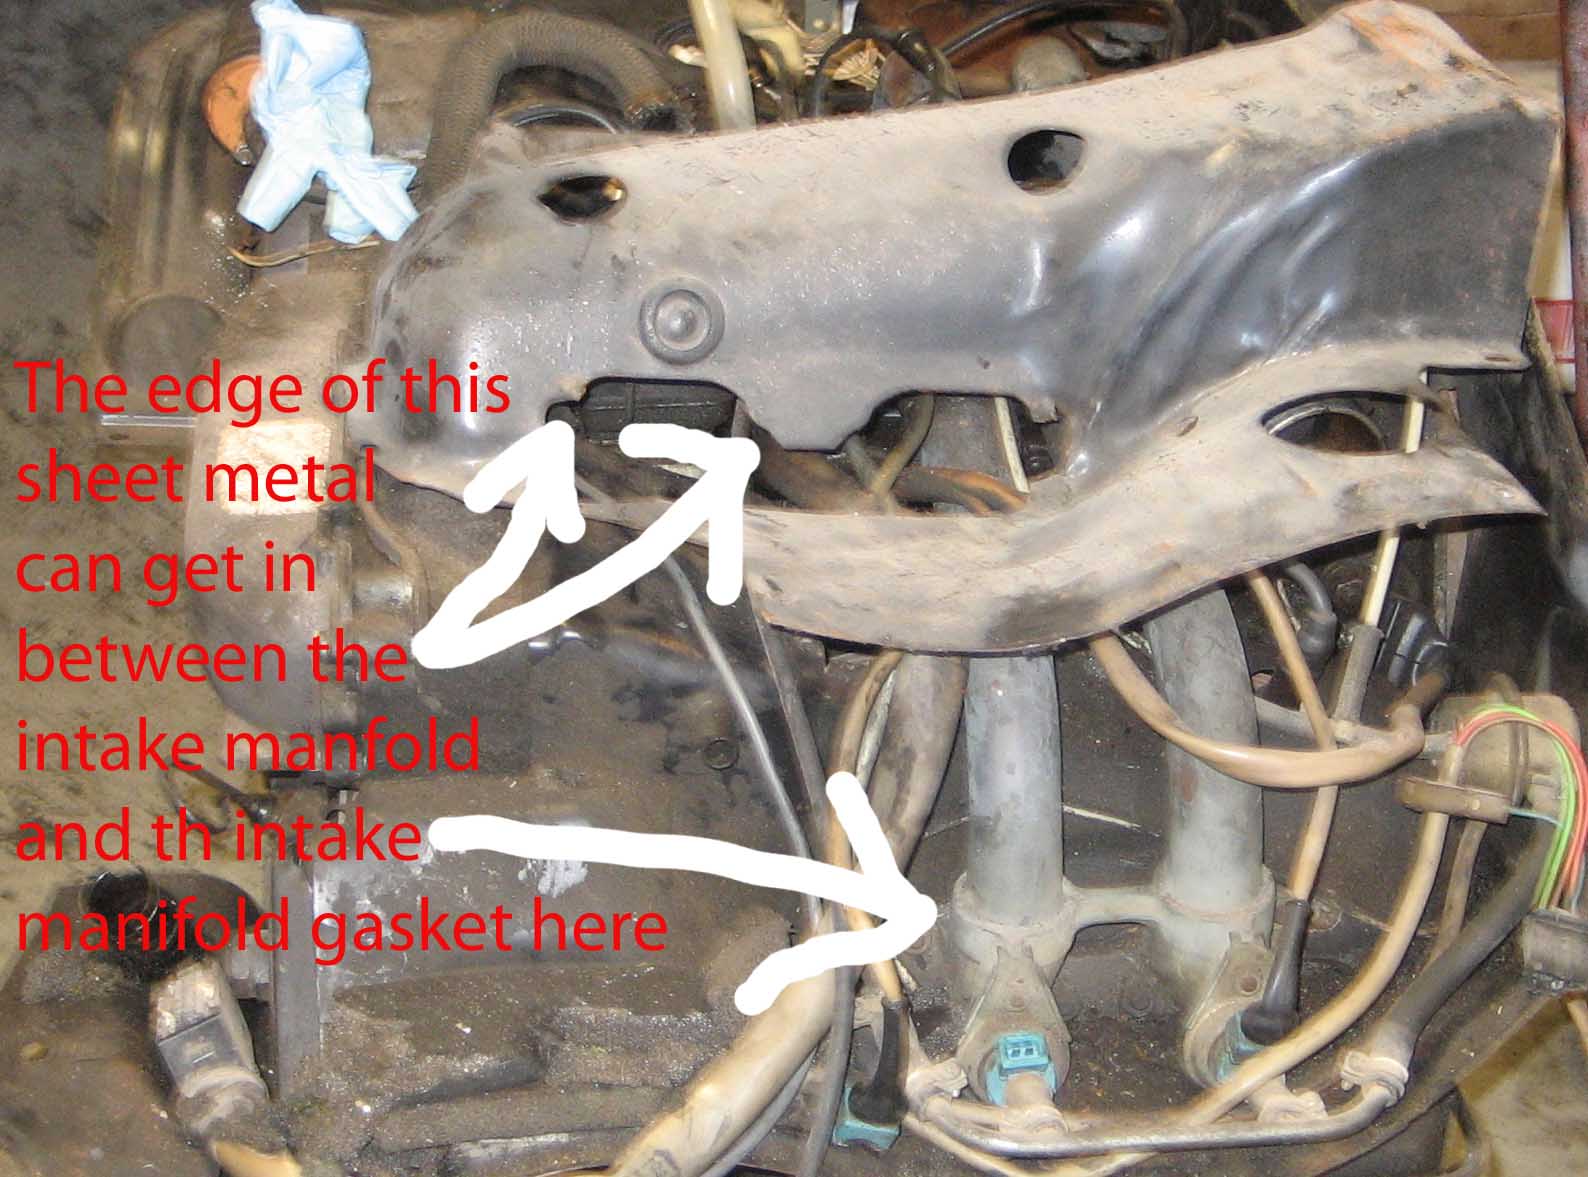

But the number one place for starting problems on a fuel injected type 4 bus engine is the intake gaskets. It’s just so common – jeez!! If you think these gasket may be leaking, trying tightening the manifold nuts. They need occasional maintenance tightening and tightening them just might fix your bus. And tightening is just one of the many things you can do during a tune-up on a no-maintenance bus with hydraulic lifters and electronic ignition and those spark plugs that last ten zillion miles.
You may wonder why it took so long to get to this point. Well, if you understand how the thing works, it makes it easier to understand why it doesn’t work.
How do you find the air leaks? Simple – with the engine idling, spray carburetor or brake cleaner wherever you suspect a leak. The idle speed should change – up or down – it doesn’t matter. With a leak, flammable brake or carb cleaner will be drawn into the engine where it’s burned and the idle speed will change.
But be careful – a stray spark from a plug wire can ignite the carb/brake cleaner. Incidentally, this is one reason you should always make sure you have nice spark plug wires on your vehicle – the better the wire, the more likely the spark will make it to the spark plug rather than igniting a minor gasoline leak on it’s way to the plug. ALWAYS use BOSCH plug wires, or at least plug wires that actually have wire inside. Many plug wires offered from the many sources vying for your $$$$ offer cheaper wires that don’t have any wire inside but rather carbon or graphite impregnated or filled this plastic tubing. These wires have very high electrical resistance and thus make it easier for the spark to jump out through the insulation before it makes it to the plug. Technically, these wires are NOT FOR THE VOLKSWAGEN!!
So have a water hose with a nozzle on the end with the water on so it’s ready for immediate use. Fire extinguishers are fine but they make a real big mess!! Avoid!!! The ingredients in fire extinguishers are real corrosive and they will mess up everything they come in contact with. Use water but trust me – fire is highly unlikely to happen but with water available and quick action on your part, the chances of any damage whatsoever are highly unlikely. It takes time to burn things. Have hose right next to you. If you have a fire, be happy it happened now rather than while you were driving the vehicle and you’ll definitely find a bad plug wire. However, if he plug is not firing as in fouled or just “bad”, the spark may jump out of the wire prematurely too and cause a fire.
However, sometimes, an air leak doesn’t seem to respond to carb or brake cleaner pr sometimes intermittently. I don’t know why and you can use many cans of brake cleaner to find out where it is or only receive inconclusive data. Long ago, there was a single port 68 bus. Hydrocarbons were off the chart – it would not pass a smog test. I knew it had an air leak but I could not find it so I duct taped the top of the carb – air tight, took off the rocker arms and plugged any vacuum outlets on the manifold and carb except one. I sprayed WD-40 at the intake gaskets. Blowing through a hose attached to one of the ports on the carburetor resulted in bubbles being blown in the WD-40. I’d found the leak. It was caused by hairline crack around the mating surface of the manifold where it mates with the intake gasket. Very, very rare – never rule anything out. There’s always a reason. Sometimes you just need thicker gaskets (poorly made manifolds) or even 2 gaskets – original genuine VW single port type 3 dual carb manifolds comes to mind.
Don’t forget to check the short hoses that join the legs of the manifold to the center section. Putting hose clamps on them is a good idea whether you think it needs it or not.
Tighten the head sensor while you’re at it.
It may be illegal in your state or country, but blocking the EGR valve with a piece of metal (thin piece of a metal to block entry to manifold) inserted between the intake manifold and the valve (just loosen, don’t remove, the allen bolts and slip it in) can often help a vehicle that runs fine but stumbles when taking off from a stop – hesitation. Just as an air leak adds unwanted air to the engine, a leaky EGR valve allows exhaust to enter the intake system when it shouldn’t. And the EGR valve is designed to only allow a metered quantity of exhaust to enter the intake system between idle and full throttle – not at idle or full throttle. With wear due to age due to the nasty environment the this valve operates in (hot exhaust passing through it), leakage at idle is common and this causes hesitation when taking off from a stop and possibly causes a lean mixture with leakage at full throttle. You can take the valve apart attempt to improve sealing at idle by grinding – lapping compound and a drill. Takes time – very hard material.
Basically, do anything you can to minimize air leaks – proper, careful fitting of parts, sealant when you think it’ll help and clamps when necessary.
So many variables!!!
That’s all I know that I can put in words.
By the way, there’s a donate button on this site and you won’t find this stuff anywhere else and it took a real long time write it.
This entry was posted on Tuesday, May 27th, 2014 at 6:49 am
You can follow any responses to this entry through the RSS 2.0 feed.
