Stupid brake problems …
Brake Pedal Freeplay
Brake pedal freeplay is simply the distance between the brake pedal pushrod and the piston it pushes against in the master cylinder when the brake pedal is at rest. Correct pushrod freeplay is exactly one zillionth of an inch. Read – it’s not supposed to touch in that touching is like you having your foot pushing on the pedal a teensy bit all the time. Universal rule of thumb – it just can’t touch and the less the free play, the higher the pedal. Just push on the pedal and feel the easy movement turn into resistance by the spring in the master cylinder. Ignore the resistance of the spring on the brake pedal itself. You should feel a little bit – about 1/8′ to a 1/4″ inch or so at the end of the pedal. This translates into a small fraction of that between the pushrod and the piston. It’s teensy, you don’t know what it is, but you know it’s there. That’s it.
Brake pushrod freeplay is adjustable using the brake pushrod on all rear engine models except for Vanagon.
Vanagon Brake Pedal Pushrod Adjustment Explained
Vanagon free play is only determinable by placing a piece of clay on the piston, installing master on booster (no bleeding, no other connecting of anything is necessary), and removing and measuring the thickness of the clay. That’s the freeplay. Put a teensy bit of oil on the piston or the clay so it won’t stick and comes out without deforming so you can get an accurate measurement. That”s how you measure Vanagon brake pedal freeplay. You’ll have to do it a few times to figure it out. I’ve never tried it.
Well, actually, that’s not all the freeplay. The total freeplay is the distance measured with the clay and the play (wiggle) between the pin and the yoke and the pedal assembly and it’s bushings. Add all those distances up and that’s the total freeplay which translates to that little bit of easy motion you feel when you push lightly on the brake pedal before you feel any real resistance.
So you don’t need any clay because there’s no real adjustment. Yes, you can adjust the pushrod but you can’t alter freeplay. All the adjustment is there for is to ensure that the hole in the brake pedal lever and the hole in the yoke at the end of the pushrod line up so you can install the pin that links them together. Nothing more. You don’t even need to measure it – just adjust the length of the rod so the yoke lines up with the hole in the pedal lever to make it easy to install the pin which results in no preload that may cause the pin to bind. That’s it. Don’t get anal regarding binding – just make sure it goes in easy. If you do this and measure, you’ll get exactly the same value for length it tells you to adjust it to in the Bentley book. So if you have a brake problem in a Vanagon and think the pushrod needs adjustment, think again unless someone else has previously “attacked” the vehicle but this is an unlikely place to wage war. There’s plenty of other poorly understood, easily accessed, commonly plundered battleground sites on an old Volkswagen, no matter how pretty the vehicle is.
Freeing Up a Sticky Brake Caliper
A sticky brake caliper causes the front brakes to pull to the side without the sticky piston or the side with the least sticky pistons. Sticky pistons to push the brakes on because they’re … stuck. The usual cure for this is to buy a new or rebuilt brake caliper but there’s a way to avoid spending one cent to fix this problem provided you have zero brake fluid leakage at any piston. Rear engine Volkswagen vehicle front brake calipers seldom leak – the problem is usually sticky pistons.
You must have a working brakes in that when you push down on the pedal, it doesn’t go the floor and the front brakes actually receive pressure from the master. This is because you need to use the brake pedal to free the piston.
You can determine which pistons need freeing by removing the wheels, and trying to push them back one by one with a large screwdriver. If you to push too hard, you can bend the rotor. They should move relatively easily.
When you find a stuck piston, remove the brake pads, then remove the offending caliper (leave the other side on the vehicle – one caliper must be on at all times when doing this) without disconnecting the hose and place it on a cardboard box so it won’t hang from the hose. You’ll need to disconnect any hose securing clips so you can freely handle the caliper. For Vanagon, remove the upper ball joint nut to drop the bracket down and free the hose so you can handle the caliper. This has NO EFFECT on alignment with a decent ball joint.
You’ll need an old brake pad or a piece of wood that is big enough to cover a caliper piston and a C clamp that will enable you to secure the old pad or wood over the piston that does move (if you have 2 stuck pistons on one caliper, it doesn’t matter which one you put it on) to prevent it from moving and take up enough space between the pads so the stuck piston can’t move out so far that it comes out of the bore. 1/2″ movement is safe. It can be a hassle to put a piston back into the bore. Avoid at all costs.
After you secure one piston from moving, push down on the brake pedal – pump it few times and eventually the piston will likely move. You may even hear a pop as it finally jumps out of the bore. Go easy – you don’t want it to come out completely.
After it comes out a bit, you need to push it back in – it’s unlikely you’ll be able to do this with anything other than the following contraption ….
Disc Brake Alert …
When bleeding calipers with two bleeder screws, use the top one if you have two. Air in the caliper floats to the top so that’s where you bleed. If you bleed the bottom one, expect to be bleeding for the rest of your life. You never need to touch a bottom bleeder screw except to make sure it’s tight. Some vehicles may have a plug on the bottom. Again, just make sure it’s tight.
If you have only one bleeder screw and it’s on the bottom, that caliper should be on the other side of the vehicle but you can bleed it properly without moving it …
with brake fluid hose attached and pads still in, unbolt and slide caliper off vehicle. Place a piece of wood or the handle of a crescent wrench handle – anything – as a spacer between the pads to prevent them from moving so much that you risk a piston coming out of the bore and leaking, requiring … finesse to situate it back in the caliper. Your spacer should be about as thick as the rotor.
Now hold the caliper so it’s situated as if it was attached to the vehicle with the bleeder screw up and bleed. Keep the fluid off the pads! A hose is helpful but a bit usually comes out between the bleeder screw and the caliper itself too. This works. Just don’t forget next time.
If you want a really good bleed that makes micro difference, after you bleed your calipers in-situ, take them off and hold them nearly horizontally with the bleeder at the high end of a minor slope and pointing up. Now open the bleeder screw – no pumping, just open it – and observe – you may see a 2 0r 3 tiny bubbles come out of the bleeder screw. These bubbles occupy the very top of the caliper and due to imperfect manufacturing, the void they occupy, if you have them, should not be there – it’s an imperfection in the caliper. I bet they all have it.
How to Bleed Brakes All By Yourself For 2 Bucks Plus Fluid …
Obtain about 4 feet of fuel hose that fits snugly over a bleeder screw. Carbureted bug fuel hose works well.
Pick the wheel you want to bleed.
Loosen the bleeder screw you want to bleed then finger tighten.
Place the end of the hose over the bleeder screw so it loops up about 8 inches above the bleeder screw/ Use anything you can to hold the loop in the hose secure enough so it won’t fall while your bleeding. Aim the end at the oil pan.
Loosen the bleeder screw at least 1/2 turn.
Pump the brakes 8-10 times about once every 2 seconds. Too fast and you can make bubbles and defeat your purpose.
Close the bleeder screw by hand and drain the hose. Even if you pull the hose off with the screw open, don’t worry about air. Just finger tighten as quick as you can, then tighten with a wrench.
You only have to bleed the the axle you’ve worked on. If you’ve only changed the master cylinder you need to do them all except Vanagon because the master is so high that the hoses do not have the opportunity to drain. See Vanagon specific section below for more info regarding this topic.
Go on to next wheel. Start with left rear wheel? Old wives tale. Well, the right rear brake hose is usually the longer of the 2 rear ones (it has the potential to hold more air) but it really does’t make that much difference so if you’re reading this and my simple mention that it makes a teensy difference probably isn’t going to solve your desperation headache so keep reading – relief is probably on this page.
This is a foolproof way to bleed the brakes. Realize the length of hose between the top of the loop and the bleeder remains full (it’s now a reservoir) after you’ve pumped the pedal a few times. The other side of the loop empties into the oil pan. When you release the pedal, the system wants to pull air in through the hose. But the fluid is in the way and thus the fluid instead of air moves into the wheel cylinder or caliper.
This is also superior to the “one man bleeder” tool in that this tool can tend to pull air instead of fluid into itself between the bleeder screw threads rather that only suck fluid from the system because the air is easier to move and the backflow from the hose flows between the threads and thus evacuates any potential for air coming into the system. And Vanagons practically bleed themselves because the reservoir is so high.
This method works on all models of rear engine Volkswagen automobiles. If you bleed your brake like this and they still suck, keep reading.
Master Cylinder
All hydraulic systems work on the 7/11 principle – if you insert a straw into your mouth and take Big Gulp of your favorite beverage and without letting the straw empty out and you put your finger over the end of the straw … and blow – you really can’t – the fluid beverage won’t compress – it acts like a cork in conjunction with your finger. Of course, if you blow hard enough, your beverage will begin to squirt out the end between your finger and the straw – provided you don’t loose the mouth to straw seal at the straw/lip interface and make a big mess that will leave bystanders looking the other way and more sensitive souls my even gag at the sight. Regardless, disgust will prevail.
If you had a perfect, unbreakable seal at each end and blew hard enough, the straw would explode. Fluids are incompressible.
Air behaves differently because it is compressible.
Think of this – imagine a cubic foot of air is composed of one trillion molecules.
You can force ten cubic feet of air into a 1 square foot container – air, and all gasses – helium, hydrogen, nitrogen, butane, lp gas – are all compressible. This makes it possible to force (squeeze) ten trillion molecules of a gas into a space that would only hold one trillion molecules without force (squeezing) – as it is just floating around in your living room
With liquids, it’s different since they’re not compressible – you can only put one trillion molecules of water into a one trillion molecule container, no matter how much you try to squeeze. In fact, if you squeeze hard enough, you’ll explode the container you’re trying to put it in, and that includes any container made of any material know to man. You just can’t squeeze water, or any other liquid. Including brake fluid.
That’s why we use brake fluid for brakes and that’s why when air gets in the system, we have a mushy pedal – we’re sharing the force imparted on the brake pedal between the air and the fluid. The air pocket in the system decreases in size as if it was a small air filled balloon as we push on the pedal and thus pedal movement that is normally translated into moving the brake parts via the fluid is being used in squeezing the air pocket smaller and this results in a mushy pedal and lower pedal before brakes actually begin to work if they work at all. It depends on how much air is in the fluid containing system.
The brake system in your car starts with the blowing into the straw – actually your foot on the pedal pushing a piston (or two for 67 and later vehicles) and thus pushing fluid towards the calipers or wheel cylinders and making their pistons move and thus moving the shoes or disc brake caliper pistons and thus the disc brake pads. All pistons at the wheels are schematically located at the same place as your finger on the end of the straw. The fluid doesn’t move much – it only moves towards the the wheels about 1 ” (a reasonable guess) due to you pushing on the pedal. When you take your foot off the pedal, the springs at the wheel cylinders push the pistons back into the wheel cylinders and the fluid moves towards the master cylinder that same 1″. If there is air in the system, you have to move the brake pedal farther to make the fluid move that same 1″. Master cylinder failure results in no movement of fluid to all wheels (pre-67) or at least one pair (one axle) of brakes. Every single part of the fluid system that is designed to hold fluid must have no air in it whatsoever with the exception of the area above the level of the brake fluid in the reservoir. No air anywhere.
With a dual circuit master cylinder, there are two pistons so there are two ways the master can fail. If the piston seals at the open end of the master fails (this is the piston the pushrod actually pushes on), fluid will leak out the end of the master or be forced into the reservoir rather than pressurize the front the calipers or wheel cylinders. The seals at the pushrod end of this piston fail, you’ll have fluid on the floor in front of the pedal assembly or on the ground for buses or in the booster if so equipped.
If the seals fail on the piston at the closed end of the master, fluid will be forced into the reservoir rather than the rear brakes. When this happens, the piston bottoms completely as it compresses it’s return spring and bottoms out at the closed end of the master. It makes for a rock hard pedal and it takes a lot of effort to stop the vehicle since only the front brakes are working. A bad booster can give you a hard pedal but it won’t be rock hard.
Wheel Cylinders/Drum Brakes
Click here for this
Brake Booster
The brake booster helps you push the brake pedal down. It will in no way, shape, or form solve a low pedal problem – ever.
To check it, you push down on the pedal and start the engine. The pedal should drop. If you have a hard pedal and this doesn’t happen, you may have a bad booster or a bad one-way check valve at the engine. Disconnect the hose from the firewall and blow then suck on the end of the hose at the engine end. Air air should not be able to move towards the engine. You should be able to blow through the hose away from the engine. With a bad booster, your engine can die at idle when you put the brakes on because the rubber, drum head-like diaphragm can tear causing an air leak for the engine – it’s just like removing a hose from the engine.
Vanagon Low Pedal Cure: Volkswagens’ Primitive Anti-Lock Braking System
So you have a Vanagon and you’ve bled your brakes with a friend, used the $2 hose method, paid a shop to pressure bleed the system or all of the above and you’ve replaced every single part you can buy and it seems no matter how many gallons fluid you bleed and you’ve properly bled the disc brake calipers as described above and you put in new hoses, wheel cylinders, calipers, master cylinder, boosters, special brake fluid an still nothing – spongy low pedal – you’ve got air in the system … maybe.
If you’ve bled the calipers correctly, there’s no air in them unless the manufacturer made the interior of the caliper wrong in that air meant to be bled is not accumulating near the top bleeder screw due to the interior of the caliper being configured wrong. Unlikely – forget about it. So it’s probably not the calipers. You’ve been pouring all that fluid in the master – that’s not it. The wheel cylinders are too simple inside to fail to bleed. Although don’t rule out that the hole for the bleeder screw is not drilled all the way through into the cylinder – it’s happened.
There’s only one thing left – the proportioning valve.
The process of elimination will rule it out or not. The way you do it is to remove it entirely and connect the two metal lines together via a short metal line and two couplers. You can get this at any generic auto parts store.
If you do this bypass (bleed rear brakes after you do this) and you have a hard pedal, you’ve found the problem and it does happen but seldom and I’ve only seen this on air-cooled Vanagons but newer ones may do it too. Old buses have these valves and I’ve never had a problem with one ever. There’s plenty of used Vanagon ones out there – including yours. Your odds of finding an known good original working valve are slim but you’ll probably have a positive result with a used bus one. I recently used one from a 73 and it’ worked perfectly. It had a bleeder screw – I didn’t even use it. Buses up to 79 will fit on the Vanagon and the specs for checking in the Bentley manual are very close for both bus and Vanagon. Rebuilding is an option if you can wait but realize there’s one part that’s simply not available to the dealer and that’s the rubber check valve for the ball valve part of the proportioning valve. If you’ve tried everything else and no solution, bypassing the valve will likely solve your problem until you find a rebuilt valve or find a good used one. They seldom go bad but when they do … brake fluid manufacturers rejoice until you find out it’s the proportioning valve.
Serious googling will result in very few rebuilders but they’re there.
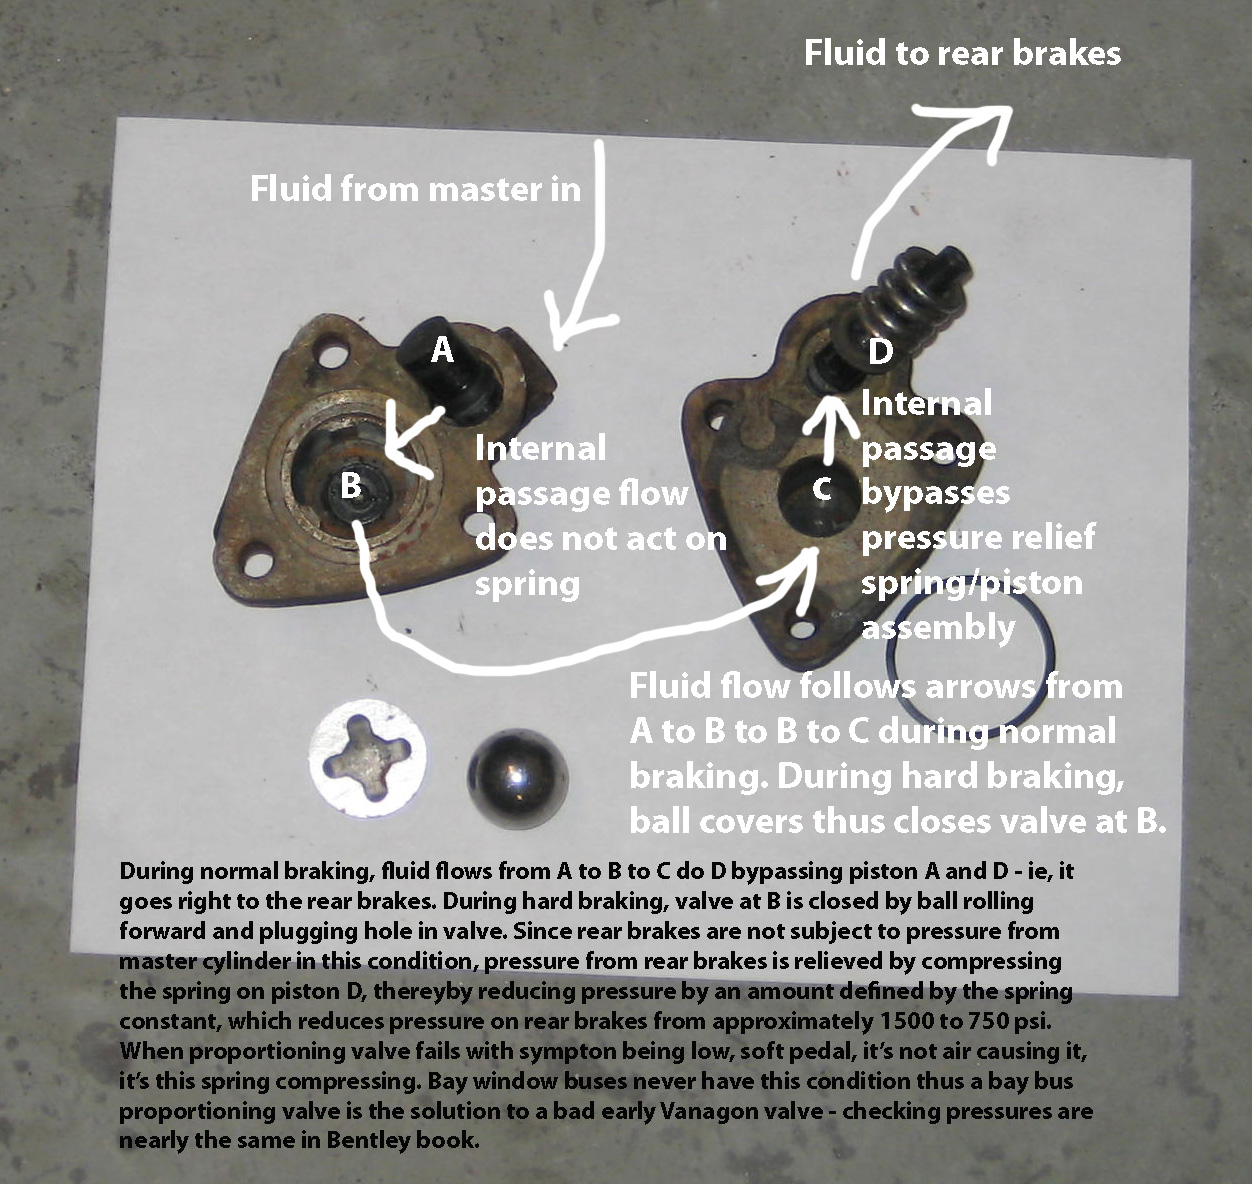
Testing the Valve
With the valve bypassed, with real hard “test” braking (nail ’em, but you’re testing – hard brake a few times until you hit them hard enough to hear squealing) you’ll hear the rears lock up – you’ll hear them begin to squeal. With the valve installed and working, you’ll hear the fronts lock up first. This means the valve is working correctly …
… modern vehicles with anti-lock braking systems (ABS) use a sensor to determine how slow the wheel is turning during braking. If it’s real slow it’s likely ready to lock up at any moment. The signal from the sensor then tells the ABS computer the wheel is ready to lock and the pressure from the master cylinder is relieved for the particular wheel that’s ready to lock up and the brakes are off for that wheel for that moment. With locked up wheels, there is no friction – no braking – just like a pebble sliding across an ice pond. When the rear brakes are locked up and the tires are sliding on the pavement, it’ s as if the rear brakes are not even on. But the front ones will be. Now think of the same condition for a bicycle – front brakes on aggressively, rear brakes not on at all. You may crash due to a combination of the bike wanting to flip over and it trying to spin where the front steering pivot is the axis for the spinning. The exact same forces acting on the bike act on the car with locked up rear brakes and it’s dangerous but this is only a factor when you really slam on the brakes. For normal driving, the proportioning valve rarely even has to function – it only works when you really nail the brakes. For some vehic les, it may never have even been activated during it’s entire lifetime. Same can be possibly said for ABS systems (they’re so sensitive ).
You can think of the proportioning valve as being a primitive form of ABS for the Vanagon (all buses with disc brakes actually). But instead of sensing the rotation of the wheels, is just reduces the pressure on the rear brakes just enough to keep them from locking up when the pedal is being pushed down as hard as the driver can. It just limits the pressure to a the amount pre-determined by the engineers at Volkswagen long ago. Realize, the stronger the driver’s leg, the harder the brakes go on. There’s no limit how much pressure the master cylinder can make (other that forcing fluid out the seals with pedal pressure only Andre the Giant could develop) so the proportioning valve allows for a limit, but only for the rear brakes.
So with the rear brakes unable to lock up in an emergency braking condition, the fronts can lockup. And like a pebble sliding across an ice pond, the fronts are not really doing much since they’re sliding and the rears are really doing the stopping preventing your Volkswagen bicycle from doing what a bicycle does when you slam on the front brakes and not the rears when you’re going 40 miles an hour – the car keep may want to spin with the front as the axis and if it’s going a lot faster than a VW bus is really supposed to go, it can literally flip end over end.
And speaking of the bicycle flipping – the 2 forces that create the tendency for the bicycle to both flip and spin are magnified many times by something else that is very common – the slamming of the suspension where the front end of the vehicle is visibly and obviously lower in the front than the back. The truth is, slamming the front end of a car does the opposite if making it handle better and it makes the vehicle dangerous and unstable, particularly on buses. And putting smaller tires on because ???? With a significantly smaller patch of rubber mating with the road – less friction(pebble sliding across an ice pond) – when making a turn, wants to go straight (less friction, Issac Newton) and slamming just magnifies the problem. A slammed bus at 50 miles an hour making a gentle lane change on the freeway can literally scare the hell out of you because it feels like it’s gonna roll. Keep it level!!.
So if you want to make a Volkswagen handle better, go ahead and lower it but make sure it’s level. You’ll be a lot happier and it’ll handle like a Porsche. Of course, adding about a 50 to 80 pound bag of cement to front for anything but a bus (buses are relatively heavy in the front compared to non bus models but I guess there’s room under there) really helps too. Ask yourself this question – if a car handles better when the front end is slammed, how come not a single one of the super car manufacturers offer new cars that are slammed? Because of … what I just told you. And if you want the closest thing to a 911 for handling, think Super Beetle. The front and rear suspension are exactly the same as a 911. Lower a Super Beetle but keep it level, don’t make the suspension too stiff (stay away from massive sway bars), build a fast type 4 engine for it, don’t put massively wide tires and wheels on it (if they won’t fit behind the lip in the fender, they’re too big for the capability of the steering, and big tires need more horsepower to turn them) and you will go fast.
Vanagon Master Cylinder/Booster Replacement
They can leak internally or from the open end into the booster. If the booster works, and it has fluid in it, take it off and drain it. With master cylinder removed, you need to remove the 4 bolts/nuts that hold the pedal assembly to the body. Lift the assembly high enough to reach around to booster securing nuts and hassle it out. No dashboard removal is required. It is required if you find a need to remove pedal assembly.
If you have no other problems with your brakes other than the master, you only need to bleed at the two brake lines at the master. Put a rag under one pipe to collect fluid, pump a few times, loosen pipe end until fluid flows slowly, and close. Repeat for the other pipe. If you have no other problems, you’ll have high pedal and you’re done.
If you have a low pedal and no leakage it’s can also the master. The master can leak internally in that brake pressure from one piston leaks past it’s seals and into the reservoir. This drastically decreases the pressure to that brake circuit and make for a low, hard pedal with the engine running and thus the booster working.
If nothing else is wrong and you have a low pedal, it’s likely the proportioning valve. See above for how to check it.
Changing the Fluid Hose From the Upper Reservoir to the Lower
Reservoir on Bay Buses, Particularly Those With the Upper Reservoir Below the Dash If You Don’t Have the Original Part
This is applicable to all master cylinder reservoirs in that the same physical conditions apply but is specifically for buses that have the master cylinder reservoir in front of the steering column.
The easiest way to successfully change this hose if your original plastic hose is damaged and MUST be replaced is start with thinking of walking down a trail from the top of a hill. It’s all downhill except it’s not – there will be places where the trail flattens, undulates upward then downward a bit, the steep down, flat, etc, etc but the trends is mostly downhill.
When replacing this hose, the only thing that is acceptable is all downhill – there can be no uphill – ZERO UPHILL. With an original hose, it’s impossible for any uphill to occur. If you don’t have an original hose, clear vinyl hose from Orchard Supply works but you have to work with it to obtain zero uphill and you may not be able to get it perfect.
If you do this it’s likely you probably need the rubber sleeve that goes between the hose and the entry nipple on the lower reservoir. It’s available aftermarket, I’ve seen it somewhere. You can make this sleeve out of rubber hose that fist snugly over the reservoir nipple. You’ll have to carefully grind the hose to decrease the wall thickness of the rubber itself until it’s thin enough for the vinyl hose to slide over it with a bit of WD-40 applied. You grind it with a bench grinder. A file may work but you’ll be busy with it for awhile. Make it so the end of the sleeve slightly overlaps the end of the nipple and thus tapers narrower to help initiate sliding of the vinyl hose. You may have to taper the surface of the hose itself also. The result will be very thin but the vinyl should fit snug, not loose. The best hose to use if German fuel injection fuel hose.
Realize, we’re not working with the perfect metric size hose with respect to the vinyl stuff from Orchard. Patience. You may have to make the rubber sleeve twice – or more. This works long term (decade(s)) if you do it right and it won’t leak. If you have the original plastic clamp, use it. If not, use a typical mini clamp gear clamp – the thinner it is the better. It won’t need to be real tight because the rubber sleeve will effectively seal the interface with little force from the clamp itself.
I’ve seen several vehicles of this generation with every single brake part brand new and still have a low pedal. The real problem was the new ill-fitted hose in the sense described above and this condition will not allow the brake fluid to effectively supply the master cylinder with fluid – air bubbles prevent it from filling. You can bleed it all day long and you will never have proper pedal height. You may find it impossible to to perfectly situate your Orchard Supply hose. You’ll have to look at it very carefully to see any bubbles. Something that helps a lot is to lift the front of the bus as high as you can with a jack and look at how the hose angle changes as you lift it, looking to see if it makes the perfect zero up hill, perfect downhill trail with no uphill undulations from the upper reservoir as described above. Try tapping air bubbles with your finger but hopefully you won’t have to.
You may also find, given that there is no perfect hose available at this time, perfect success in bleeding may only result with the front of the bus lifted way up high.
Braided Steel Covered Flexible Brake Hoses vs Stock Rubber Hoses
Braided steel flex are really nylon (I believe) or some kind of plastic hose, rather thin outside diameter (3/16″?), enclosed in a braided stainless steel mesh. The rather stiff hose already, and encased in the sheath, is supposed to expand less than stock rubber hoses when the brakes are applied and this translates into less pedal travel and thus a higher pedal. I guess.
But without the wire this hose kinks easily and even with it, the hose can be easily deformed by bending with your hand. Try to kink a rubber hose – you probably can’t unless it’s ancient. Stainless hoses tend to begin their downhill kinking routine right where the inner plastic hose mates with it’s end fittings. Not good. They seldom fit right – a little too long, a little too short – both these conditions only help cause kinking (and eventual profuse leaking you’ll seldom – like hardly ever – see with a stock rubber hose). For longevity (they’ll last so long, you’ll probably never have to think of them again after replacement), stick with the original. And once again, if you think this is cure for a low pedal, it’s not – you’ve got a problem somewhere and it’s not the “better” brake hoses. You may need brake hoses but stainless hoses aren’t a “cure”.
The only reason where steel lines are necessary is racing. Perfectly fitting hoses with no kink causing stresses for maximum brake pedal height under severe heat conditions where brake fade is an issue. Not likely driving a car with good brakes on any streets unless you like tickets.
Brake Hoses and Diagnosis of Pulling Due to Brakes and Alignment
What happens to a rubber hose after many years is the small inner passage begins to clog. It’s constantly deteriorating – the black stuff you see in your brake fluid reservoir is the rubber from deteriorating rubber brake hoses. A new set will likely last for at least a decade if you drive the car.
The severest thing a rubber hose can do is leak. This is very uncommon. Pinching it to much on a split bus front clamp can cause it. Otherwise, they just … don’t.
What they do do over a time is the interior can decrease in diameter due to swelling of the rubber on the interior of the hose. The brakes are applied and the force of the hydraulic pressure forces the swelled rubber out of the way and the brakes go on. When you take your foot off the pedal, the brake springs at the wheel cylinder push the cylinder’s pistons back in and the fluid moves towards the master cylinder. But with a “coagulated” hose, the springs are sometimes not strong enough to overcome the resistance required to force the fluid to expand a nearly 100% blocked hose. Jack up the car and pump the brakes a few times. Check wheels for free movement immediately. It they don’t, wait a few minutes. If the wheel is free then it’s probably the hose. Try it again then quickly open the bleed.er valve. If the wheel frees instantly, it’s the hose or sure. If not, it’s probably a sticky wheel cylinder piston.
Diagnosing Pulling and Veering
A brake hose that is compromised as described above can cause the brakes to behave like the following –
You put the brakes on and the vehicle pulls to one side then the pulling goes away. This is because the side with the coagulated brake hose takes an instant longer to push the brake shoes on because it takes a bit more time for the fluid to move in the hose than on the side without nothing wrong with the hose. The vehicle will initially pull to the side with the good hose, then it will straighten out in a few moments. This is a textbook example.
A vehicle that tracks straight and pulls when the brakes are applied most likely has brake fluid on the brake shoes on the side it doesn’t pull too.
Severe pulling with new front brakes and drums with a reasonably good surface can likely be traced to the shoes. Shoes today are poorly made and it’s not unusual for the shoe to have uneven surface with high and low spots. I’ve even see a shoe that tapered thicker on one end. Proper adjustment was impossible without filing the taper away. Look at the surface of the shoe – you can tell which parts are touching and not touching. Recently an early bus I worked on had only the outside edge of one pair of shoes actually touching the drum during braking. I sanded both sides’ shoes with coarse crocus cloth just remove the highs. The problem went away almost completely and as the shoe wears in, it’ll only get better.
Sanding may not always be enough. You may find that when you place a loose shoe in the drum, you find that the curve of the shoe does not match the curve of the drum and thus only a small percentage of the shoe actually touches the drum.
