Brakes – front and rear, all models
How to Repair Front and Rear Br
Click Here For Brake Headache Remedies
I’m using the rear brakes from an ’82 Vanagon for an example but all of this can be applied to all years and types of air cooled vehicles for both front and rear brakes.
Here’s a photo of what’s typically wrong with the brakes as the wheels …
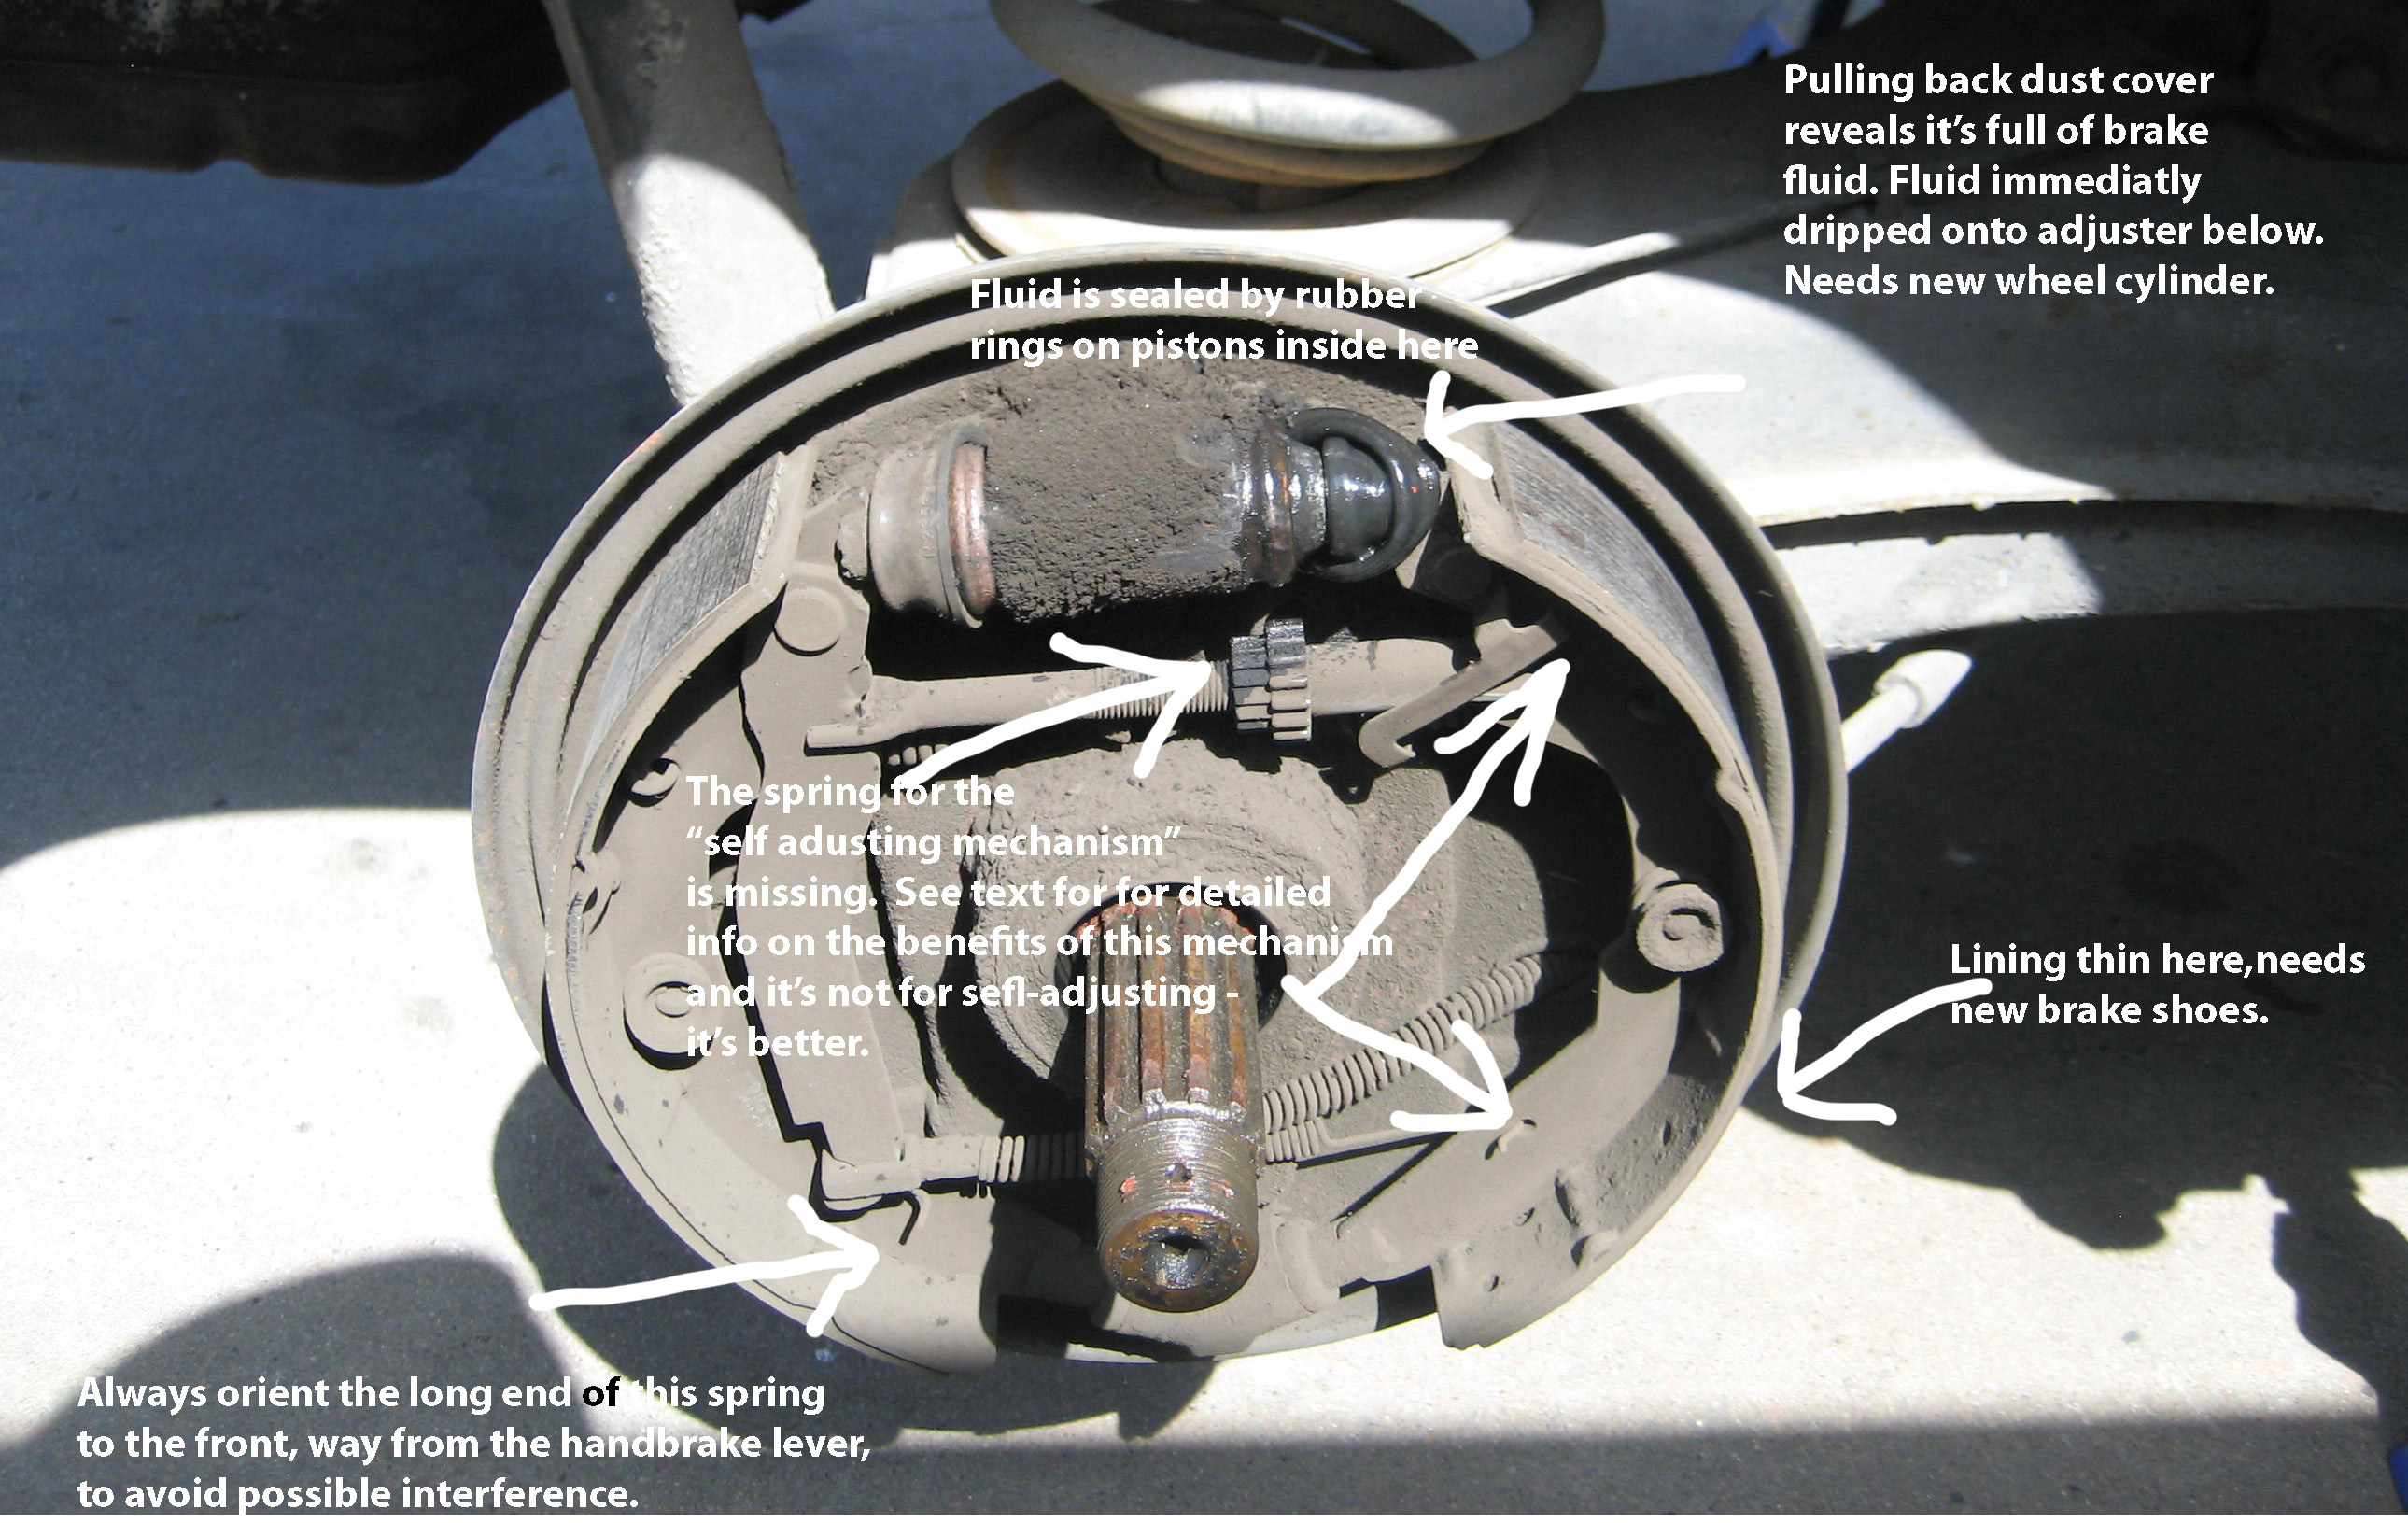
Always use new wheel cylinders.
Always use new wheel cylinders even if they don’t leak and even if they look new on a vehicle that’s been sitting for a 6 months to a year or more. These often end up leaking pretty soon, sometimes immediately
Replace shoes that are wet from brake fluid or oil.
And here’s something else that’s wrong …

And here’s the adjusting hole for manual adjustment …

And here’s the adjuster …
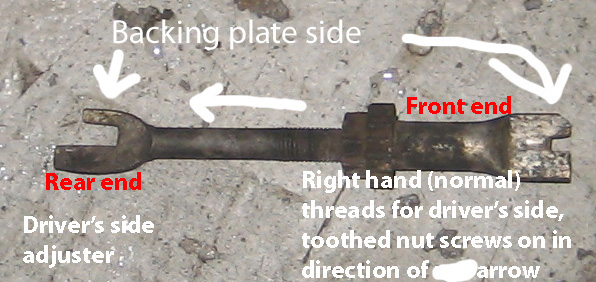
And here’s a good look at the toothed nut …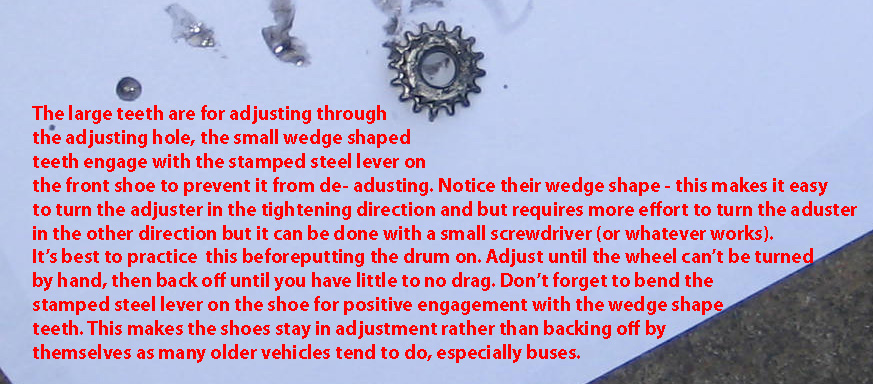
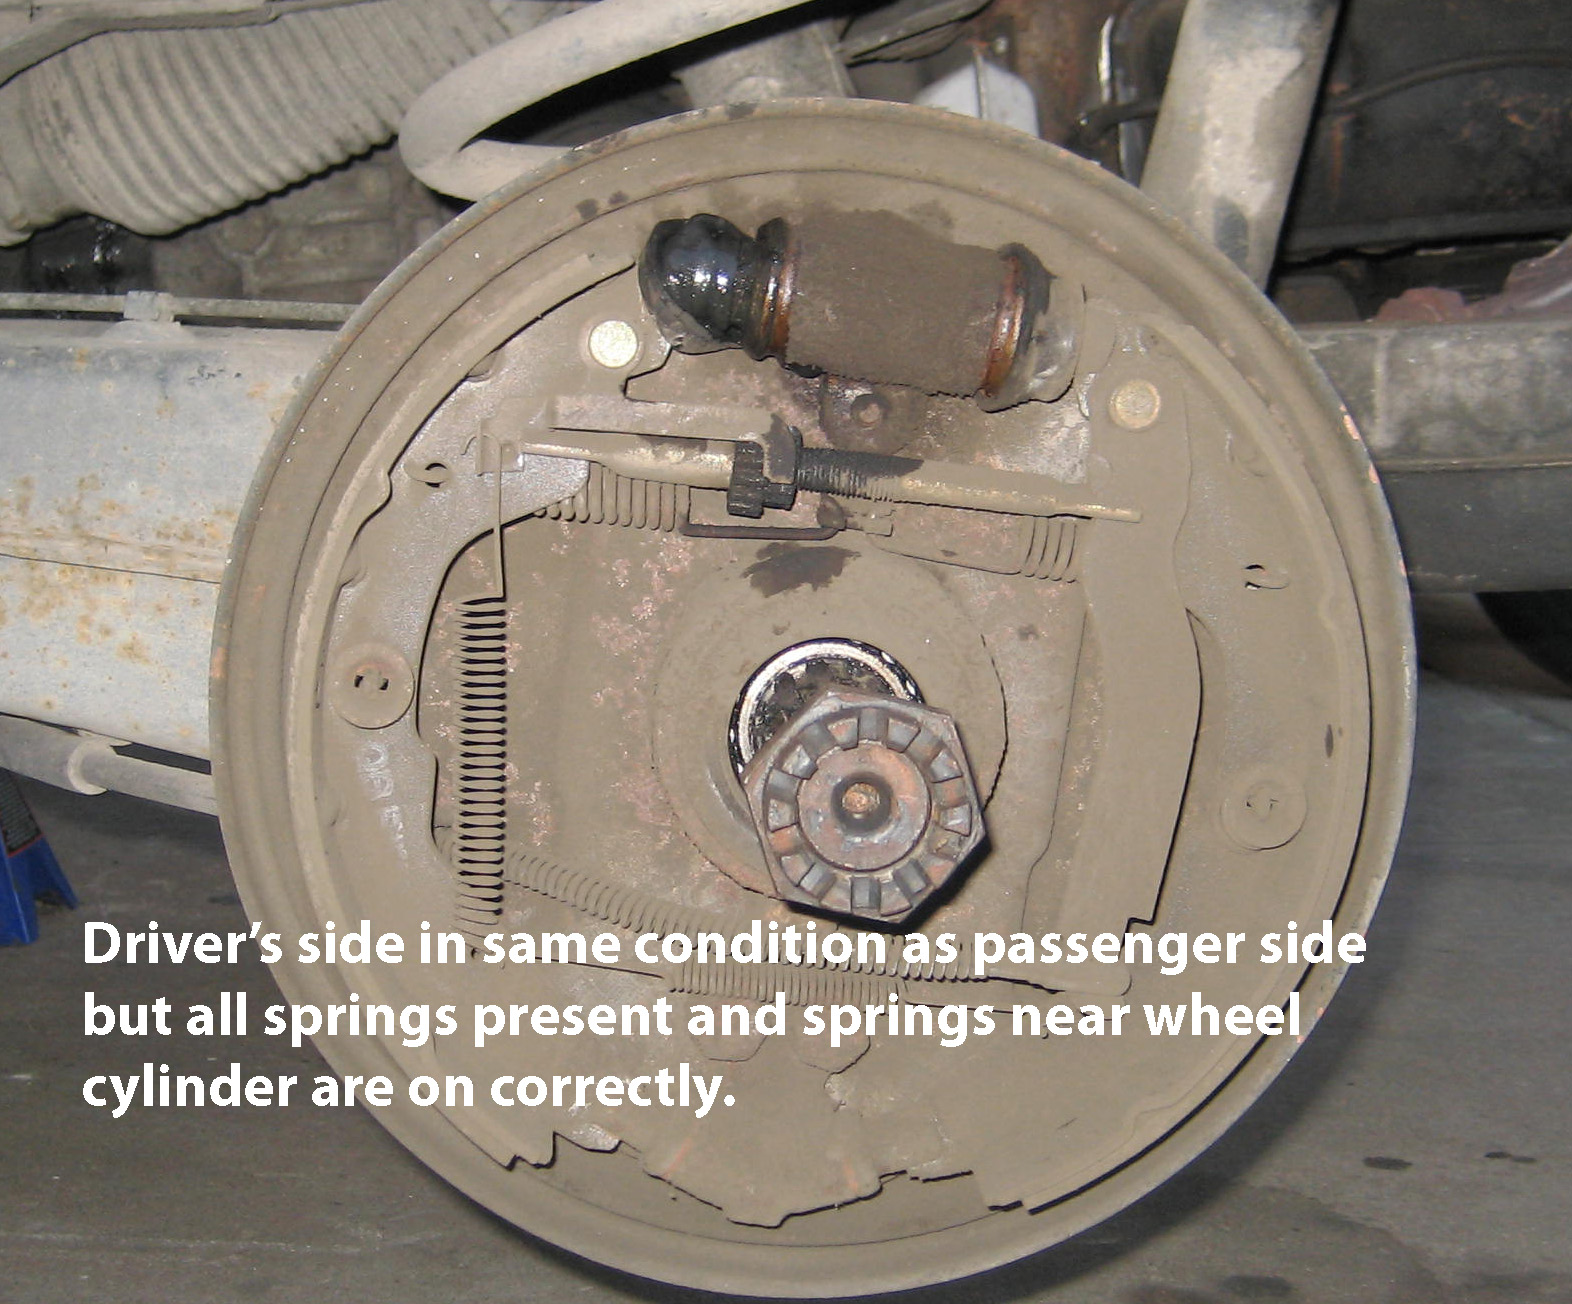
And here’s the driver’s side …
This is what is looks like when it’s finished …
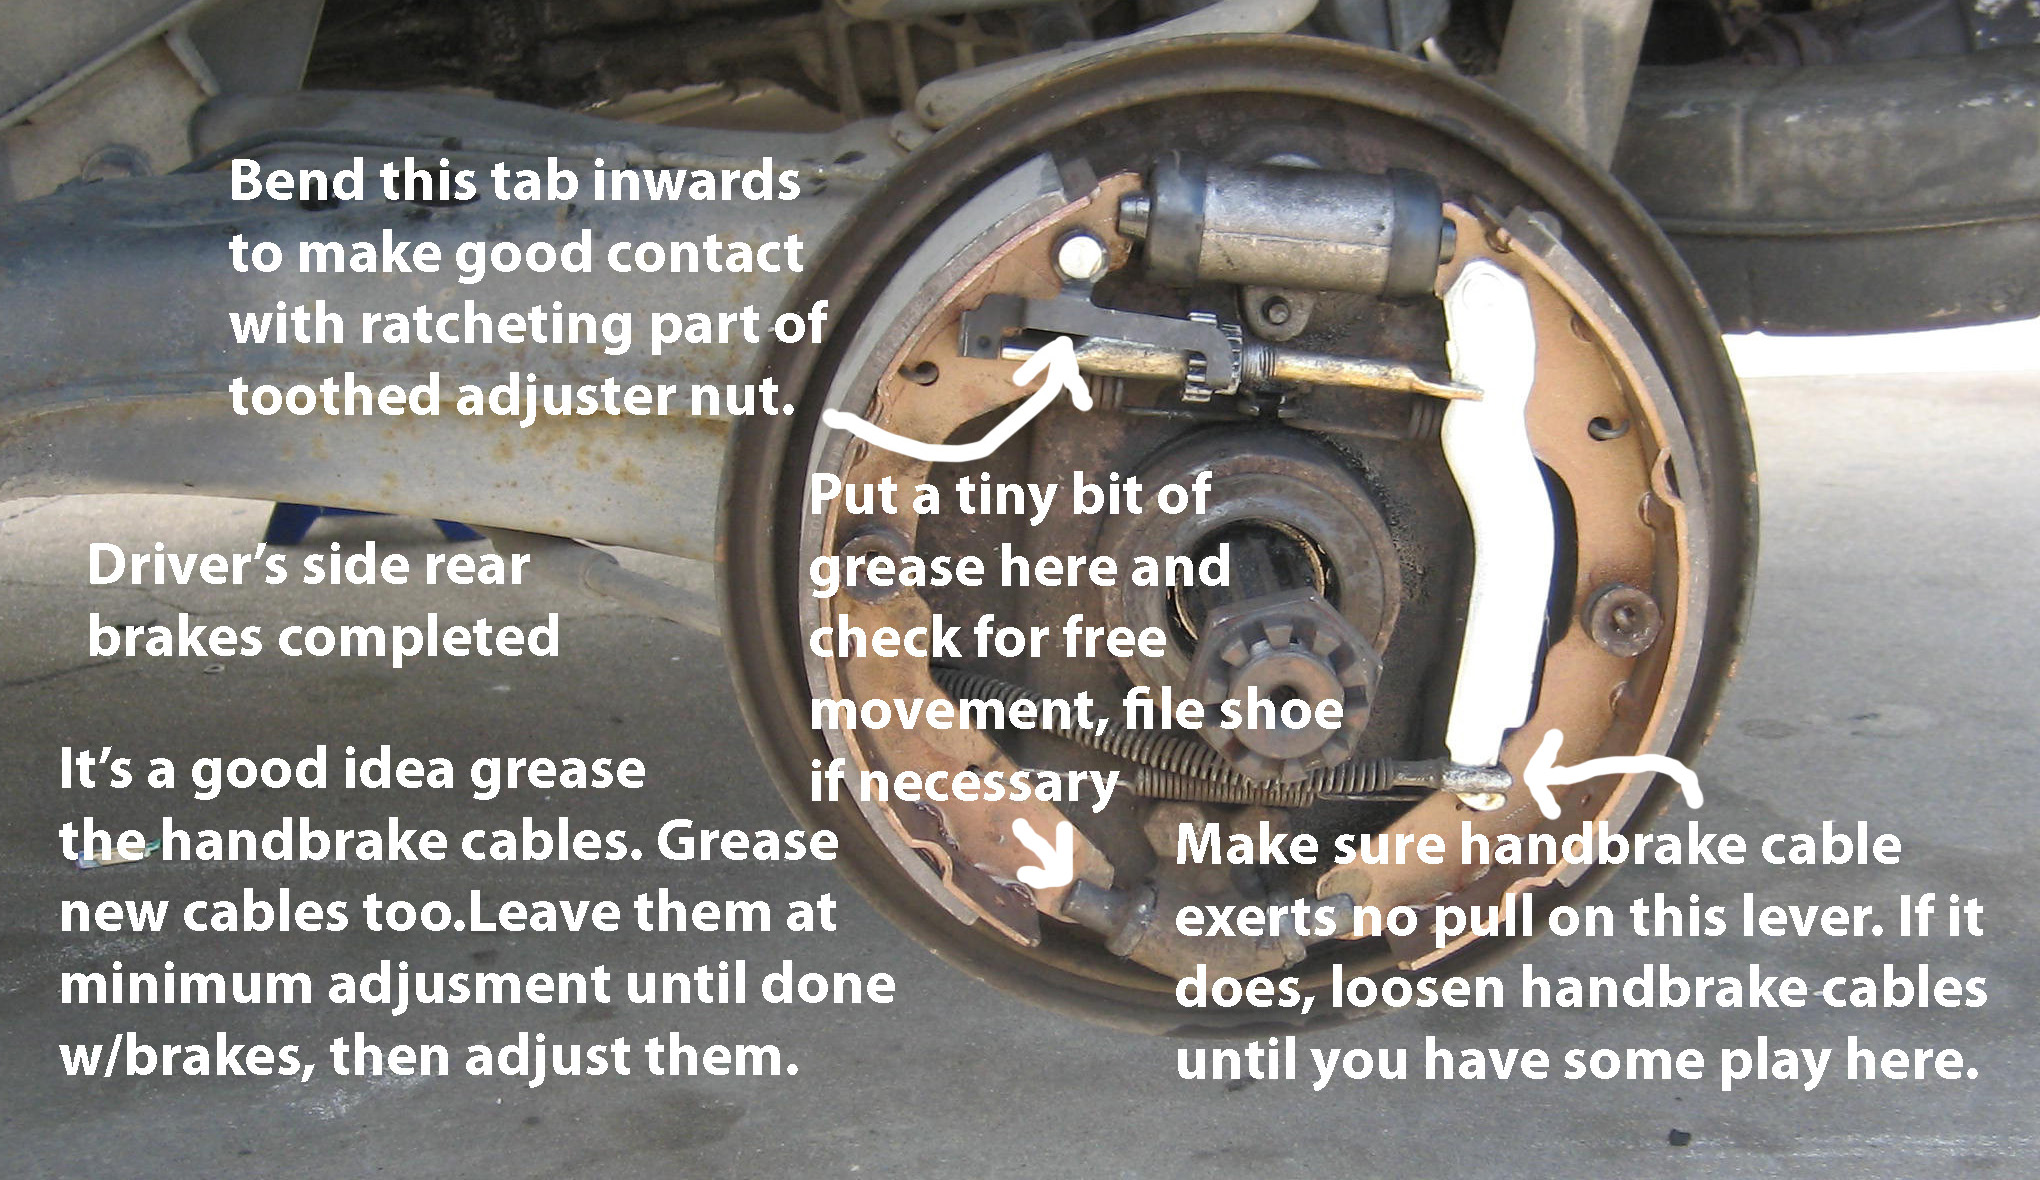
Put a little grease on the adjuster threads too. Putting it on the raised parts of the backing plate where the shoes touch is a waste of timebecause it goes away real quick.
Adjusting
After you put the drum on – snug, do not tighten all they way, because you may have forgotten something, particularly the technique for adjusting the Vanagon rear brakes with a teensy screwdriver and need more practice. You may also need to experiment to determine the best tool to use for this because the toothed wheel moves a bit as you adjust and as it does, the tool you started out with might not work after the toothed nut moves a bit. I start w/teensy screwdriver and end using the round end of a teensy Snap-on pry bar. A sturdy, shortened, handle-less ice ice pick with probably do it too. Practice.
Bleeding is not necessary before adjusting the brakes.
To adjust on any vehicle, turn adjuster until wheel will not turn, the back off until it does. Some effort will be required on Vanagons since you forcing the ratcheting part of the toothed wheel to go in the direction it resists rotating. Practice.
For 72 and up buses, adjust each adjuster 3-4 movements then go to the other – back and forth, front adjust to rear adjuster and so-forth. This is necessary because of the design of the wheel cylinder.
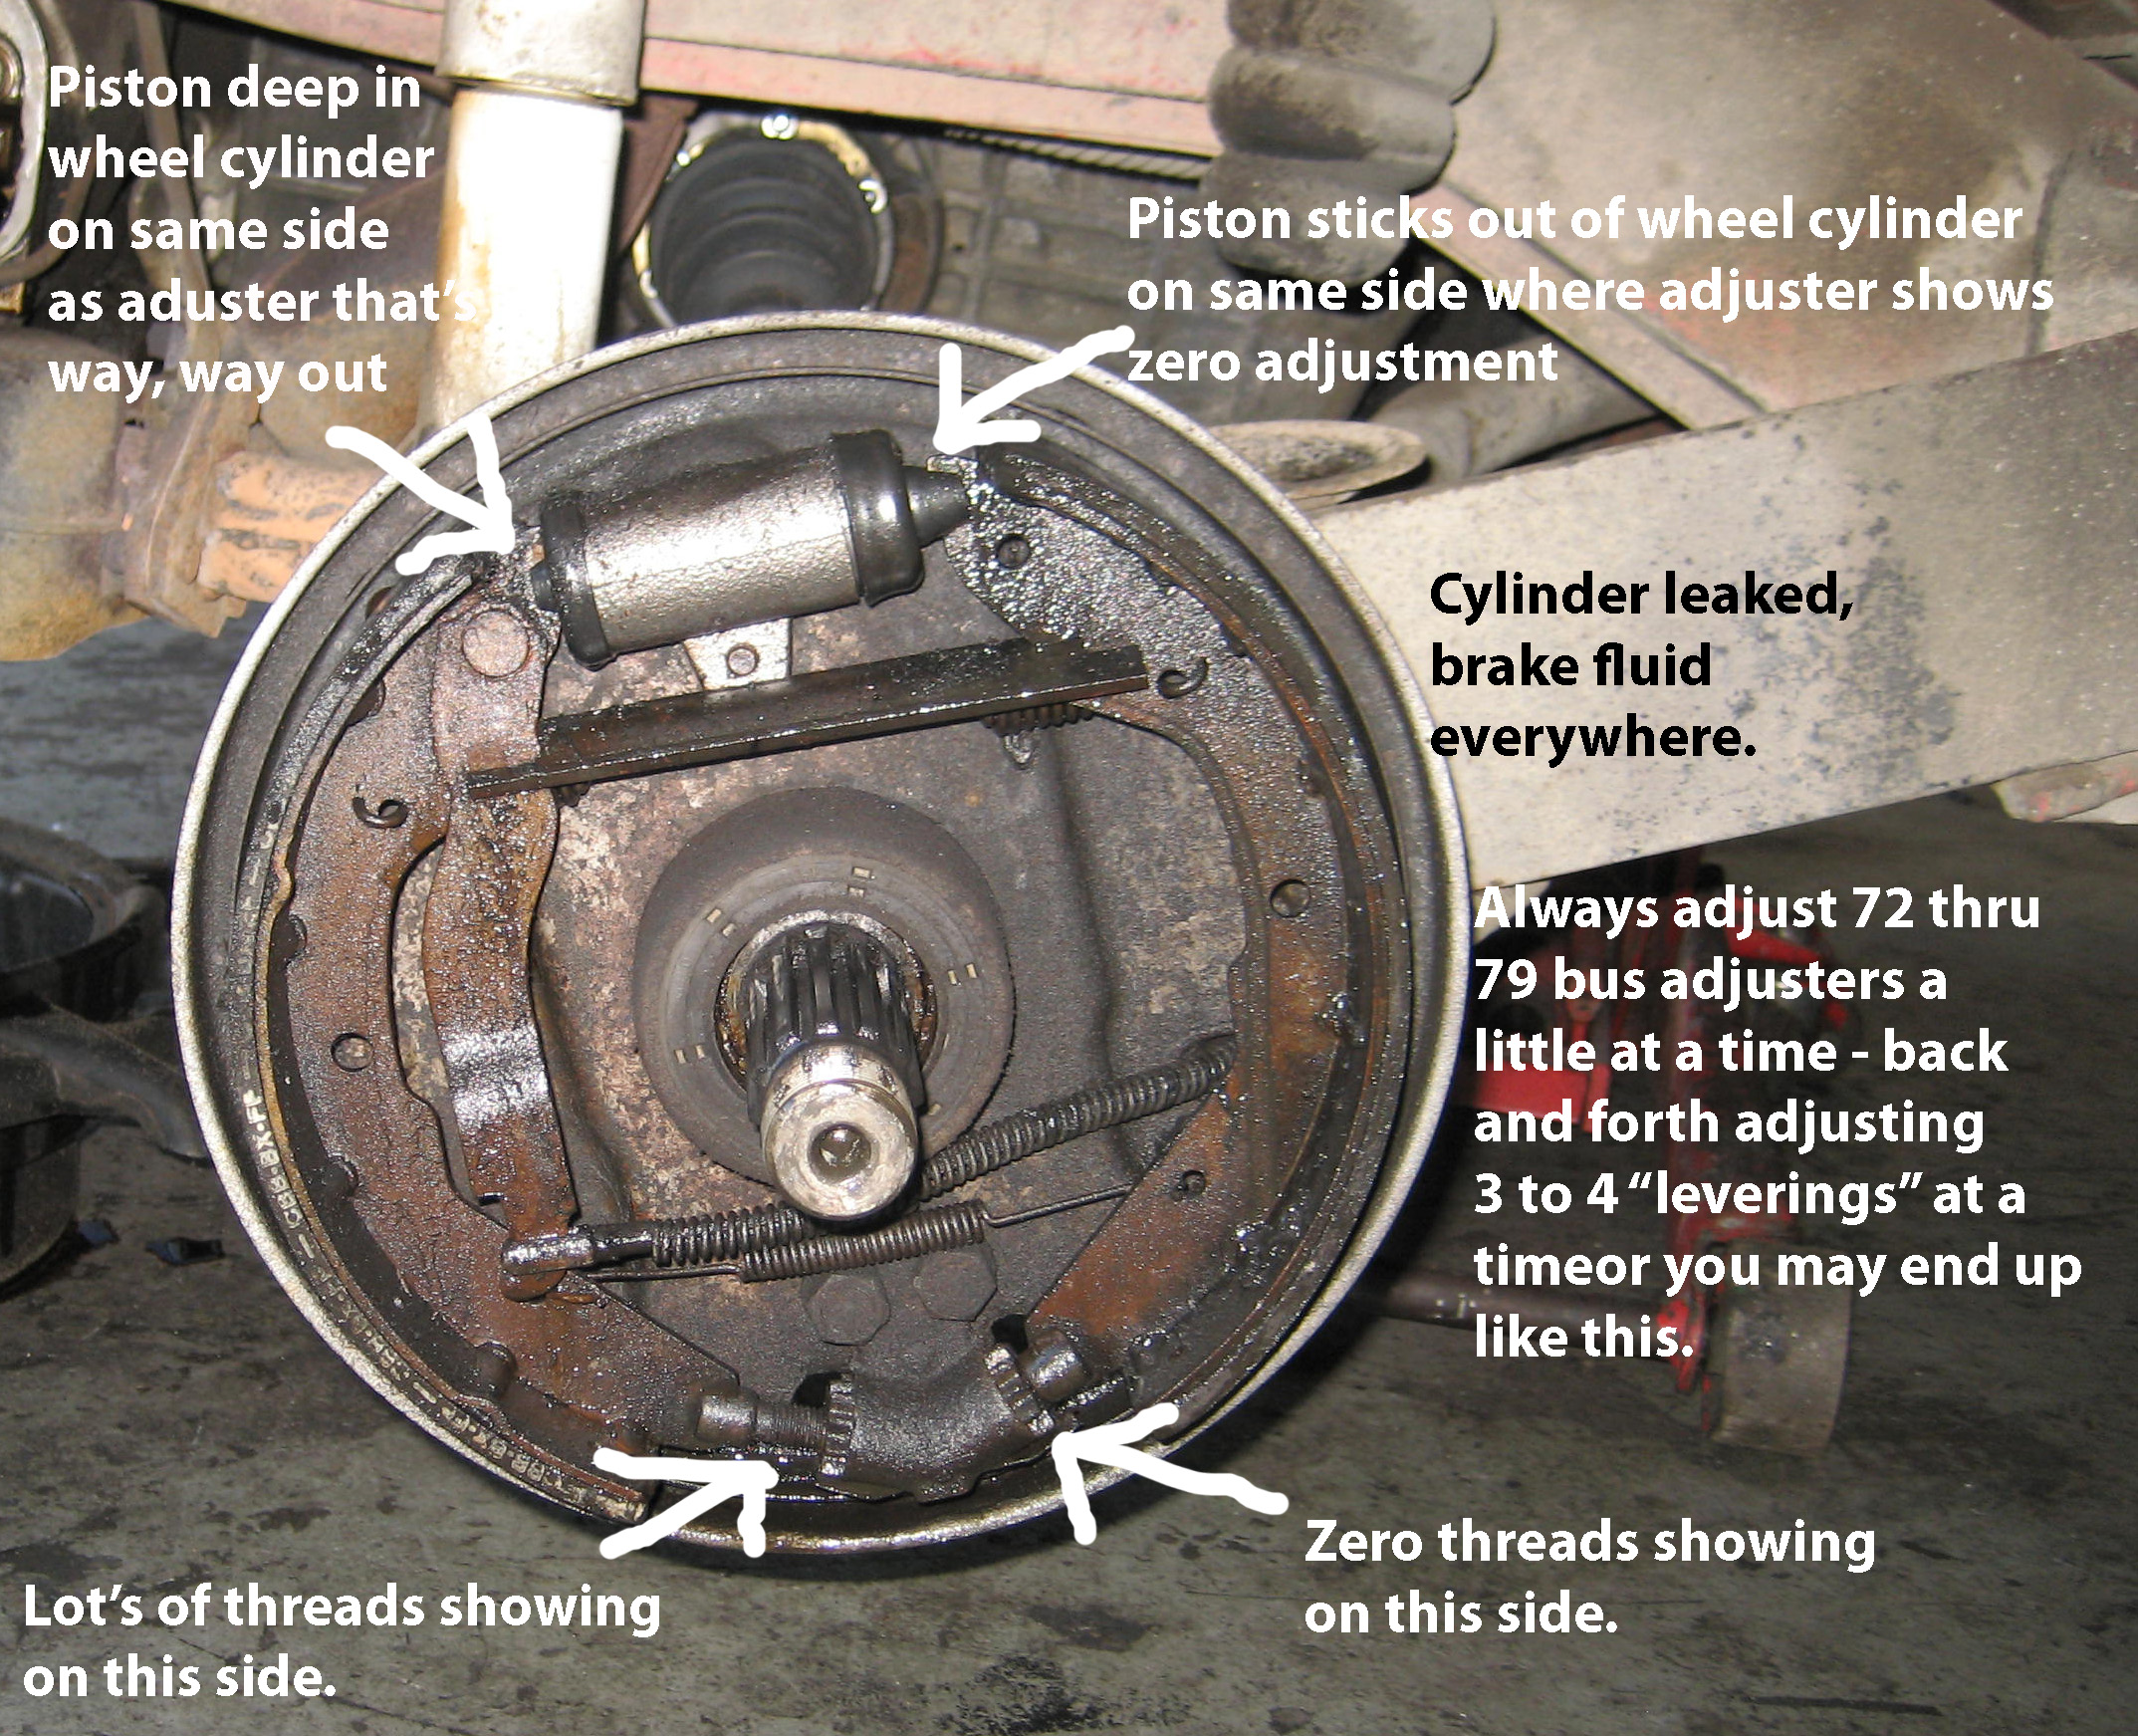
If you find that after wheel locks and you back off adjuster, turn wheel, then it stops turning, back off adjuster some more. This is a sign of an imperfectly round drum. It is real bad,you’ll find you’ve backed off the adjusters (de-adjusting) so many times, you’ve pretty much unadjusted them and you’ll have a low pedal. Get the drums checked at a machine shop. If they’re not too thin, they can be fixed. Sometimes a new shoe is wider or narrower a tiny bit than the old one and it may touch a the raised, unworn part of a used drum. This is called a step. If it’s real bad, you’ll need to turn the drum. Otherwise, only turn drums if the surface is damaged, badly grooved, rust pitted (from long-term sitting, rust pits can cause pulsation, even from rear drums), or damaged from metal to metal contact with old shoes .
But … if you want perfectly smooth brakes, try this … and it works with most stock wheels and few aftermarket wheels …
Be sure you drums are not over the limit and your brakes are new as are the front wheel bearings …
Have new tires installed.
For tire size, I recommend only stocks size for all vehicles.
Drive the car for week.
Remove drums with the wheels attached. This is not always possible with aftermarket wheels.
Convince a machine shop to turn the drums with the wheels still attached. Some shops can’t do this due to limitations with drum lathe.
You’ll have a super high pedal, smooth brakes, and this will solve a pedal pulsation problem you may notice when braking vigorously from higher speeds, like coming off an off ramp and having to slow down real quick. Might stop your steering wheel from shaking.
Bleeding
Always adjust before bleeding. Basically, bleeding is simply removing the air from the system and replacing it with fluid. It’s really like one long, sinuous soda straw. If have no helper, use a long piece of fuel hose. Push one end over the loosened bleeder screw at the wheel you want start with and lift the hose up so it goes at least 6 inches above the bleeder screw (drape if over the shock tower) and loops back down so it can drain into an oil pan. Now just pump a few pumps. You’ll see fluid in the pan and because the hose goes up, it can’t suck any air into the cylinder because the part of the hose nearest the cylinder will have more fluid in it than the air can displace when your the pedal is released and the cylinder pulls in through the bleeder screw. Works better than many one man bleeder setups you can buy in a store and zero moving parts, just about a 4 foot long hose. Repeat for each wheel.
Front Wheel Bearings
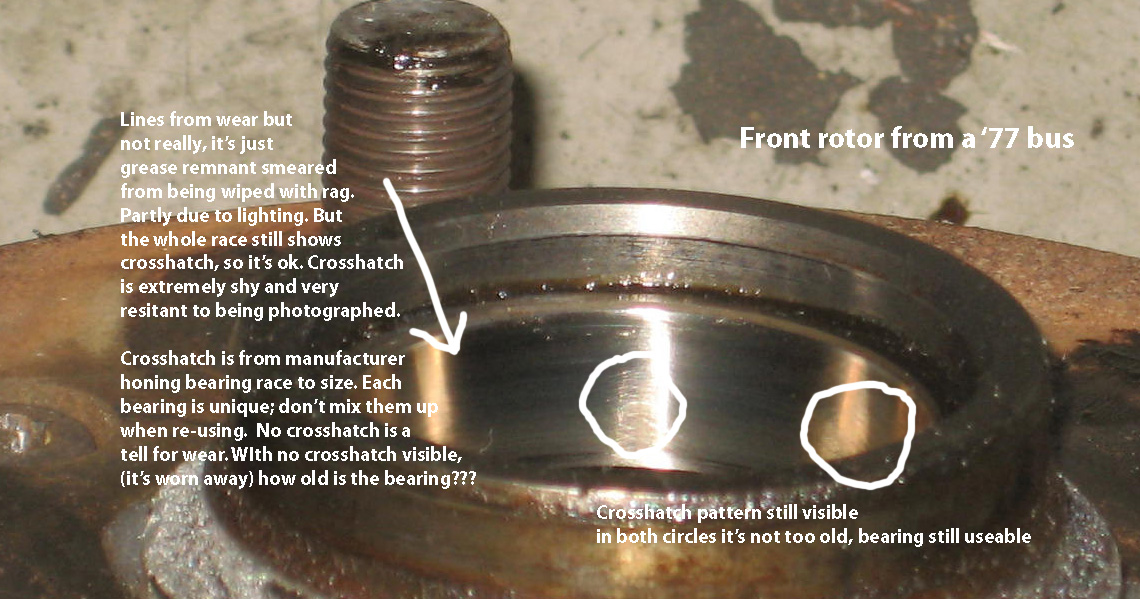
Always put new front wheel bearings and seals in when you do the front brakes unless you see this …
Only use front wheel bearing grease that says “High Temperature Disc Brake Wheel Bearing Grease” like this …
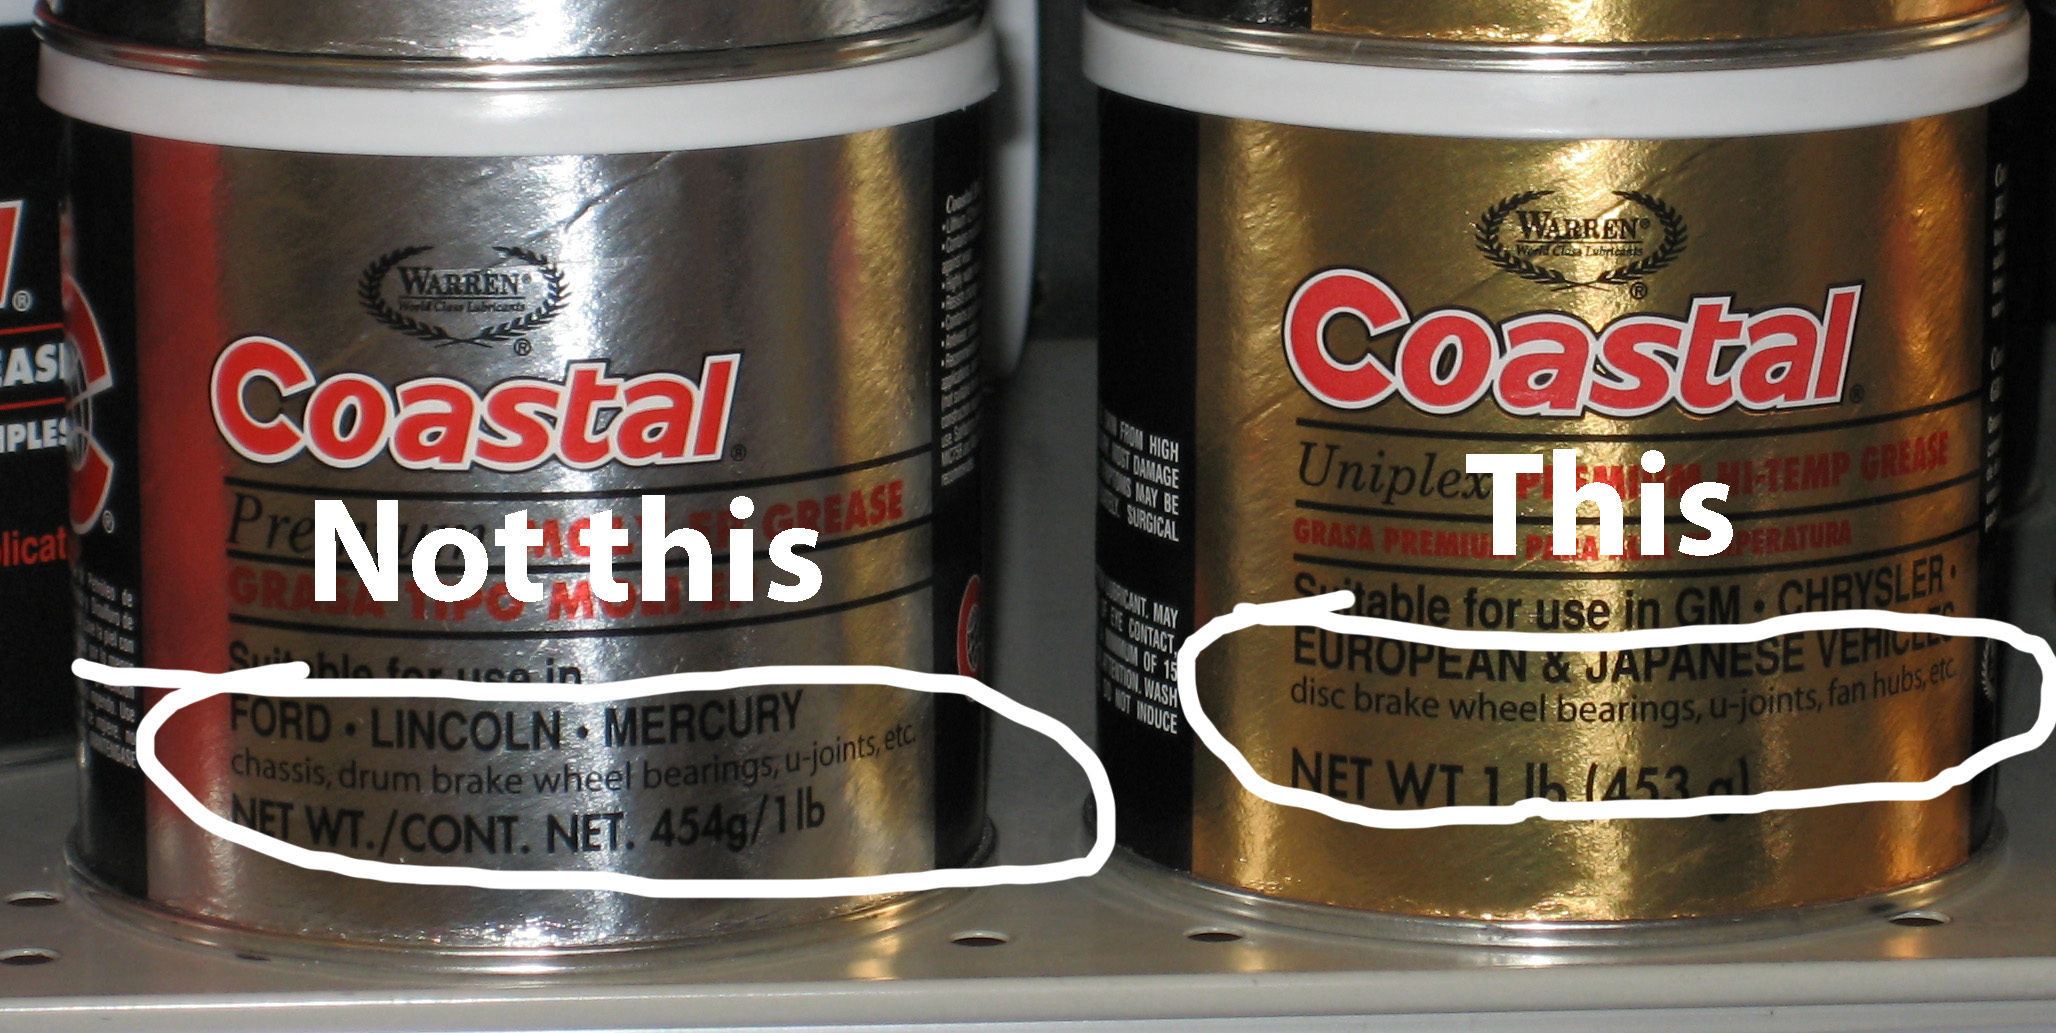
The stuff on the left reduces the life of a bearing because it likes to separate from the surface and with higher temps it tends to liquify. I’t kinda waxy too. If new grease seems hard, check the date or call manufacturer. It’s happened to me – container was 6 years old, volatiles were reduced.
True story…
New wheel bearings in 66 bus, manufacturer unknown.
40,000 miles later, passenger side outer bearing begins making noise.
2 weeks later, the driver’s side outer making noise.
Interesting, no?
Always replace them all at the same time if possible.
Cursory wheel bearing check …
Find a gently sloping hill to drive down.
Moving at about 35 mph, put it in neutral, turn off engine, and coast.
Listen.
Apply brakes lightly.
If vehicle gets quieter, you likely have at least one bad front wheel bearing.
Try it a few times to tune your ears.
Of wheel turns freely when car is jacked up, spin and listen – you’ll hear it. Disc brake may resist spinning unless pads are removed. But if you heard noise as described, it’s probably got at least one bad bearing. Outers are usually the first to go – they’re smaller than inners.
Adjusting front wheel bearings?
Not too tight, not too loose. I guess you could call it a “tight snug”.
Handbrake Cable Adjustment
Adjusting handbrake cables …
Pull the lever whatever amount of notches it says in the book (realize that if you adjust the cables so the lever requires too few notches to pull up to lock, it may be harder to use because of less leverage due to less travel. Use you’re own judgement, but not too tight – not too loose. If too tight, you may also create a condition where the is no slack in the cable when the handbrake is off. You must have slack when it’s off so the wheels don’t drag) and adjust each cable a little at a time, turning each nut a for or five rotations at a time, checking each rear wheel occasionally until the both are locked up, then release handbrake and check for drag. Adjustment can be a hassle on vehicles with an equalizer bar (they should really call it an unequalizer bar). After you mess with the cables and think it’s as good as it gets, but seem to have a teensy bit of drag on one wheel, back off the adjuster at the wheel a couple teeth – fine tuning, it’s all a judgement call.
Equalizer bars are like small teeter-totters where the cables attach as a pair. Bugs from ’65 and up have them. Buses from mid ’72 have them, all Vanagons have them. Type 3 too from ’65 an up have them too. Real old buses have them too, I think …
Equalizer bar vehicles require more effort to adjust, but it’s basically the same procedure. They cables may look uneven where they protrude out of their securing nuts, but sometimes that’s just the way it is.
Always replace cables in pairs.
Drive the vehicle and use the brakes a few times, check adjustment, THEN adjust handbrake cables. If cables are new, after adjusting them, pull lever up real hard as high as you can, the let it sit to allow new cables to stretch a bit, then check adjustment again.
Maintaining Adjustment
Old VW’s , especially buses, tend to back off the brake adjusters. You may find you have to adjust one particular wheel every week. You may think you need new backing plates because the spring tabs that are supposed to prevent the adjusters from backing off are broken but they don’t necessarily work .
But there’s another solution – what you need to do is damage (hit the threads with a big hammer) the male threaded part of the adjuster with a hammer. Then when it screws into the female part (toothed nut), it requires some effort. You’ll have to experiment with this and you’ll need a vise to hold the toothed nut while you install the male part into it after damaging the threads. This works best with steel toothed nuts because with brass ones, the male part usually “re-threads” the brass and thus the male part screws in easily o matter how many times you do it but this condition varies. Use anti-seize and lot’s of WD-40 on the treads while doing this and and don’t make the fit so tight you can’t turn it after installation, but it will require significantly more effort to turn it when adjusting than normal.
You’ve now created an interference fit, rather crude but very functional, similar the the one used here on the fast idle adjustment screw on this Karmann Ghia …
Weber ICT”s use the same thing for the idle speed screw.
It may seem hackish but it works and it HURTS NOTHING unless you have the extremely rare fetish for aesthetically perfect threads. Now the only reason you’ll need to adjust your brakes is due to lining wear, not adjusters that automatically de-adjust themselves. Makes your handbrake stay tight for a real, real long time. Works for front brakes too.
The Vanagon self adjusting mechanism solves this perfectly and it solves this problem better than it does its pretend job of self-adjusting. Periodic manual adjustment through the adjustment hole will prove it’s not that effective and manual adjustment is usually all you need to do on any drum brake vehicle to tighten up the handbrake. ALWAYS manually adjust the brake BEFORE you attempt cable adjustment. And when checking brakes with the drum off, always make sure the handbrake cables are not adjusted so they are exerting any pull on the lever’s attached to the shoes. However, after you correctly adjust the rear brakes and cables, and have actually driven the car and used the brakes and rechecked and adjusted and you’re sure it’s “perfect”, and you pull a drum, you may find that there’s a teensy weensy bit of cable pull (handbrake off) on one or both of the levers on the wheels, it’s ok. Because nothin’s perfect and that’s as good as it gets.
Finally …
Front brakes are pretty much the same as the rear brakes except for the wheel bearings in the drums and no cables. Leave the rubber hose loose at the metal line, tighten at wheel cylinder end, then tighten metal line. Make sure hose doesn’t touch shock, body, or wheel when steering and wheel changes position. Correct by loosening at metal line end and twisting for proper location, then re-tighten.
