Setting the end play is the only real adjustment one has to do when assembling the engine. Adjusting the valves? Not so critical, especially with hydraulic lifters – you don’t even need a feeler gauge. You can adjust the end play with a feeler gauge but the best way to set end play is with the engine fully assembled and with a dial indicator.
You should always install the distributor drive gear in after you set the end play. The gear can prevent the crank from moving back and forth freely and can even jam the crank and prevent it from turning after the flywheel is tightened. So put the drive gear in after the end play is adjusted and flywheel is finally installed. Also, putting the gear in after the flywheel is installed puts the the driving gear on the crank in the perfect place for the distributor drive gear to mesh with it Click the following link to learn how to put the drive gear in …
Distributor Drive Gear Installation
In early books, the minimum end-play adjustment is 0.065 millimeters. It was later changed to 0.07. When adjusting, always try to get it as close to the minimum as possible because it as it wears it only get’s bigger to it’s best to start out small. Incidentally, the .10 millimeters, near or at the high end of the range for end play depending on whether is a late Vanagon or old bug, is pretty close to 1/250th of an inch. Divide that by 4 for space between each shim, the flywheel and the main bearing and it’s amazing the the whole idea of the engine even works at all. Be careful and patient when setting the end play. It’s real common to pull in and out on the crank pulley of a recent rebuild for a cursory end play check and feel like you’re looking at 1/16th of an inch of end play. That’s a lot more than it’s supposed to be – especially on a new engine.
The shims available as new come in a range of specific thicknesses. They’ll allow you set the end-play within the range specified in the repair manuals but you my not be able to set it where you want it – as close to the minimum as possible. This is where a micrometer comes in handy.
If you measure a .34 shim, for instance, with a mechanical digital micrometer, you may find that with repeated (like twenty times) measuring, you’ll find the micrometer lands just under that value – like when the odometer in your car is changing from 7 to 8 – not quite at 8 and not at 7 either. Same thing when you measure a shim. You’ll need a bunch of new and used shims to get your end play where you want it because you may find you need a .31 shim (which VW never made) but if you measure enough used shims, you’re likely to find one that’s somewhere between .30 and .32 and that’ll be the one you need to dial your end play in right were you want it.
Before you set the end play, use a 3/8″ tapered pipe thread tap to replace the original oil galley plugs with threaded plugs. Use lots of Loctite. Trial fit numerous times as you tap. Plugs vary in production. Having pair of calipers to compare is a real necessity. You may need to grind some of the taper off the end of the tap as it bottoms in the hole and the tapped hole is still too small of a diameter for the plug to start. But be real careful. You don’t want to end up with a hole you can’t plug. You may need to buy a new case to fix it or make you’r own plug. You may need to buy two taps if you blow it with the first one. Better two taps than a two engine cases. BE CAREFUL. Any air cooled or water cooled VW with the engine in the rear is prone to leakage at these plugs. It’s always best to do this on an overhaul or when replacing the seal because if you do replace the seal and not the plugs, you my find you still have a leak and have to pull the engine (or transmission if it’s a Vanagon) again to fix it so why not just get if over with the first time?
Here’s a type 4 engine with the only seal you should use and with the plugs installed …
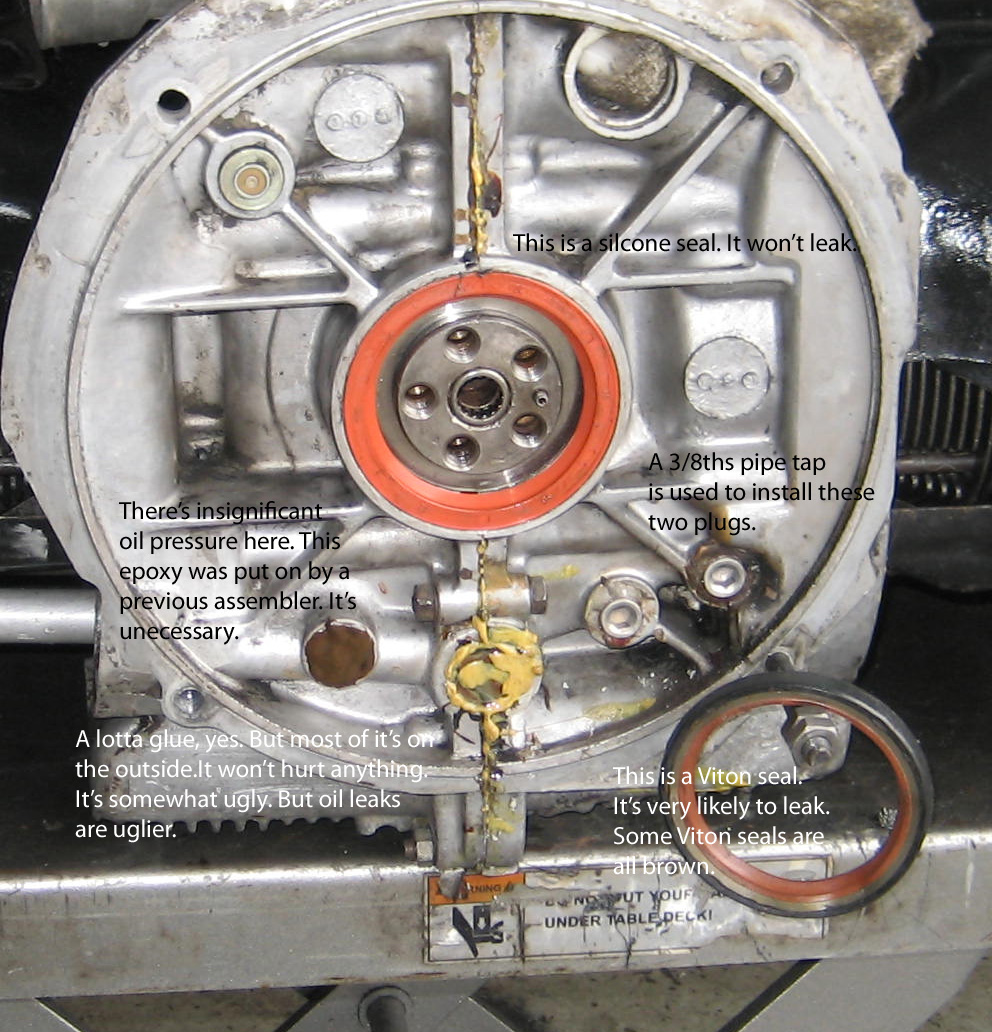
If you sit on a mattress and get up, the mattress instantly returns to the position it was in before you sat on it. In engineering terms, it has no “compression set”. Viton seals suffer from too much compression set. Silicone has pretty much zero compression set so it responds to movement (mainly due to precession of the crankshaft) at the flywheel instantly. Black seals have a lot of compression set too. The red silicone seal is the only seal you should use in any VW with the engine in the back.
But there’s one more place you need to seal too here where the flywheel mates with the crank. That’s what he “o” ring is for. The seal keeps oil from leaking between the flywheel and the seal and the “o” ring keeps the oil from leaking between the flywheel and the crank and out between the dowel pins on early engines or the 5 bolts that hold the flywheel to the crank on later engines including the last Vanagon. Oil leakage here is deposited right on the friction surface of the flywheel and onto the clutch. To prevent this, use red Loctite on the face of the flywheel where it mates with the crank. It’ll never leak. The “o” ring is not necessarily ineffective but it’s not that good at sealing against a leak either with a crankshaft and flywheel that may have been bolted together several times and have turned around in the engine well over a billion times.
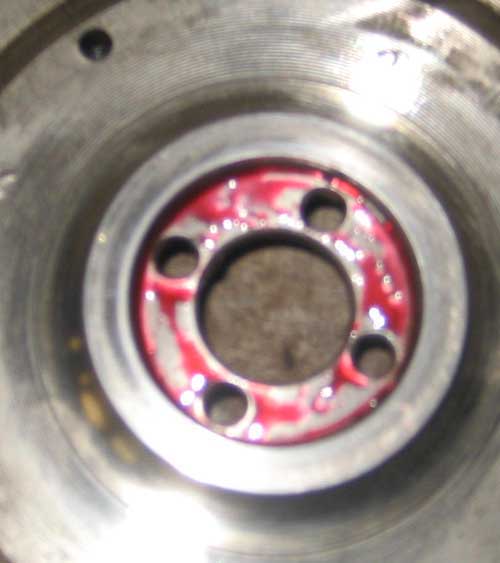
Loctite here means no leaks past the dowel pins or the flywheel securing bolts on type 4 engines.
Here’s the flywheel shim setup for a 2.1 liter water cooled Vanagon engine …
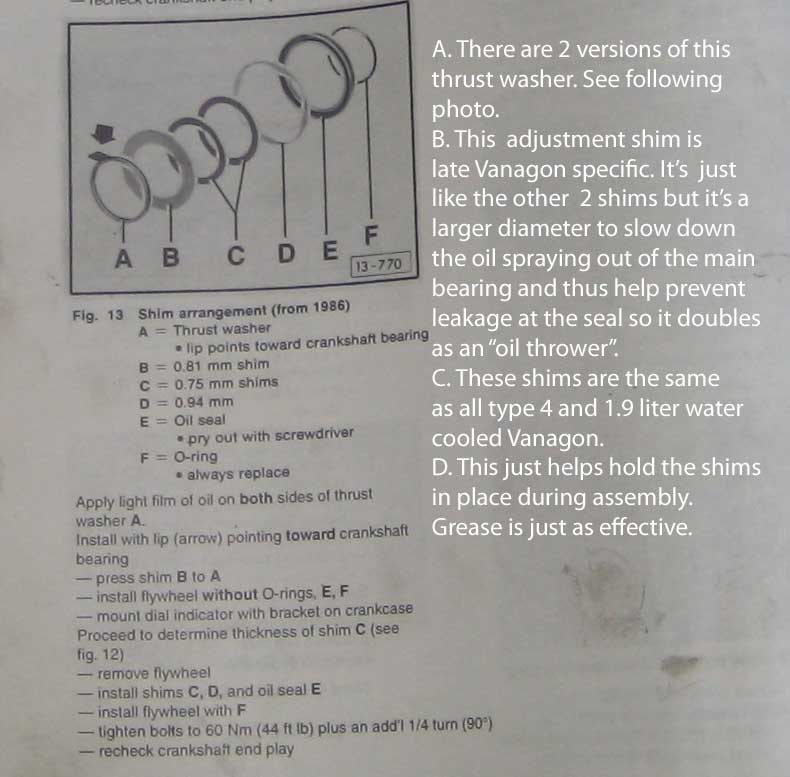
Here’s the shims for a 2.1 liter Vanagon. There’s 2 kinds of thrust washers. One is not mentioned in the Bentley manual. Maybe I need another edition? Actually, after thinking about it for awhile, I think what happened is VW originally made the 2.1 liter with all the shims the same outside diameter and with the thrust washer tab pointing towards the flywheel. But after the vehicle was in production, they may have had some problems with the seal leaking where they didn’t have this problem on the 1.9 version and on all the air cooled versions. But since the 2.1 has a compression ratio of 9:1, there’s likely more blowby and thus they felt the oil thrower would reduce the chances of the seal leaking by preventing the oil spraying (reduces velocity) rat the seal as it exits the main bearing.

Early crankshafts not designed for “o” ring flywheels take different shims that “o” ring flywheel cranks. 40 hp shims may be different too. I can’t remember. 36 hp shims are different than all other engines. You can always tell if your shims are correct in that the proper shim will just fit over the crank. It you shims have a lotta sideways wiggle, you’ve got the wrong shims.
Finally – setting the end play
The minimum end play is what you really want. It’ll only get bigger as the engine wears so it’s best to start out at the low end of the limit. For the most accurate reading, place the dial indicator close to the middle of the flywheel for minimum flex.
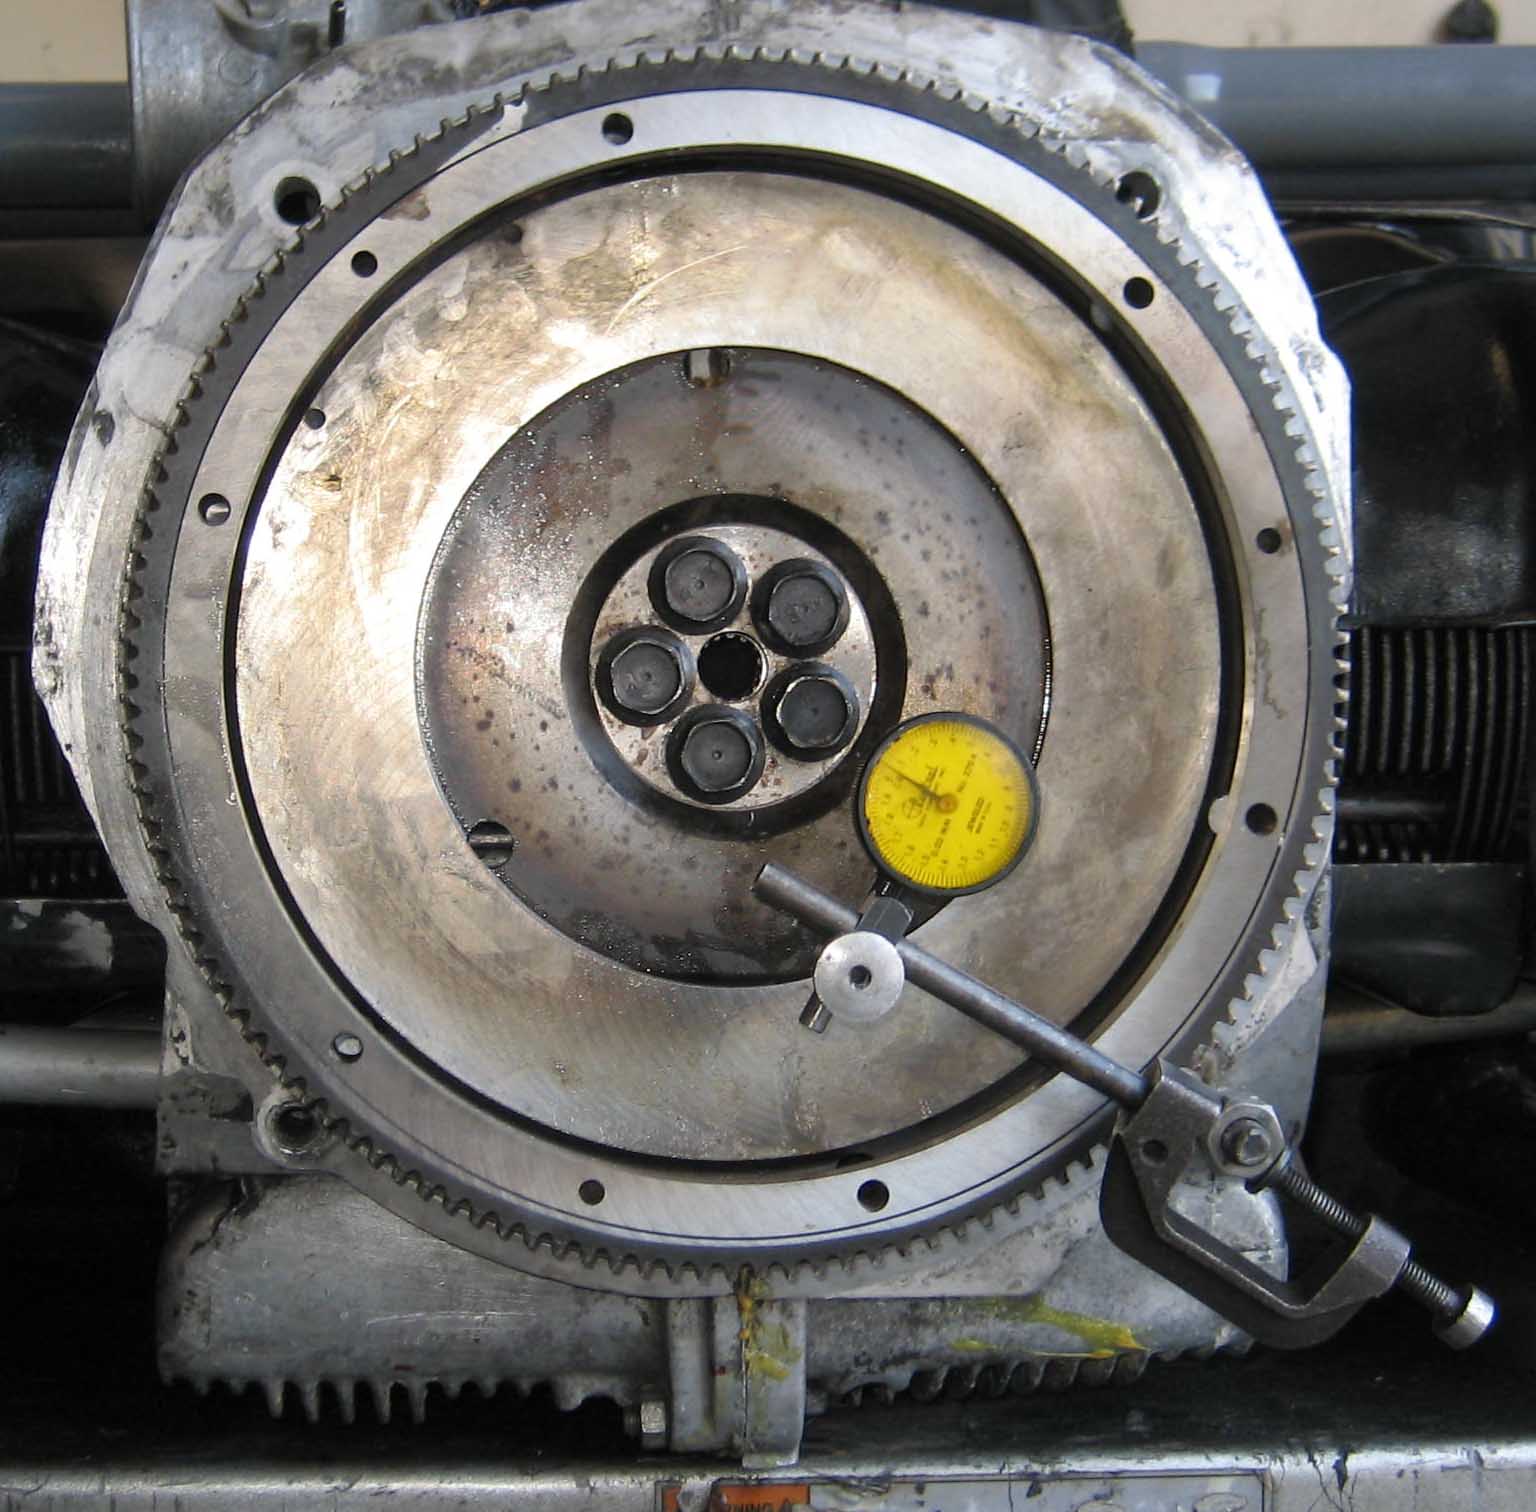
Firmly pound the flywheel towards the crankshaft pulley end of the engine with the end of the handle of a big hammer. A plastic hammer my not move the crank all the way. You want to make sure the crank moves and stays, not bounces back. Zero the gauge – check for zero fifty three times. Now hit the crank pulley bolt to push the crank back the other way. When you hit the crank pulley rather than prying on the flywheel, there’s no distortion of the flywheel due the prying and the shock from hitting the crank pulley bolt is not transmitted to the flywheel where it would possibly upset the tranquility of the dial indicator . Now read the gauge. This is your end play.
Setting the end play to the minimum usually requires used shims to dial it in. It can take a lotta tries and maybe a couple hours or even more. It can be real frustrating but you only have to do it once. I had a type 4 flywheel for a 200 millimeter clutch (very rare, the best choice for a type 4 engine installation on any type 1 trans). There was zero end play with the 3 thinnest shims I could come up with. In order to obtain proper end play, I made a gasket of thin paper that went between the flywheel and the crank. This paper gasket gave me the desired end play. All real old type 1 engines used a paper gasket here. A paper gasket to dial in recalcitrant end play adjustment is not a crime and perfectly acceptable but the only time I’ve ever done it was for that very rare type 4 flywheel. Interestingly, there was no hole in that flywheel for the dowel pin at the end of the crank. Hmmm … crankshaft different in some small way?
Another very important point …
Old engines that have been in service for a long period of time may have a loose main bearing at the the flywheel. This movement can translate to faux end play. For instance, it the bearing moves 0.10 millimeters and you adjust end play to 0.10 millimeters, you really have zero end play and your engine could seize so pay close attention when adjusting the end play on a used engine. Sometimes you can actually see the bearing move back and forth but it’s really impossible to measure it close enough to know exactly how much movement it has to actually compensate for it when setting the end play. You have to be careful, aware, and use your own judgement.
This entry was posted on Monday, March 9th, 2015 at 7:08 am
You can follow any responses to this entry through the RSS 2.0 feed.
