The only special tools you need are a Sawzall and a press or access to one.
But first, here’s some real important information you won’t find in the Bentley book …
VW puts a new ball joint in the brand new VW bus on the assembly line long ago. One day, may years later, someone puts another one in the same hole. Realize, every time the ball joint gets removed, it takes a little metal from the trailing arm with it. Read – hole gets bigger. So fit gets looser. They can actually come out. Realize, the only thing holding them in is friction and the weight of the bus. The bus is pushing the lower joint downwards into the trailing arm but it’s pushing against the torsion spring – it’s not like it’s pushing against the ground or anything solid. So it can come out when the spindle moves up faster than the lower trailing arm’s torsion spring can push it upwards and, like when you run over a manhole cover that sticks up a couple inches past the surrounding pavement. Actually, the upward movement of the spindle is always trying to pull the lower ball joint out of the lower control arm whenever the upward speed of the spindle is greater than the speed the lower torsion spring can move the lower trailing arm upward.
Realize that in a bus, when the joint is pushed all the way into the hole, it doesn’t go all the way to the end of the hole there’s still a little bit of length left. Thus, there’s still some virgin material left. So, for instance, if you’re putting them in a bus, you put the new left lower ball joint into the right lower trailing arm and put that trailing arm on the left side – it’ll fit – the left and right sides are the same. Same goes for the upper arm – left and right are the same.
That way, when you push the new joint in, at least some of it will contact virgin material. Use Loctite, no lube and it’s best to not clean any rust or anything else from within the hole. Take off the boot during installation when using the press so you won’t damage the boot.
But you can do more. Particularly with a Vanagon lower joint since you can’t reverse the spindles like you can the trailing arms so you have to work with what you have. When a meteor hits the moon, it makes a crater – a depression. And what defines the depression is a raised area all the way around the depression that rises above the existing, surrounding , moonscape. When someone hit’s your car and puts a dent in it, the same thing happens – you get a low where the impact occurred and a high surrounding it. Same thing happens with a centerpunch.
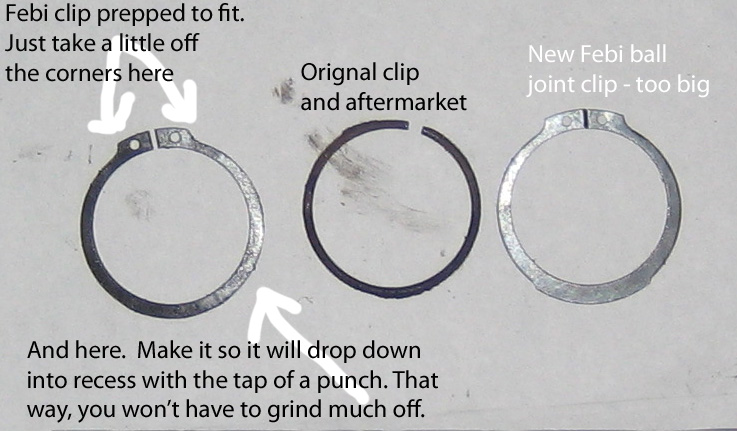
Before you put your Vanagon lower ball joint in, using a center punch, hit the friction area on the joint all the way around with the punch with each punch mark about 1/4″ apart. You’ll get a low with a high surrounding it and this is an effective way of tightening up ball joint fit. You can even make two rows all the way around and stagger the punch marks. No measuring needed – just eyeball measuring. Install with Red Loctite. It’ll never come loose. And lately, with some particular brand of Vanagon lower joint, you’ll find the clip to be a conventional clip (kind with 2 holes for circlip pliers and flat and wide vs the original round profiled one. You’ll need to grind this flat clip narrower so it fits between the joint and the ridge that surrounds the joint – just narrow enough so you can expand it with circlip pliers and and tap it home (gently) with punch. Don’t make it so thin so that installation is easy – make it just thin enough so it fits into the recess between the joint and the raised area around it. A punch will be necessary if you grind just enough off the clip to make it possible to install properly. You’ll also have to grind the clip’s ears a bit shorter to they fit in the wider opening in the surrounding ridge where they’ll eventually reside after installation. You don’t want the clip to touch anything but the ball joint. It must not touch any part of the spindle. Don’t attempt to use the old clip just because the new one won’t fit between the joint and the raised area around it. You need to use the clip that comes with the joint. And grinding will be a necessity.
Here’s some ball joint clips for a Vanagon …
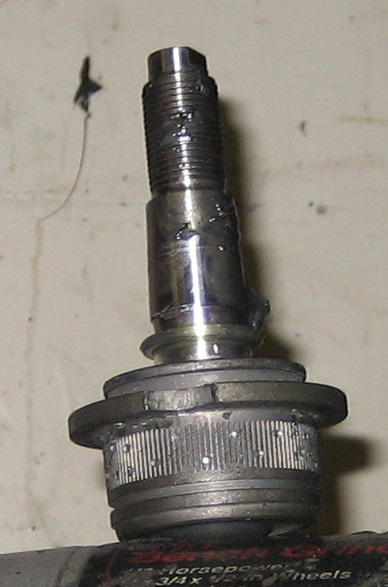
Here’s the center punching and there’s a little grease on the other side of the pin. That’s all it came with. A couple tablespoons will do it …
The Vanagon center punch method can be applied to all models. Type 3 is totally different.
Vanagon joints usually come out simply by swinging a hammer with a head about as big as your fist. Don’t forget to take out the clip first and hit from the clip side. Swing the hammer like a golf club. They come out pretty easy. You’ll need a pipe that fits over the area where the boot mates to push it in. Remember – take off the boot before attempting to push it in. And they’re usually pretty stingy with the grease so add a some – a couple tablespoons or so. Push down into the joint. Use CV joint grease (moly ep. means moly extreme pressure).
This is how to situate the Vanagon ball joint for installation into the spindle with the press …

And here’s the joint completely installed …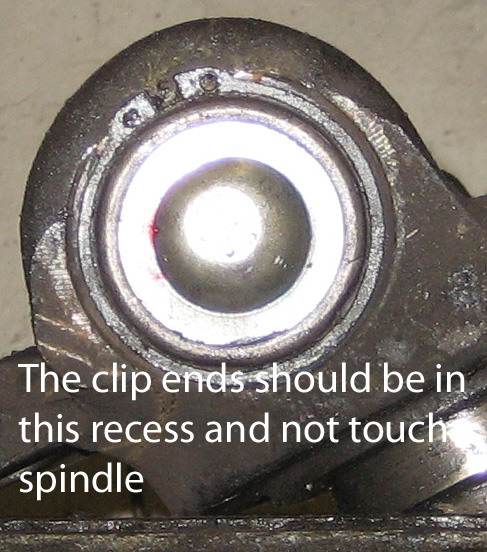
To remove the joint from a bus, you can find a tool for it. I don’t know where one is. But there’s another way. You’ll need to take off the trailing arms. One tip on arm removal – douse the snubber clips with WD-40 and then attempt to rotate the clip by tapping with a screwdriver or punch aided by a hammer. Just rotate it a bit back and forth. That way you’ll know it’s free and it’ll be easier to slide off and thus you probably won’t damage it and be able to use it again. Put some water pump pliers on the base of the snubber and rotate it too. Doused with WD-40 of course. It’ll really help with removal. Take them off before you remove the arms and put them on after you put the arms back on. This will give you a little more room to work with when hassling the arms off and on.
Onward …
Situate the arm you’re working with in a press with the moving part of the press placed on the threaded end of the stud. The objective is to push this stud right out through the joint. Putting the nut on may help keep the press stable on the stud. It will come out – it will literally pierce right through ball joint itself. If the stud flops around too much to keep the press engaged, you may have to cut some off with the Sawzall but realize you still must push the remainder of the stud out of the joint to be able to completely remove the joint
With the stud removed, now you need a Sawzall. You’ll need to secure the trailing arm real well in vise and then with the saw, cut into the remaining wall of the ball joint at 4 places about 90 degrees apart. But DO NOT CUT THROUGH THE WALL so as not to cut into the trailing arm (a little scratch is ok – just be careful). You only want weaken the joint. These four cuts will relieve most of the pressure retain the joint and make it possible to remove.
Once you do the above, the joint will come out very easily with a few hammer blows.
You’ll need an appropriate size pipe and a press to install. Best thing is to reverse arms along with center punching as described above and plenty of Red Locktite.
All of the above applies to all air cooled and water cooled Vanagon. Type 3 is totally different.
Can a lower ball joint come out of the trailing arm on a bus and make the wheel fold?
Yeah, it can. Bug’s a little different – joint points down – but it’s only friction holding it into the trailing arm so it’s possible for it to come out too but highly unlikely. Bus – much more possible than bug. I’ve seen it happen. This 1973 bus had had 3 sets of ball joints installed in it’s lifetime including the ones it came with new. The third time was the charm. Right lower. Solved with a virgin set of used arms from a 68 bus, reversed of course.
Vanagon has a clip so it’s pretty hard for it to happen but they can wiggle on any model if the hole is big enough to allow it even though it required a press to put it in. A wiggling ball joint in a bus makes a clicky noise. A bus with new joints that hasn’t been done the way I’ve described and has a phantom clicky noise when hitting bumps that can’t seem to be pinpointed may very well have a loose joint.
In a nutshell – center punch with Red Loctite and reverse arms where applicable.
This entry was posted on Wednesday, February 4th, 2015 at 7:04 am
You can follow any responses to this entry through the RSS 2.0 feed.
