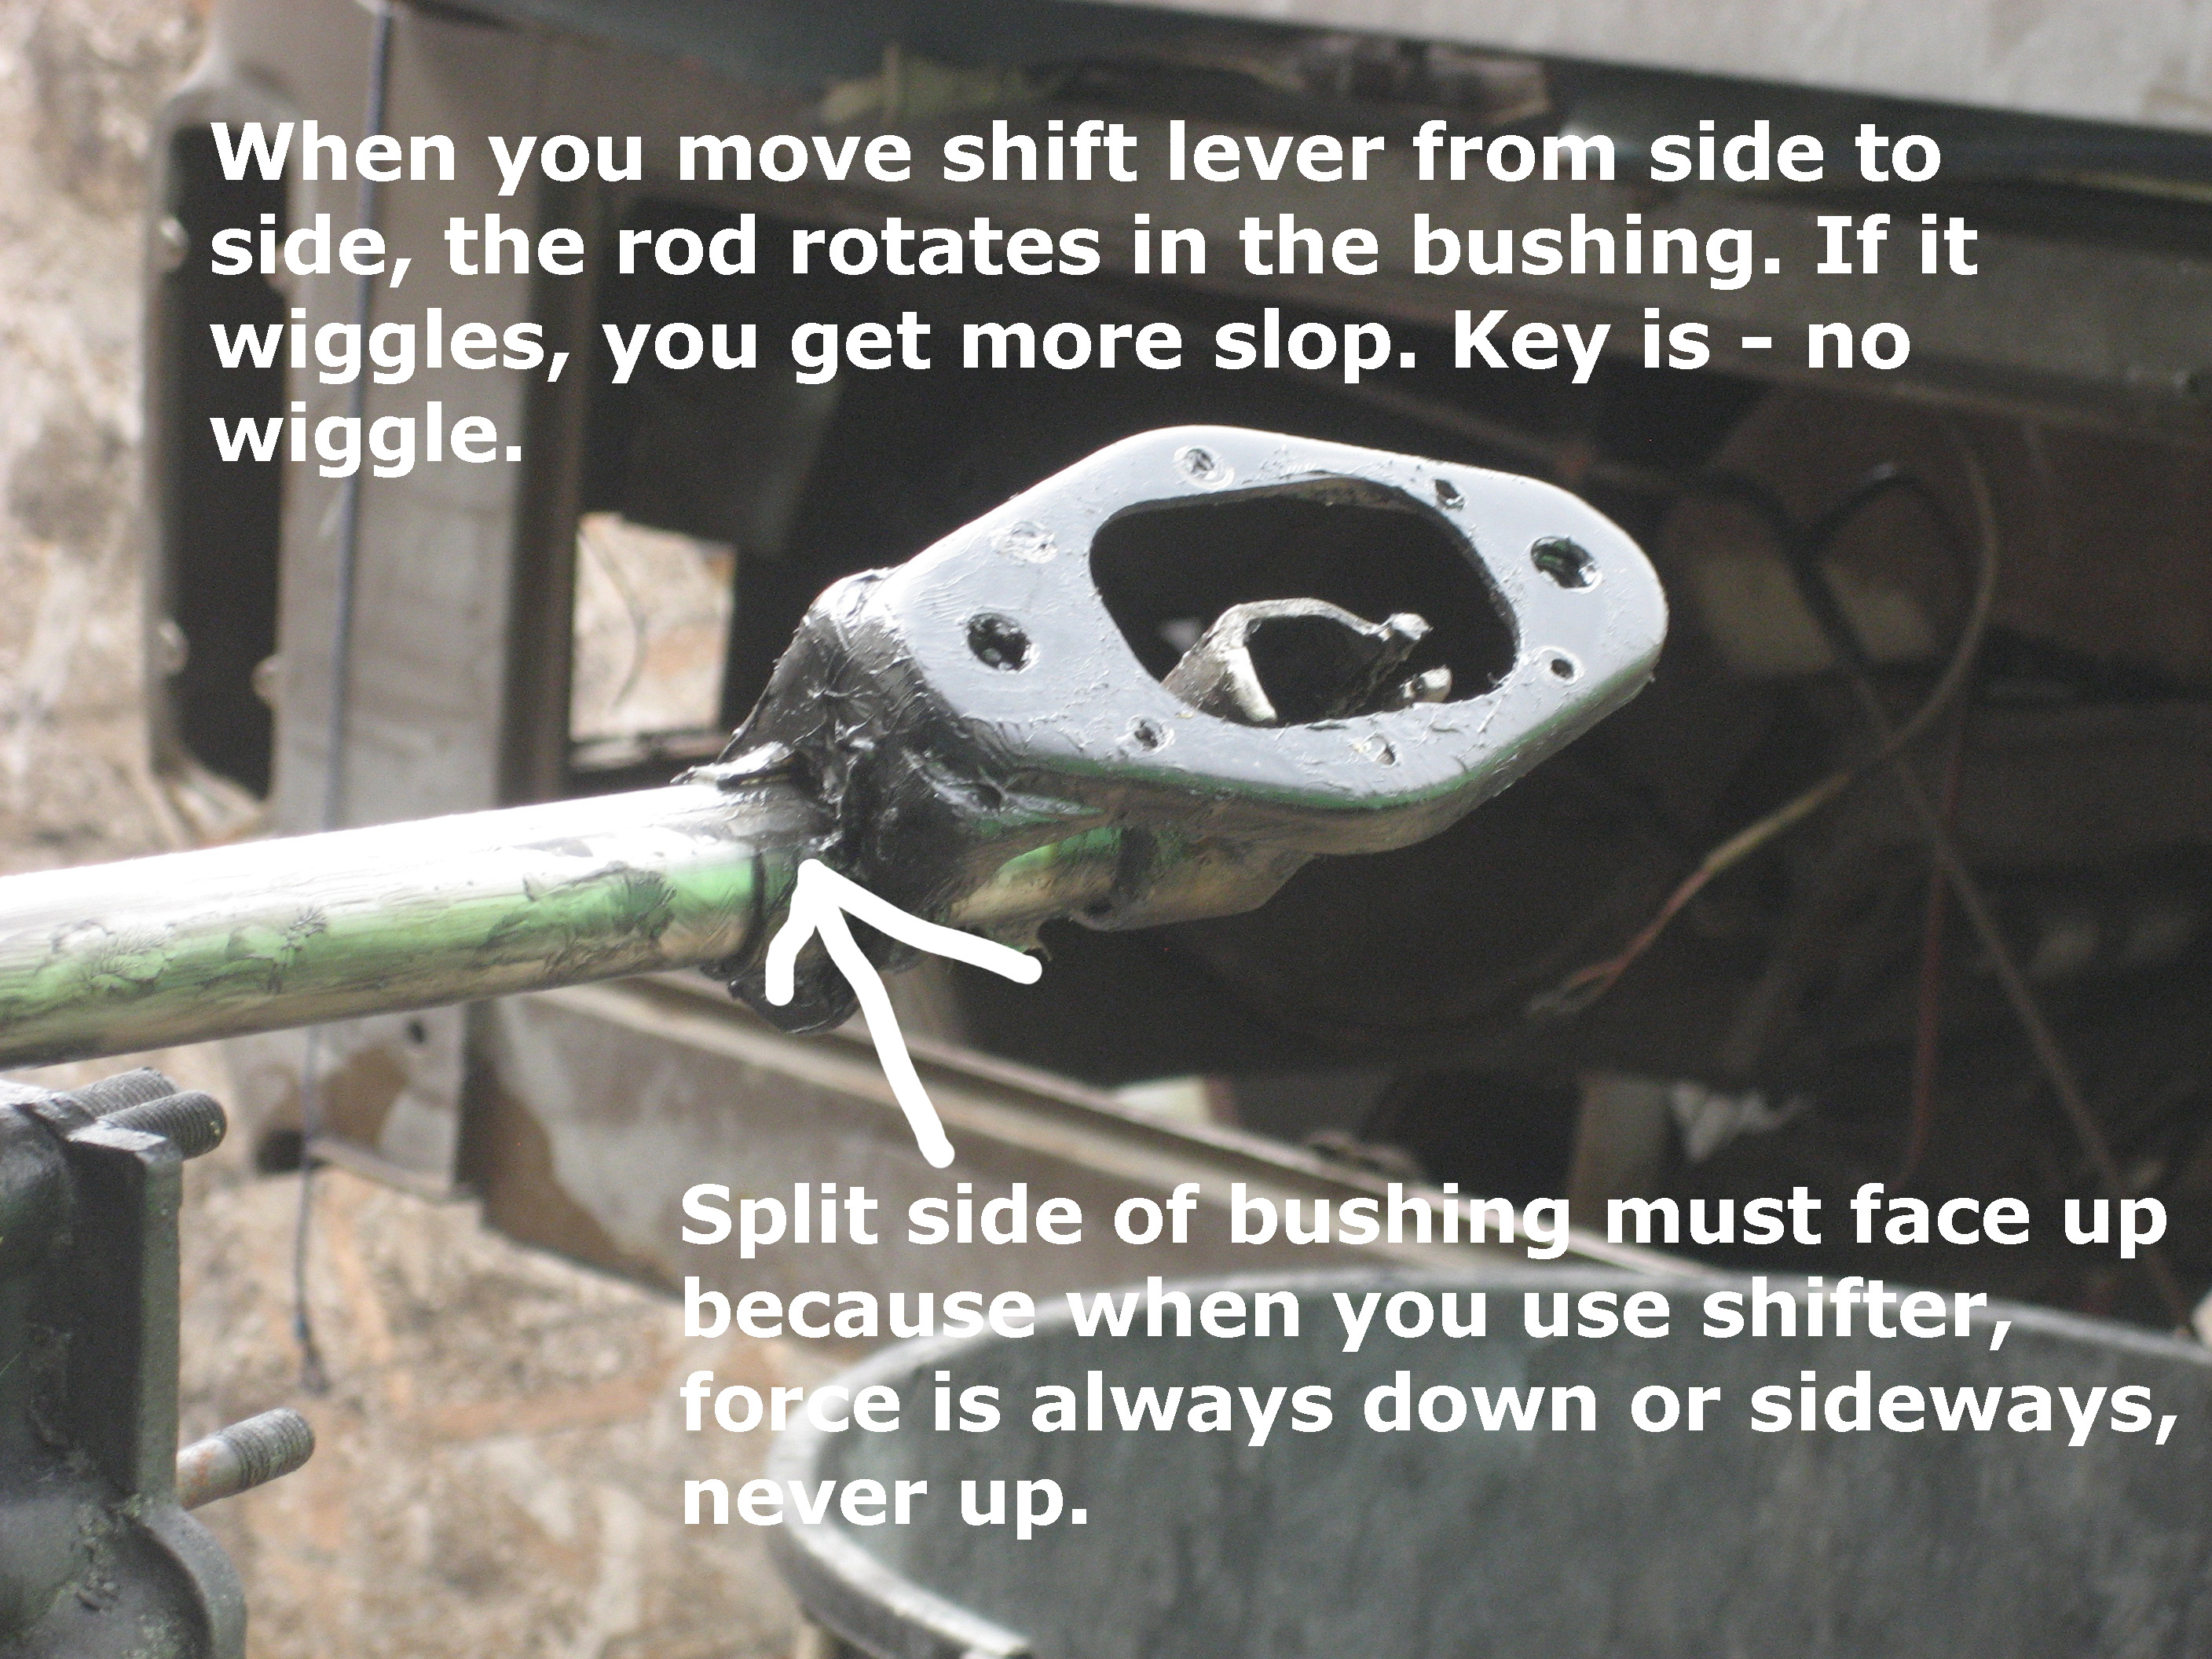
The first thing to do is take the shift coupling access cover off from under the back seat on bugs and Ghias, and under the vehicle on buses and type 3. After you do this, put the vehicle in neutral, grab the coupling with your hand and rotate. It’ll rotate the shift rod (leads to the front of the car) 20 degrees (I’ve never measured it). This is what happens when you move the shift lever (the thing you pull on when you shift gears while driving) from side to side in neutral. When you push it to the right or passenger side, the rod rotates about 20 degrees towards the left or driver’s side.
The point is, when the rod wiggles in the bushing or the coupling has slop or both, some of the motion you impart on the shift lever is translated into taking up the slop and maximum rotation of the shift rod for proper shifting is increase since the slop must be taken up before rotation begins. And since the shift lever is rather long, a little bit of slop is magnified by the geometry involved and it makes the shifter really sloppy and loose feeling
So the key is, you gotta reduce slop for a nice tight shifter with minimum slop.
The first thing to do is “fix up” the coupling if you have this kind (late style):
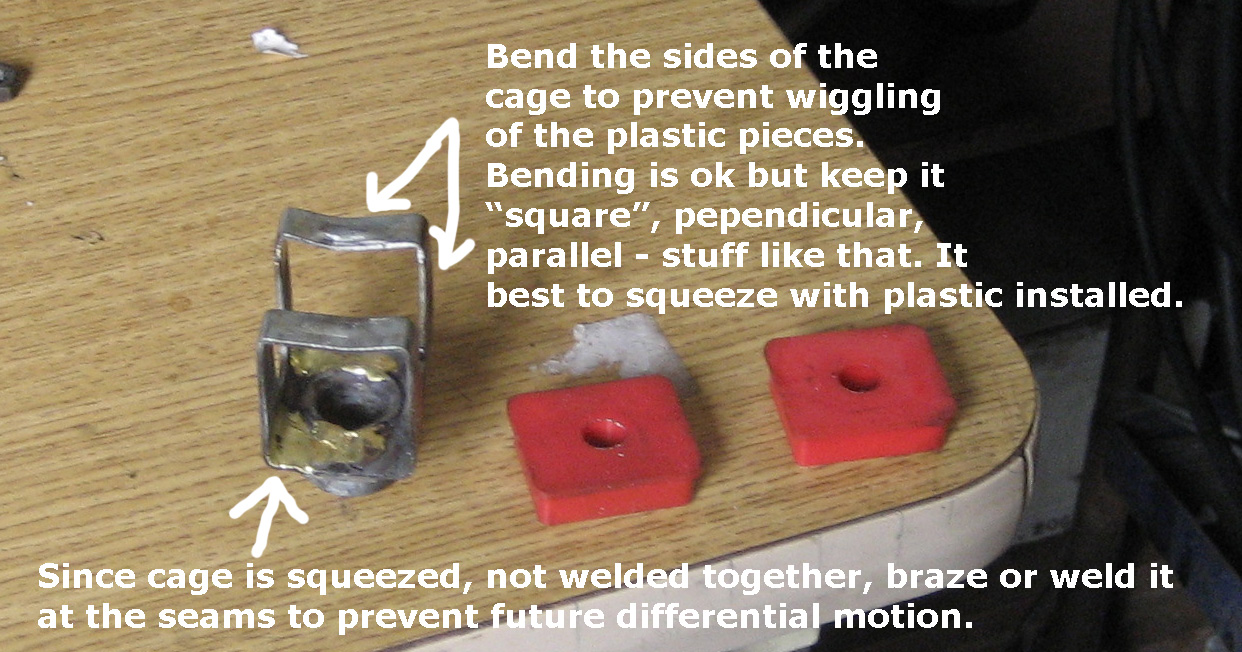
Use a pair of wire cutters to hold the funny tubular nut that goes the through the plastic. There’s no other tool that’ll really hold it. Some older models use a circlip on the end you’d normally use the wire cutters on. The screw seldom really tightens on a new parts made today. If you can use the old stuff (genuine VW), it’ll probably tighten fine. Also, genuine parts – no matter how old – may wiggle less in the hole in the shift rod itself. Remember, the tighter everything is, the less slop you’ll have at the shift lever.
Symptoms of a worn out plastic bushing that supports the shift rod up near the shift lever itself include rattling (often temporarily relieved by simply touching the shift lever) or, choosing second gear and ending up in fourth. Replacing the shift bushing is a lotta work but it’s the only thing that will fix this problem. Don’t let someone tell you these symptoms require a new transmission.
Here’s the shift bushing installed on the shift rod out of the vehicle. This is normally inside the tunnel …
The shift bushing can only be replace when the shift rod is removed from the vehicle. Here’s what it looks like unassembled …
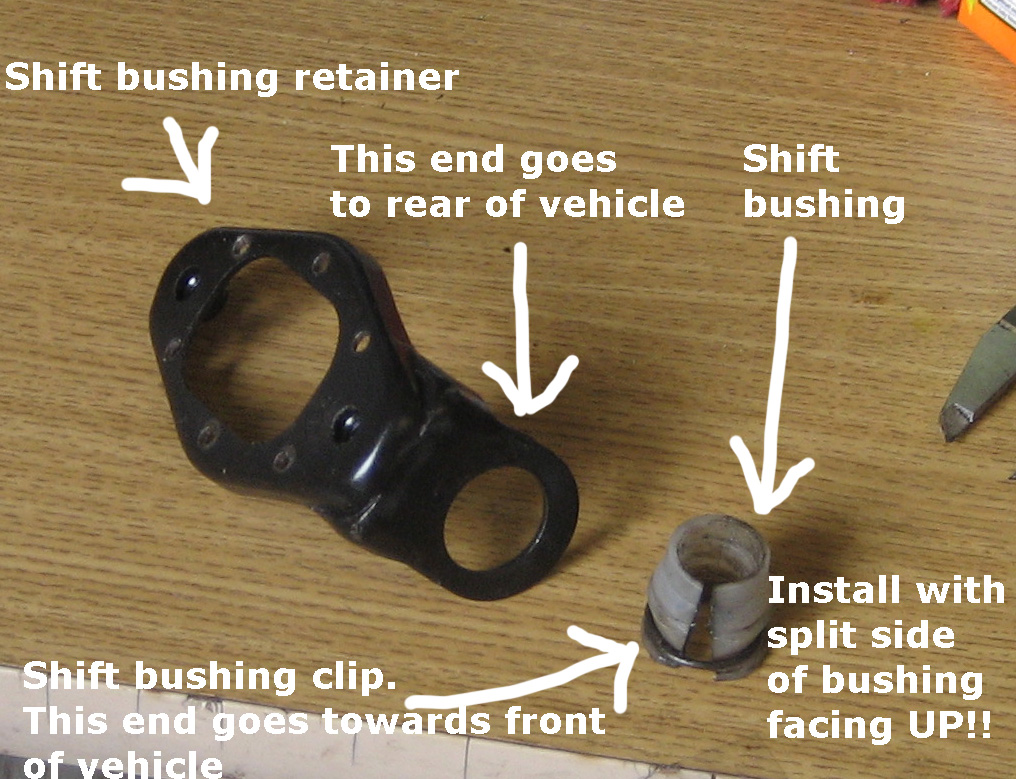
It’s relatively easy to replace the bushing. You’ll need to install it in the hole through the hole the shift lever covers. But the thing is this – when the shift rod is finally installed in the shift bushing and rotated, the shift bushing must not move – it must not rotate with the the shaft. If it does, the edges of the hole in the retainer act as a toothless hacksaw blade on the bushing. The edge of the hole is narrow. Since the bushing has a groove in it to engage with the hole, the plastic is thin there too. So with the the bushing turning with the shaft and differential motion between the bushing and the edge of the hole, the bushing will not last. And the thing that causes differential motion is that the hole is too big. And when the bushing is disintegrated as it usually is, the rod rubs against the hole and makes it bigger. and since “testing it” installed is a hassle, for best results you need to put in a new retainer.
You should trial fit a new retainer to make sure the bushing does not rotate with the shaft. If it does, cut through the hole for the bushing. Now bend the hole so if fills the gap and weld or braze it together, file as necessary and trial fit. If the bushing doesn’t turn with the shaft you’re done. If not, carry on.
You may be able to devise a way to measure the hole in your existing retainer while it’s still in the tunnel but I can guarantee that if the bushing is long gone, the hole will be bigger. The smaller the better. And after all – how bad is good enough? For best results, install a new retainer. It’s a lotta work – very greasy.
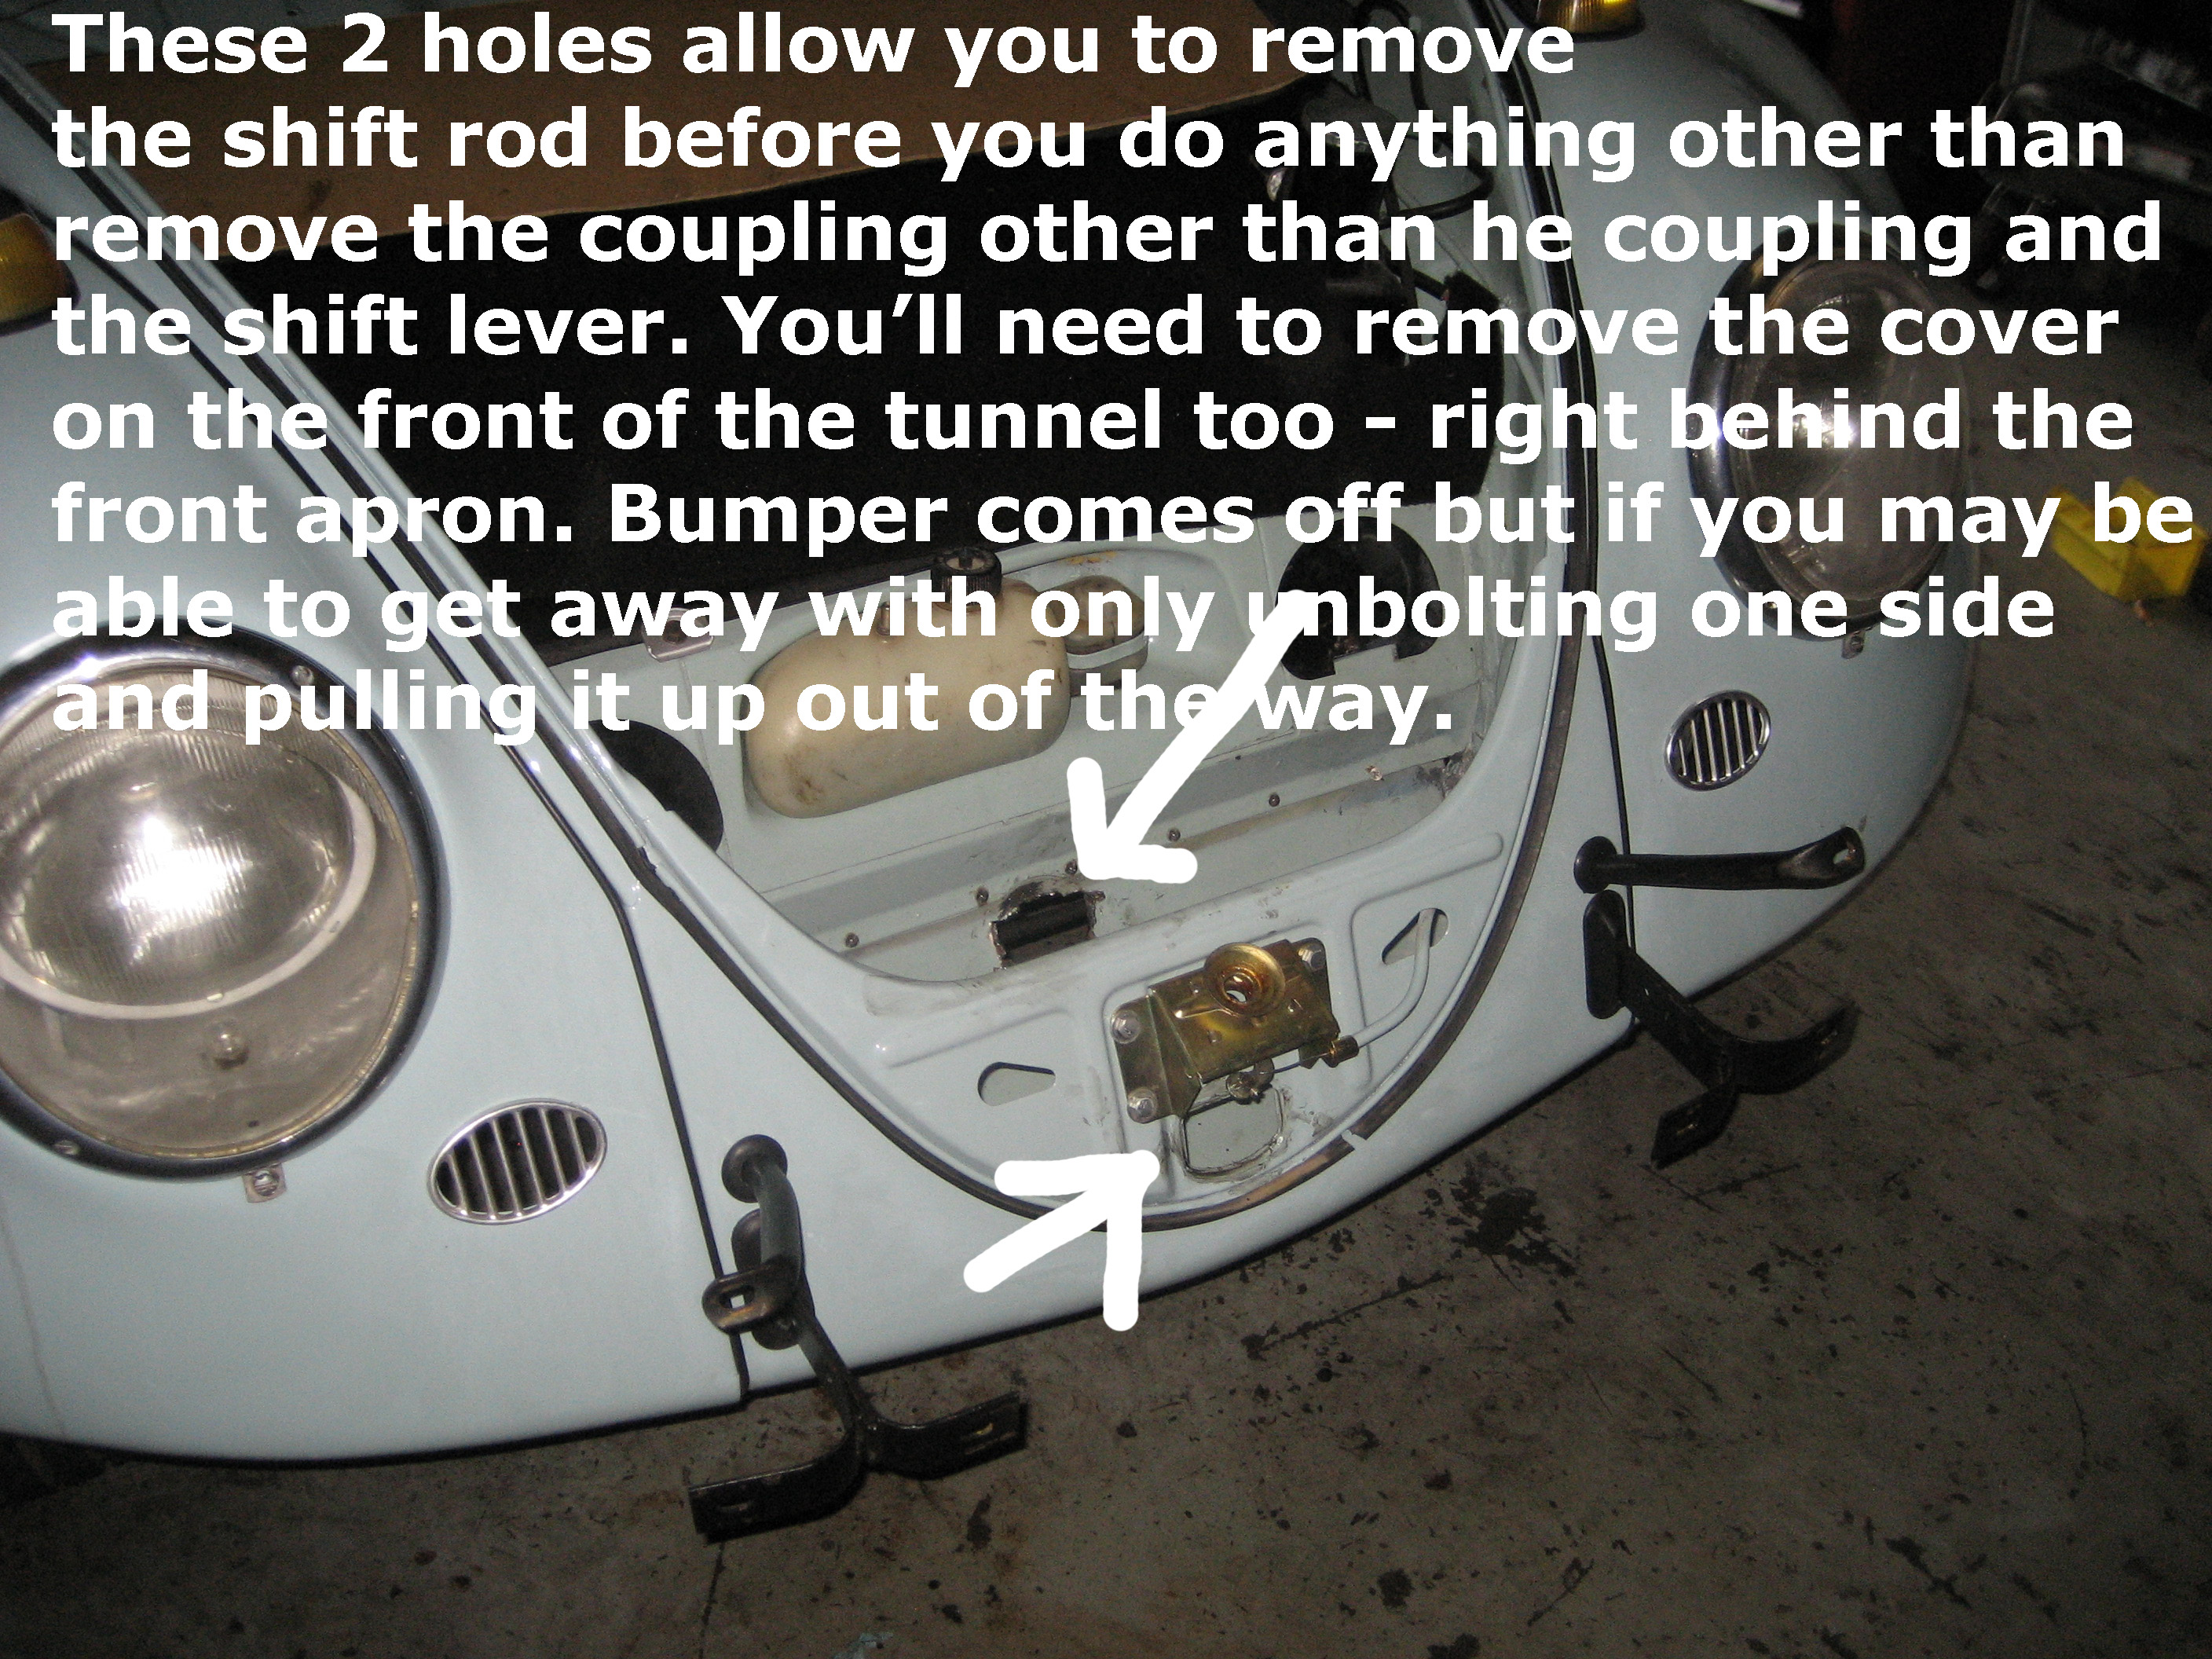
In order to remove the shift rod, remove the coupling entirely, remove the shift lever, and remove the cover at the front of the tunnel, remove the cover behind the spare tire and you may need to remove the entire bumper. You may not need to remove the shift rod entirely if you’re just replacing the bushing and thus may not have to even touch the bumper but for retainer replacement, it’s gotta come all the way out.
 \
\
For retainer replacement, you’ll need to drill out the spot welds. If you’re just replacing the bushing, just stuff the bushing into the hole and push the shift rod through it. But more on that later. Here’s how to get the retainer out …

After the welds are removed, secure the old retainer with bolts to hold it so you can bend the sides in far enough to withdraw it through the hole …

Now you’ll need to install the bushing/retainer assembly onto the shift rod and slide it into the tunnel. Just installing the shift rod alone if you’re only replacing the bushing can be a hassle – it can hang up on the fuel pipe, and more also the heater cable tubes. If you meet resistance, don’t force it. Worst case it could get stuck and you could end up having to CUT THE TUNNEL OPEN TO FREE IT – DON’T FORCE IT!!
Use needle nose through the shift lever hole. A bent coat hanger is perfect for lifting the rod up, the pliers for moving it forward or backwards. You may need to place the retainer in the very front of the tunnel and insert the shift rod into it as it may not fit through the hole or can enlarge the hole. Once the rod is inserted you’ll need to hold the retainer near the front of the tunnel as you slide the rod through it as close as possible to the front of the rod the push it in and work from the hole for the shift lever.
With WD-40 and sandpaper, sand the rod a bit to clean off any rust to make the above more possible. Grease the whole rod and the bushing too so it’s nice and slippery for installation. And always trial fit and check to make sure the bushing doesn’t turn with the rod. After the rod is all the way in and the retainer is in the vicinity of the shift lever hole, install the coupling to hold it up. If the rod won’t lift up high enough to reach the shaft from the transmission, it’s likely hanging up on the heater cable tubes.
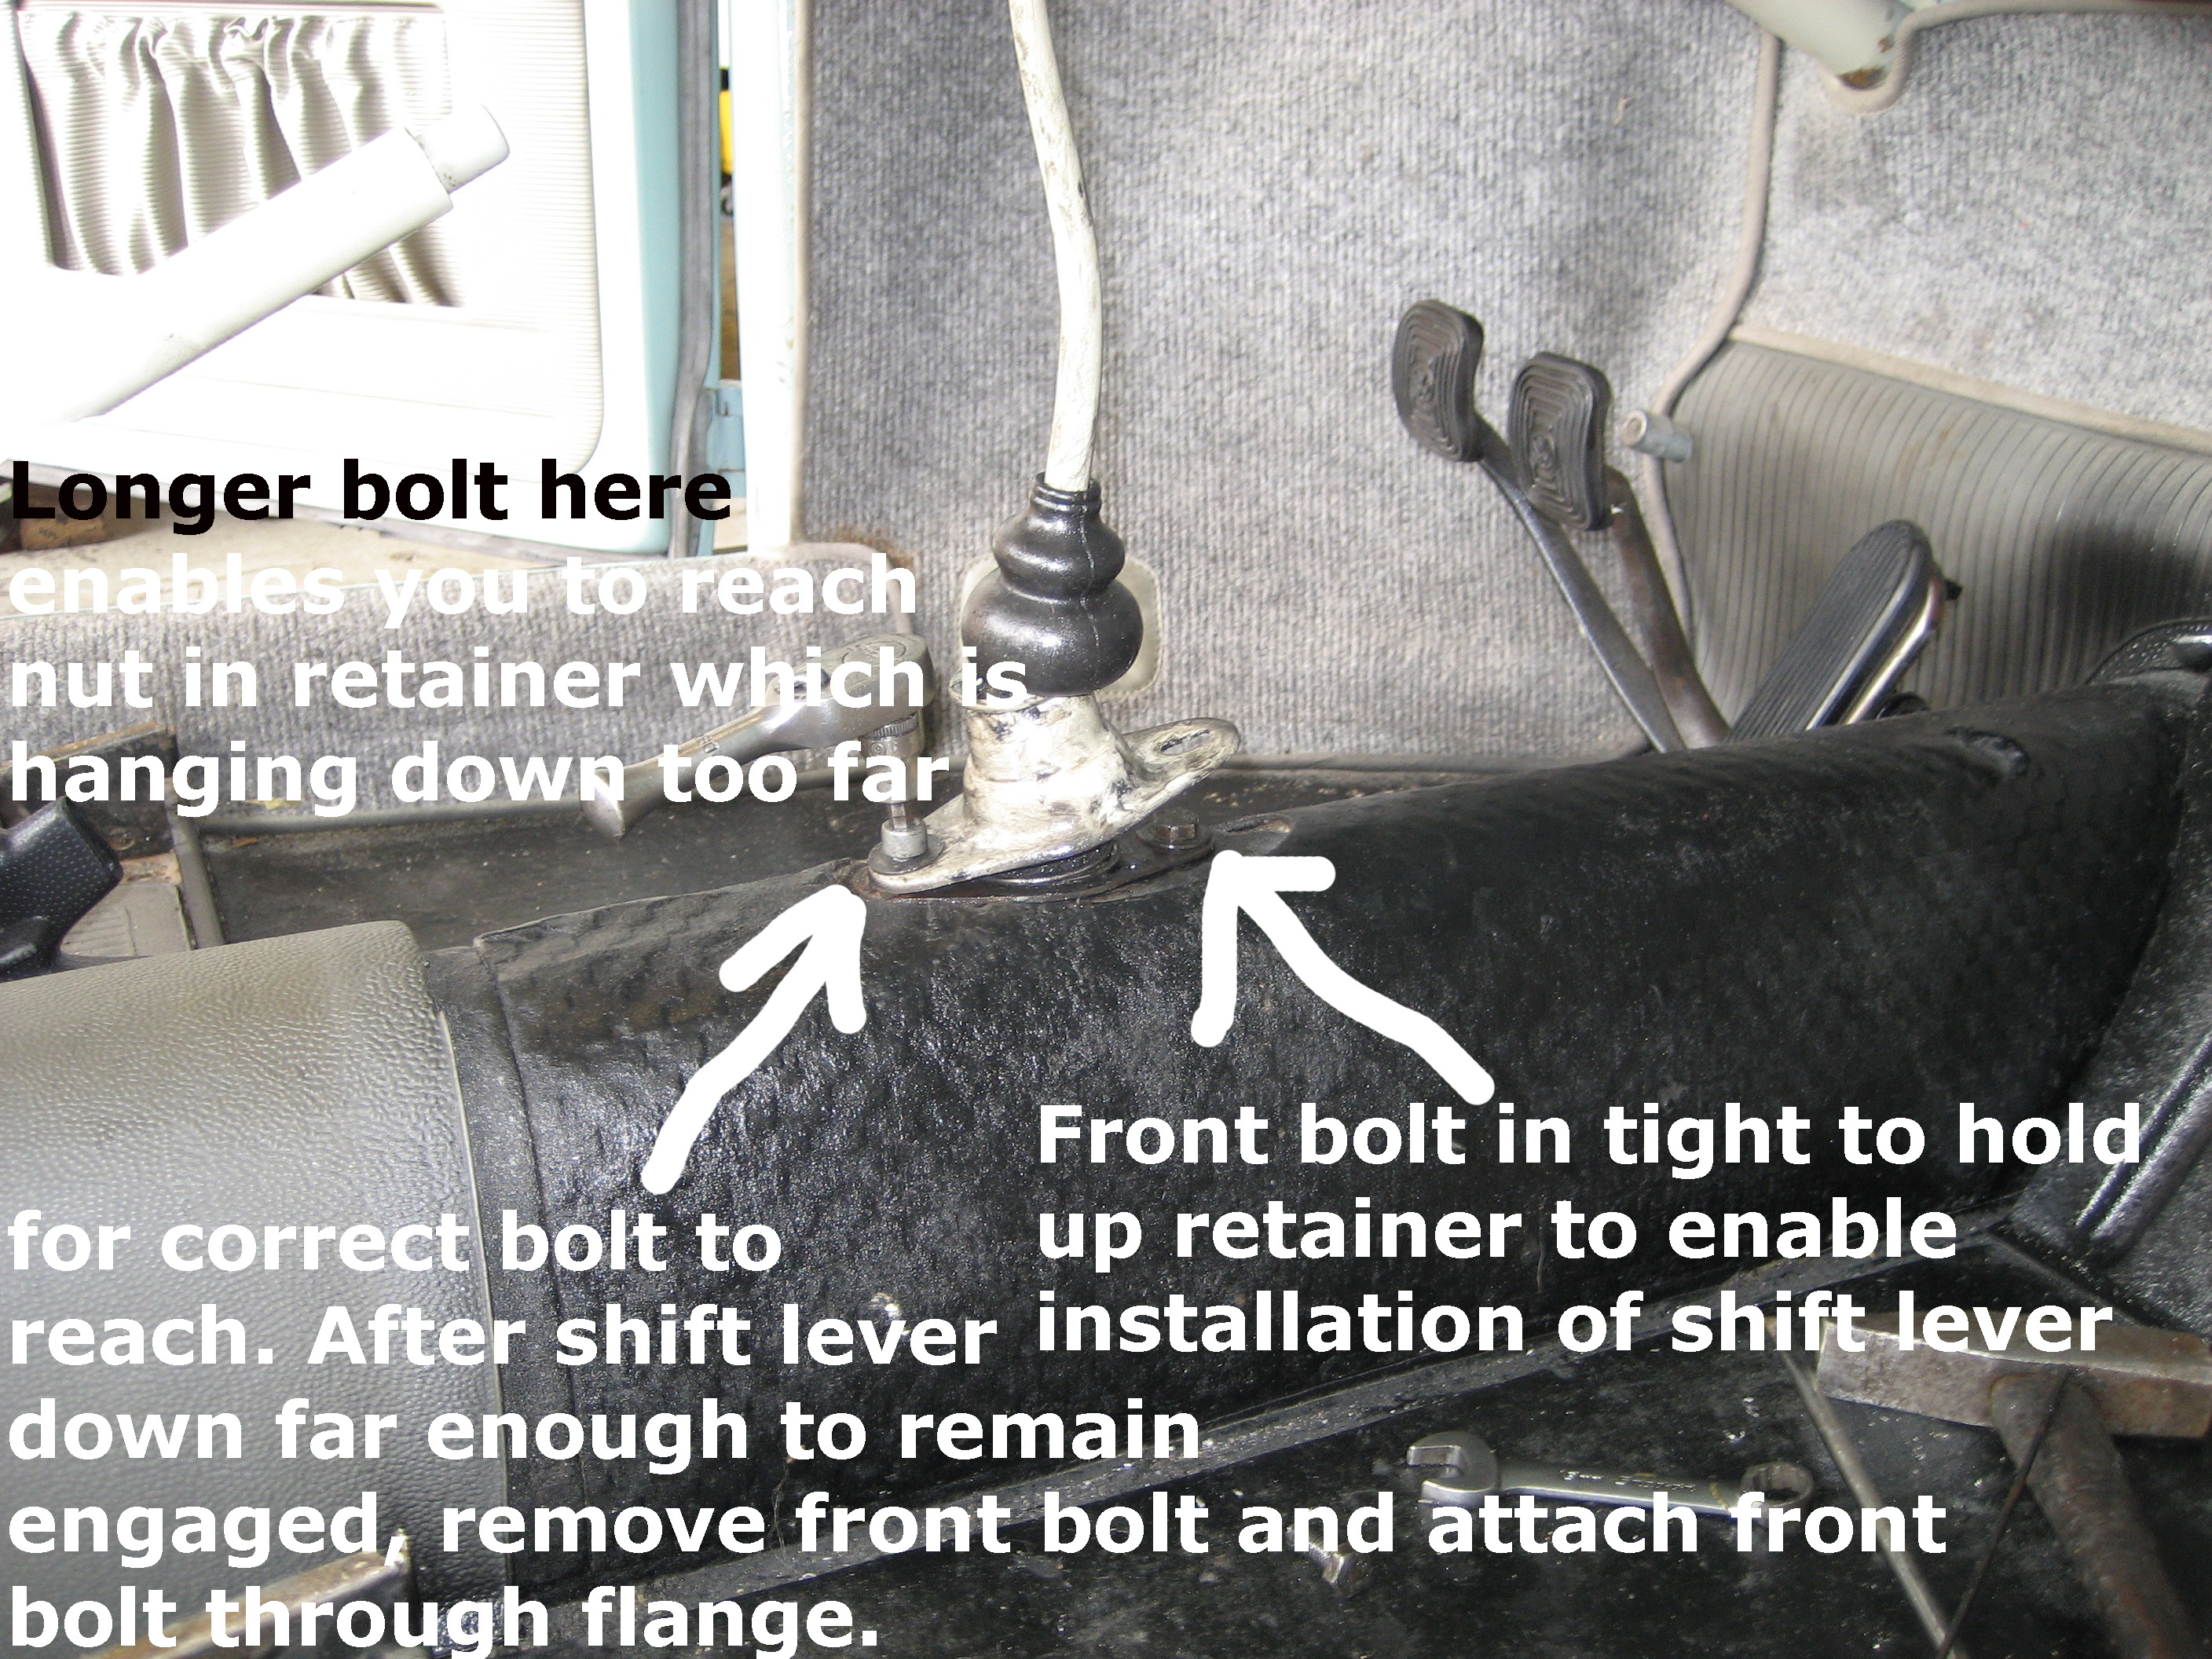
After the coupling is attached, lift the retainer with the bent coat hanger and install the front bolt. Then engage the shift lever properly and with a significantly longer bolt (but not so long than it can hit the shift rod), bolt the rear of the lever flange to the retainer. After it decides to remain engaged without you having to use 3 hands, remove the front bolt and then install the front bolt through the shifter flange and snug up, install correct bolt of rear, and with both bolts fairly snug but loose enough to slide the assembly, find neutral, sliding assembly around to “find the center”, tighten, and see if it works. If you did all of the above, it’ll be as tight as it was new.
Here’s what I’m talking about above …
Of course, you can weld the retainer but you get more range of adjustment without welding and if you screw up when welding, well that’s a problem. Also, be aware that your tunnel my be quite flammable – grease, gasoline, fifty years or more of accumulation. Whenever welding in the tunnel, at least have a fire extinguisher nearby but the best thing is a water hose with an nozzle you can instantly turn on or off. The active ingredient in a fire extinguisher is very corrosive and can cause damage too and it’s imposible to get it all out. This is the reality of fire extinguishers.
The only other place that can contribute to play at the shifter is if the shaft (hockey stick) coming out of the front of the transmission or old or wrong (shift fork to narrow for slider on fourth gear for instance – often these are mismatched but can work but cause more front to back play than side to side play at shift lever).
For instance, if you do all you can re bushing, retainer, coupling on a 64 bus for instance and the hockey stick wiggles a lot, you may find it hard to find first gear from time to time for instance. Repair kits for the hockey stick bushing are available but transmission removal is necessary.
Regarding grease accumulation – grease prevents rust. Need I say more? Think first before you steam clean the front end. There’s nothing a front end like more than a fifty year grease patina. Comprende? Think link pins, king pins, bushings, bus link pin needle bearings – these parts love grease patinas. Don’t clean it unless you’re gonna show it but realize it’ll take decades to develop it again.
Although not all years use the bushing or the retainer used here in this example, all shift linkages have parts that wear and since you read all of the above and understand the principles, any model that differs can be understood and thus fixed.
The shift couplings on split buses and early bugs have rubber than can get soft and cause differential motion between the two pieces of metal it’s bonded to. The coupling shown in the photos in this post is susceptible to the part that engages with the hockey stick to differential motion between itself and the cage. That’s why I braze them – to prevent that. If you have a coupling of this type with differential motion, it’s best to replace since you may have trouble re-aligning it perfectly (horizontal, perpendicular – that kind of thing). But always braze or weld a new one – it may last forever.
Very early bugs and buses have a retainer that looks real similar to the one shown in this post but it requires no bushing – it’s metal to metal contact with the shift rod. But the hole the bushing would go into is shaped more like the exit hole in a beer can a bullet had penetrated so the rod is supported by the metal surrounding it like the metal on the back of the can. Sorry, no picture. It’s basically a longer hole so it supports the rod. If tired, update and do as shown in the post.
This entry was posted on Sunday, August 3rd, 2014 at 11:39 am
You can follow any responses to this entry through the RSS 2.0 feed.
