Apply grease, oil, or anti-seize (dilute a small portion in separate, dedicated container with engine oil or WD-40), dependent on what it is, to everything that moves and a lotta things that don’t …
Every single bolt and nut that has anything to do with the bumper or bumper brackets
Clutch cable – including the threaded adjusting end and definitely the pivot and clip on the front end of a bus cable unless you want that little pin/clip thing to break or shear through the yoke long before the cable has a chance to wear and finally break due to organic failure
The normal, not “self tapping” bolts for the pan under the front of a bus
Accelerator cable
Clutch pedal pivot for bus
Brake pedal pivot for bus
Brake pedal return spring (oil)
Clutch return spring (oil)
Curved cable guides under the handbrake lever,
Accelerator pedal swivel pin and each end of the pedal link
Pedal assembly on all except buses. You’ll need to remove it and completely take it apart to do this. Grease the hook and cable eyelet liberally. Oil the roller, roller pivot and and put a little grease on the slider on the back of the pedal where applicable
Vent wing latches. If you have a frozen latch, lubrication combined with gentle coaxing with a pair of pliers will usually get it moving again.
The lower vent wing pivot, then adjust tension so it stays open at 60 mph. And I don’t mean do this when the vehicle is moving at 60 mph, do this with the vehicle stationary while you’re fixing the door locks and the door panel is off. For Vanagon, since the engineers were drunk when they designed this, you’ll need teensy Vise Grips to turn the misoriented Phillips screw – the head points away from vehicle. Otherwise, you’ll either need to remove the window entirely or drill a hole through the outside of the door to use a screwdriver so to avoid these 2 options, you need teensy Vise Grips
Latches for the sliding windows on split buses
A small squirt of WD-40 on rear sliding windows on bay buses but flood everything that you can see that moves for louvered windows on campers
Every single screw, nut, and bolt inside a door.
The screws or bolts that secure any hinges
Safari window latches (expensive when they break, lube makes ’em last)
Handbrake cables including the threaded ends
Handbrake levers on the rear shoes
A light smear on the hood prop on bay buses on back into the sixties splits and the wheels it slides on for all earlier model buses
Pivots for the release bearing and the release bearing fork
Heater cables, the heater knob assembly (early, most models)) or the heater levers (later, all models). Tension on these levers is adjustable by tightening/loosening securing nut for all models with levers.
Bay buses have the “Push the Rope” heater cable design. If your bay bus levers are hard to move, it’s usually the cables. Replacing the red levers is a waste of time until you make the cables move freely. You’ll just keep breaking levers with too much force. If the cables aren’t broken, try removing them, rolling them up like a rope an letting them sit in container of old engine oil for a couple days.
Here are the rear heater cable securing parts for a bay bus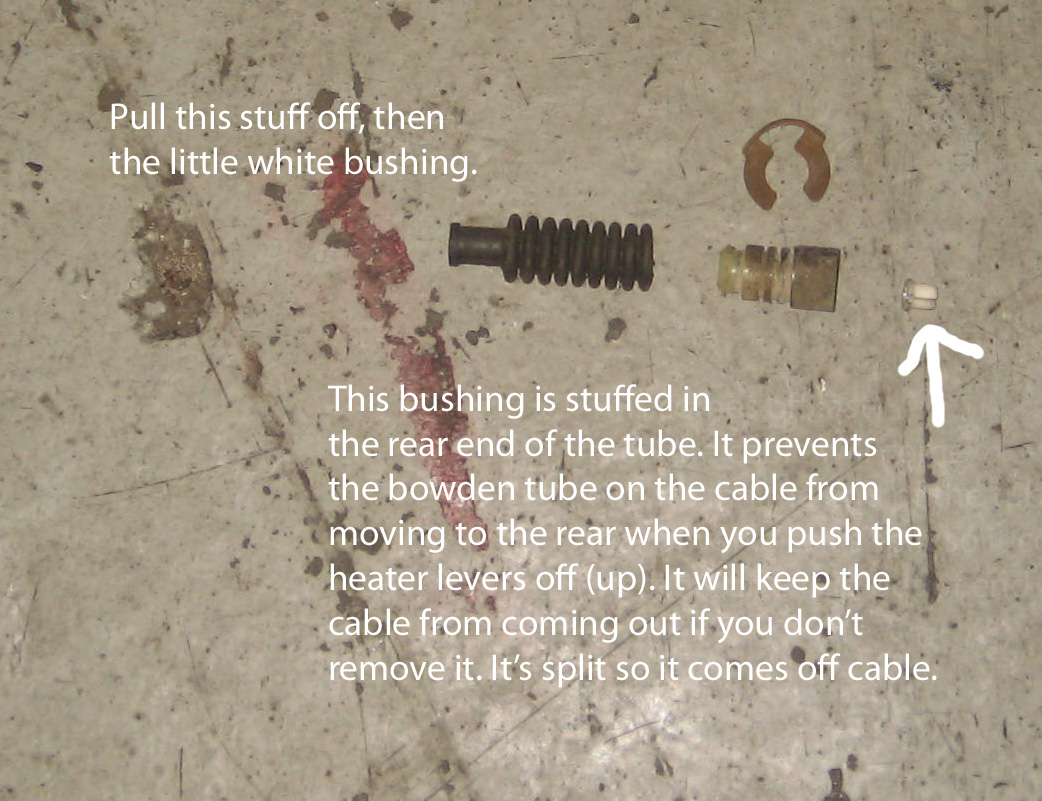 Lube before installation so they go in easy. If you have a cable that won’t come out no matter what you do or you can’t get one to go in or if it does go in but seems to bind more when installed in the tube than when operated just laying on ground (check for free movement before installation with the cable bent mimicking it’s installed position), they’ll actually work fine if you just plastic tie them to the outside of the tubes. Secure well at the heater box end with a plastic tie because this tie will be doing what the little white bushing does for normal installation – keeping the cable from pushing out of the tube when you turn the heater off. During removal, make sure you remove the cable securing parts at the heater box end of the tube before attempting to remove cable. If you don’t and try to remove the cable, it just won’t come out and you may destroy what was a good cable. Don’t loose the clip that secures the cables to the engagement hole on the levers. Early models had a spring clip that easy to deal with and not too easy to loose if dripped but don’t lose it – it’s found in many places, but only on a VW. Later models have a teensy circlip (some call it an “e” clip). If you drop it, you may never see it again but you can probably pick one up in a typical auto parts store. Do one cable at a time so you don’t mix them up or at least pay attention. Mixing them up means doing this twice. Heater cable flex tubes are thinner than the defrost and rear outlet cables on later models – easy identification when handling them under the dash. Early models, not sure, several changes/variations through the years.
Hood hinges (engine oil).
Shift lever – lift boot and flood with engine oil. The bushing underneath (bus), or in the tunnel (everything else)
Window regulator (possible without removal except in worst cases; do this when you fix the door locks)
Headlight ring securing screws and the headlight adjusting screws, particularly on the early headlight assemblies
CV joints practically last forever with adequate grease even with years of poor protection from trashed boots. If they are noisy, it’s usually a lack of fresh grease. A real noisy joint is usually curable by new grease. Grease “dehydrates” over time and looses it slipperiness and that’s usually the reason a decent joint will make noise. Smooth balls and shallow wear (6-10 thousandths in the races) mean a decent joint but it’s a judgement call too.
Door hinges. Use engine oil for nicely working hinges. If the door is sticky, spray with WD-40. You should see the WD-40 flow away from the hinge the color of rust. If not, keep spraying. If nothing changes, leave it for a few days. If may actually free up. Or keep flooding with WD-40 until you see rust flowing out. Eventually the door may be free. If it just won’t happen, consult a body shop. You can use brake or carb cleaner to flush out the WD-40 and thus carry the solids (causing the binding) with it then when outward flow is clear, apply WD-40 again. Progress takes time.
Spring plate bolts – use book torque at least, especially for buses
Link pin pinch bolts
On a restore, lube the pan to body bolts, the door hinge bolts, striker plate bolts – all the bolts everywhere, EVERYWHERE!!! Restoration give you the opportunity to do this. Makes the car quieter too. This is true.
Otherwise, for the pan bolts, just tighten them all. After all, the last time anyone touched them was at least 35 years ago for the last US bound 79 convertible. You may feel the difference.
Pretty much every single bolt or nut or screw on the car would love it if you painted a little anti-seize compound on it Even the little screw that holds a split bus headlight switch in. And it will be more effectively tightened to so the switch will stay put better.
The aluminum bezels that hold many other switches to the dash.
The horn button and mechanism will often benefit from a tiny dose of WD-40.
WD-40 can free up a sticky switches including floor mounted dimmer switches. Use sparingly on a turn signal switch if it’s you’re only option.
Put a little grease on the contact points for the swivel pins and the torsion springs that hold up the back hatch on most buses
The seat tracks. Oil the lever and the spring on the seat frame
And don’t forget to grease the front axle.
This entry was posted on Wednesday, April 16th, 2014 at 8:16 am
You can follow any responses to this entry through the RSS 2.0 feed.
